

Introduction
In this article, we are going to see how to upload files in the ASP.NET core web application and store them in the root directory of the application. We are going to use IFormFile to upload files and also see how to pass other data with the file.

In this article
- What is IFormFile
- Create Asp.Net Core Project
- Upload Single File
- Upload Multiple Files
What is IFormFile
ASP.NET Core has introduced an IFormFile interface that represents transmitted files in an HTTP request. The interface gives us access to metadata like ContentDisposition, ContentType, Length, FileName, and more. IFormFile also provides some methods used to store files. The IFormFile interface also allows us to read the contents of a file via an accessible Stream.
Create Asp.Net Core Project
Step 1. Open Visual Studio and click on Create a new project.
Step 2. Select ASP.Net Core Web App (MVC) and click on the next button.
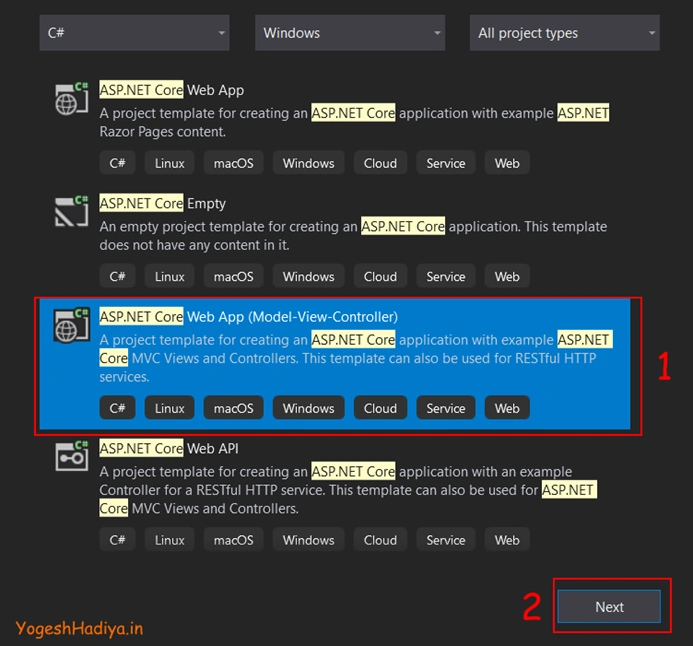
Step 3. In the next screen, enter the following details and click on the Next button.
- Project Name
- Location where you want to store your project

Step 4. In the next screen, configure other details or leave them as default and click on the create button.

Step 5. Now our project has been created. Now we will create a new controller for our operations.
For adding a new controller, right-click on the Controllers folder and click on Add, then Controller.

Select Controller from the left side filter and then select MVC Controller – Empty and click on the Add button. Then Enter the controller name and click on the add button.

Step 6. Now we have to create a model in the Models folder, which we are going to use for passing data from view to controller.
Here we create three models as given below
ResponseModel
This model contains three properties which are IsResponse, IsSuccess, and Message. This model will be inherited by the other two, and we are using this as response status and message after performing some operation.
public class ReponseModel
{
    public string Message { get; set; }
    public bool IsSuccess { get; set; }
    public bool IsResponse { get; set; }
}
SingleFileModel
We will use this model to upload a single file at a time. This model contains two properties, FileName, which we will use as a filename when storing files on the server. And other is File which is a type of IFormFile. Both properties have Data Required Annotation Attributes for showing validation to the user.
public class SingleFileModel : ReponseModel
{
    [Required(ErrorMessage = "Please enter file name")]
    public string FileName { get; set; }
    [Required(ErrorMessage = "Please select file")]
    public IFormFile File{ get; set; }
}
MultipleFilesModel
We will use this model to store multiple files at a time. This model contains only one property, which is a type of IFormFile list.
public class MultipleFilesModel : ReponseModel
{
   [Required(ErrorMessage = "Please select files")]
    public List<IFormFile> Files { get; set; }
}
Upload Single File
Step 1. Create a view of a single file upload. Here I used the index action method for this. From the index, we are passing our model SingleFileModel to view for accessing its properties on the view side.
public IActionResult Index()
{
    SingleFileModel model = new SingleFileModel();
    return View(model);
}
To add view, right-click on the action method and click on add view.

Then select View from the left side filter and select Razor View – Empty. Then click on the Add button.

Step 2. Create a design for your view as per your requirements. Here I use a simple design, as you see in the below code.
@model UploadFile.Models.SingleFileModel

@{
    ViewData["Title"] = "Single File Upload";

}
<form asp-action="Upload" asp-controller="Upload" method="post" enctype = "multipart/form-data">
    @if (Model.IsResponse)
    {
        if (Model.IsSuccess)
        {
            <div class="alert alert-success">
                @Model.Message
            </div>
        }
        else
        {
            <div class="alert alert-danger">
                @Model.Message
            </div>
        }
    }
    <div class="row mt-2">
        <div class="col-12">
            <label class="col-form-label">Enter File Name For Save</label>
            <input asp-for="FileName" class="form-control" />
            <span asp-validation-for="FileName" class="text-danger"></span>
        </div>
    </div>

    <div class="row mt-2">
        <div class="col-12">
            <label class="col-form-label">Select File</label>
            <input asp-for="File" class="form-control" />
            <span asp-validation-for="File" class="text-danger"></span>
        </div>
    </div>


    <div class="row mt-2">
        <div class="col-12">
            <button type="submit" class="btn btn-success">Upload File</button>
        </div>
    </div>
</form>
Explanation
- As you can see in the above code snippet, I created a form with post methods and redirected it to the Upload controller and Upload Action method.
- Here we are passing form data (files) with other data, so we have added enctype = "multipart/form-data" attribute in the form tag.
- We also added a button for the submit type, which submits our form to the given action method.
- Here also used our response model for showing success and error messages in the alert component of Bootstrap, which is respectively success and danger as per IsSuccess property.
Step 3. Create a post method that stores files on the server.
[HttpPost]
public IActionResult Upload(SingleFileModel model)
{
    if (ModelState.IsValid)
    {
        model.IsResponse = true;

        string path = Path.Combine(Directory.GetCurrentDirectory(), "wwwroot/Files");

        //create folder if not exist
        if (!Directory.Exists(path))
            Directory.CreateDirectory(path);

        //get file extension
        FileInfo fileInfo = new FileInfo(model.File.FileName);
        string fileName = model.FileName + fileInfo.Extension;

        string fileNameWithPath = Path.Combine(path, fileName);

        using (var stream = new FileStream(fileNameWithPath, FileMode.Create))
        {
            model.File.CopyTo(stream);
        }
        model.IsSuccess = true;
        model.Message = "File upload successfully";
    }
    return View("Index", model);
}
Explanation
- As you can see in the above code, we create a post method called Upload which accepts SingleFileModel as a parameter.
- Then we check if our model is valid or not using ModelState.Valid property. If the model is valid, then it goes to the next operation, returns the view, and shows a validation message.
- Next, we create a variable called path which contains our root directory path where we are going to store our files.
- In single file upload, we store a file with the name of the user’s input, so here we get an extension of the file using file info and create a new file name.
- Then we create a steam for file creation and copy incoming files to it using the copy method of IFormFile and pass the success message to the view.
Output (Showing Validation)
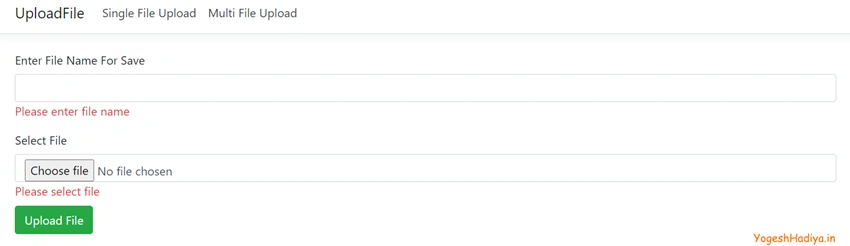
Output (Success Message after File Uploaded)

Output (File In Server Directory)

Upload Multiple Files
Step 1. Add new action methods in the controller as shown in the below code. Here we pass MultipleFilesModel in view.
public IActionResult MultiFile()
{
    MultipleFilesModel model = new MultipleFilesModel();
    return View(model);
}
Step 2. Add design in your view as per your requirements.
@model UploadFile.Models.MultipleFilesModel

@{
    ViewData["Title"] = "Multi File Upload";

}
<form asp-action="MultiUpload" asp-controller="Upload" method="post" enctype="multipart/form-data">
    @if (Model.IsResponse)
    {
        if (Model.IsSuccess)
        {
            <div class="alert alert-success">
                @Model.Message
            </div>
        }
        else
        {
            <div class="alert alert-danger">
                @Model.Message
            </div>
        }
    }

    <div class="row mt-2">
        <div class="col-12">
            <label class="col-form-label">Select Multiple Files</label>
            <input asp-for="Files" class="form-control" multiple/>
            <span asp-validation-for="Files" class="text-danger"></span>
        </div>
    </div>


    <div class="row mt-2">
        <div class="col-12">
            <button type="submit" class="btn btn-success">Upload Files</button>
        </div>
    </div>
</form>
Explanation
- As you can see above, this view is almost the same as the single file upload view. But here, we used only one control which is file upload, and also added multiple attributes in the input tag, which allows us to select multiple files.
- Also, we post the form to a different method, which has logic for uploading multiple files.
Step 3. Create an action method on the controller side to store multiple files at once.
[HttpPost]
public IActionResult MultiUpload(MultipleFilesModel model)
{
    if (ModelState.IsValid)
    {
        model.IsResponse = true;
        if (model.Files.Count > 0)
        {
            foreach (var file in model.Files)
            {

                string path = Path.Combine(Directory.GetCurrentDirectory(), "wwwroot/Files");

                //create folder if not exist
                if (!Directory.Exists(path))
                    Directory.CreateDirectory(path);


                string fileNameWithPath = Path.Combine(path, file.FileName);

                using (var stream = new FileStream(fileNameWithPath, FileMode.Create))
                {
                    file.CopyTo(stream);
                }
            }
            model.IsSuccess = true;
            model.Message = "Files upload successfully";
        }
        else
        {
            model.IsSuccess = false;
            model.Message = "Please select files";
        }
    }
    return View("MultiFile", model);
}
Explanation
- As you can see in the above code, we created a post method named MultiUpload which takes MultipleFilesModel as a parameter.
- Foremost, we check if ModelState is valid or not.
- Then we check whether our files property of List<IFormFile> has one or more files or not.
- Then iterate all the files using for each loop. In this loop, same as the single file upload code, we store files, but here, we use the name of the file itself as the file name instead of user input.
- After this, return the success message in our response model properties and return to the MultiFile view.
- Lastly, I also added a menu for these two views in the layout file. To easily navigate between these two views. You can do as per your requirement.
Output (Showing Validation)

Output (Select Files)

Output (Files In Server Directory)

Conclusion
That’s it. This is how we upload and store single or multiple files on the server in asp.net core using IFormFile. I hope you find this useful and get some help. Thank You.
You can access source code from my GitHub.
Join the conversation! Your thoughts help the community grow.