

Introduction
In the previous article, we have explored multiple attachments to the new item on a list using JSOM and REST API. In this article, we will see how we can upload the documents to SharePoint list items using REST API based approach.
So far, I have seen everyone blogging and posting articles, where they follow the approach of hardcoding the item ID and passing it to REST API and Uploading. But In this article, we will create a new item and that item ID, we have attached in the attachment.
Check the step by step guide below.
Steps
The below code snippet will show the Personal Details HTML that has been created for the user to insert data into the list. In HTML, one tag is highlighted to facilitate multi-file upload control. I am leveraging "jquery.multifile.js" plugin. If we don't use that plugin, the user will be able to select only one input file for upload only one file at a time.
- <script type="text/javascript" src="/Script/jquery-1.10.2.js"></script>
- <script type="text/javascript" src="/Script/jquery-ui.js"></script>
- <script type="text/javascript" src="/_layouts/15/sp.js"></script>
- <script type="text/javascript" src="/_layouts/15/sp.runtime.js"></script>
- <script type="text/javascript" src="/Script/jquery.multifile.js"></script>
- <span style="font-size: 22.0pt;padding-left:20px">Personal Details<o:p></o:p></span>
- <table align="left" border="1" cellpadding="0" cellspacing="0" class="MsoTableGrid" width="0" id="mytable">
- <tbody>
- <tr>
- <td >
- <table align="left" border="1" cellpadding="0" cellspacing="0" class="MsoTableGrid" style=""><tbody><tr><td style="" valign="top" class="auto-style16"><h3> Name</h3></td>
- <td valign="top" style="padding:9px;" class="auto-style17">
- <input type="text" value="" maxlength="255" id="Name" title="Name" style="width: 96%;" class="ms-long ms-spellcheck-true">
- </td></tr><tr >
- <td class="auto-style16"><h3> Address</h3> </td><td class="auto-style17">
- <input type="text" value="" maxlength="255" id=" Address" title="Address" style="ime-mode :;width: 96%;" class="ms-long ms-spellcheck-true"></td></tr><tr><td class="auto-style15"><h3 >City</h3></td>
- <td class="auto-style4"><input type="text" value="" maxlength="255" id=" City " title=" City " style=";width: 96%;" class="ms-long ms-spellcheck-true"></td></tr><tr><td class="auto-style15"><h3 >
- Contact Number </h3></td>
- <td class="auto-style5"><input type="text" value="" maxlength="255" id=" ContactNumber " title="ContactNumber" style="ime-mode :;width: 96%;" class="ms-long ms-spellcheck-true"></td></tr></tbody></table><table ><tbody>
- <tr ><td ><span style="font-family: " segoe ui" ,sans-serif; color: #444444">Click here to attach file</span> <div class="files" id="attachFilesHolder ">
- <input id="file_input" type="file" name="files[]">
- </div>
- </td><td></td></tr></tbody></table>
- <div style="TEXT-ALIGN: -webkit-center; padding-bottom: 20px; padding-top: 20px; padding-left:190px"><input name="SaveItem" style=" height: 40px; font-size: 15px;" class="ms-ButtonHeightWidth" id=" NewSaveItem " accesskey="O" onclick="" type="button" value="Click here to submit " target="_self"></div>
- </tbody></table>

Step 1
Navigate to your SharePoint 2013 site.
Step 2
From this page, select Site Actions | Edit Page.
Edit the page, go to the Insert tab in the ribbon, and click Web Part option. In Web Parts picker area, go to the "Media and Content" category, select the "Script Editor Web Part", and press the "Add" button.
Step 3
Once the Web Part is inserted into the page, you will see an "EDIT SNIPPET" link; click it. You can insert HTML and/or JavaScript, as shown below.
- <script type="text/javascript">
- var arraycount = 0;
- var fileUploadeCount = 0;
- $(document).ready(function ($) {
- $('#file_input').multifile();
- $("#NewSaveItem").click(function () { formSave() });
- });
- function formSave() {
- var listItem = "";
- var fileArray = [];
- $("#attachFilesHolder input:file").each(function () {
- if ($(this)[0].files[0]) {
- fileArray.push({ "Attachment": $(this)[0].files[0] });
- }
- });
- arraycount = fileArray.length;
- listItem = {
- __metadata: { "type": "SP.Data.BankDetailsListItem" },
- "Name": $("input[title='Name']").val(),
- "Address ": $("input[title='Address']").val(),
- "City": $("input[title= City]").val(),
- "ContactNumber": $("input[title='ContactNumber']").val(),
- "Files": fileArray
- };
- createItemparent("BankDetails", filesarray, listItem);
- }
- function createNewItem(listname, filearray, listItem) {
- var dfd = $.Deferred();
- var initializePermsCall = PostAjax(_spPageContextInfo.webAbsoluteUrl + "/_api/web/lists/GetByTitle('" + listname + "')/items", listItem);
- $.when(initializePermsCall).then(function (permData) {
- var id = permData.d.Id;
- if (filearray.length != 0) {
- for (i = 0; i <= filearray.length - 1; i++) {
- loopFileUpload(listname, id, filearray, i).then(
- function () {
- },
- function (sender, args) {
- console.log("Error uploading");
- dfd.reject(sender, args);
- }
- );
- }
- }
- });
- }
- function PostAjax(siteurl, listItem) {
- return $.ajax({
- url: siteurl,
- type: "POST",
- contentType: "application/json;odata=verbose",
- data: JSON.stringify(listItem),
- headers: {
- "Accept": "application/json;odata=verbose",
- "X-RequestDigest": $("#__REQUESTDIGEST").val()
- }
- });
- }
- function loopFileUpload(listName, id, filearray, fileCount) {
- var dfd = $.Deferred();
- uploadFile(listName, id, filearray[fileCount].Attachment); return dfd.promise();
- }
- function uploadFile(listname, ID, file) {
- var getFileBuffer = function (file) {
- var deferred = $.Deferred();
- var reader = new FileReader();
- reader.onload = function (e) {
- deferred.resolve(e.target.result);
- }
- reader.onerror = function (e) {
- deferred.reject(e.target.error);
- }
- reader.readAsArrayBuffer(file);
- return deferred.promise();
- };
- getFileBuffer(file).then(function (buffer) {
- $.ajax({
- url: _spPageContextInfo.webAbsoluteUrl + "/_api/web/lists/getbytitle('" + listname + "')/items(" + ID + ")/AttachmentFiles/add(FileName='" + file.name + "')",
- method: 'POST',
- async: false,
- data: buffer,
- processData: false,
- headers: {
- "Accept": "application/json; odata=verbose",
- "content-type": "application/json; odata=verbose",
- "X-RequestDigest": document.getElementById("__REQUESTDIGEST").value
- }, success: onAttachmentSucess
- });
- });
- function onAttachmentSucess() {
- fileUploadeCount++;
- if (arraycount == fileUploadeCount) {
- console.log(data + ' uploaded successfully');
- }
- }
- }
- /script>
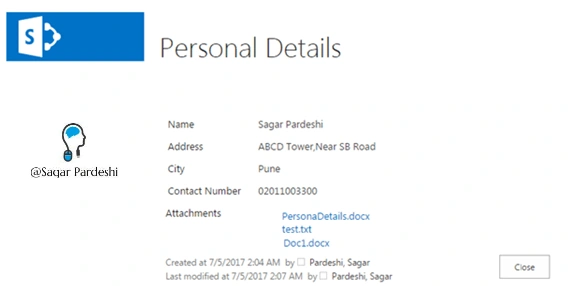
Final O/P
Jatin AnandPosted Jun 2, 2023, 3:09 PM
Hi there, trying this out, i get a '400 (Bad Request) on ajax call. It says something like this: jquery-1.11.3.min.js:5 POST https://abc.sharepoint.com/sites/sitename/_api/web/lists/GetByTitle('TempList')/items 400 (Bad Request). The list name is correct and the list exists. Any help would be appreciated. Thank you.
Shahid AlamPosted Sep 20, 2022, 8:20 AM
Hi Sagar Iam new to coding I was using the above code but some how it is not working kindly help
Jasmin BecirevicPosted Oct 14, 2019, 5:47 AM
What about --> "Files": fileArray, should this be a field in the SP List, if yes which content type? Thank you!
Jasmin BecirevicPosted Oct 14, 2019, 4:40 AM
I am trying to figure out how can you call a function which does not exist ? --> createItemparent
M JavedPosted Jun 27, 2019, 12:03 AM
Hello sagar, I am attaching 3 document in sharepoint list using rest api. Data inserted in list but some time attachment missing. do you have any idea about it. I have used deffered and promised properly.