Introduction
In this article, we will describe how we can implement Dependency Injection (DI), using Autofac. The idea of this post is to show the steps to configure Autofac in Web API. In this example, we will create a Web API controller named customer and it contains only a Service, which is able to retrieve the data from the database.
What’s Autofac?
Autofac is an addictive IoC container for Microsoft .NET 4.5, Silverlight 5, Windows Store apps and Windows Phone 8 apps. It manages the dependencies between the classes, so that the applications stay easy to change, as they grow in size and complexity. This is achieved by treating regular .NET classes as the components.

Prerequisites
As I said before, to achieve our requirement, you must have Visual Studio 2015 (.NET Framework 4.5.2) and SQL Server.
In this article, we are going to
- Create a database.
- Create Web API Application.
- Configure Entity Framework ORM.
- Install Autofac.
- Implement http Service.
- Configure Autofac.
SQL database part
Here, you can find the scripts to create a database and table.
Create a database
- USE [master]
- GO
-
- /****** Object: Database [DBCustomer] Script Date: 3/19/2017 3:54:44 AM ******/
- CREATE DATABASE [DBCustomer]
- CONTAINMENT = NONE
- ON PRIMARY
- ( NAME = N'DBCustomer', FILENAME = N'c:\Program Files (x86)\Microsoft SQL Server\MSSQL11.MSSQLSERVER\MSSQL\DATA\DBCustomer.mdf' , SIZE = 3072KB , MAXSIZE = UNLIMITED, FILEGROWTH = 1024KB )
- LOG ON
- ( NAME = N'DBCustomer_log', FILENAME = N'c:\Program Files (x86)\Microsoft SQL Server\MSSQL11.MSSQLSERVER\MSSQL\DATA\DBCustomer_log.ldf' , SIZE = 1024KB , MAXSIZE = 2048GB , FILEGROWTH = 10%)
- GO
-
- ALTER DATABASE [DBCustomer] SET COMPATIBILITY_LEVEL = 110
- GO
-
- IF (1 = FULLTEXTSERVICEPROPERTY('IsFullTextInstalled'))
- begin
- EXEC [DBCustomer].[dbo].[sp_fulltext_database] @action = 'enable'
- end
- GO
-
- ALTER DATABASE [DBCustomer] SET ANSI_NULL_DEFAULT OFF
- GO
-
- ALTER DATABASE [DBCustomer] SET ANSI_NULLS OFF
- GO
-
- ALTER DATABASE [DBCustomer] SET ANSI_PADDING OFF
- GO
-
- ALTER DATABASE [DBCustomer] SET ANSI_WARNINGS OFF
- GO
-
- ALTER DATABASE [DBCustomer] SET ARITHABORT OFF
- GO
-
- ALTER DATABASE [DBCustomer] SET AUTO_CLOSE OFF
- GO
-
- ALTER DATABASE [DBCustomer] SET AUTO_CREATE_STATISTICS ON
- GO
-
- ALTER DATABASE [DBCustomer] SET AUTO_SHRINK OFF
- GO
-
- ALTER DATABASE [DBCustomer] SET AUTO_UPDATE_STATISTICS ON
- GO
-
- ALTER DATABASE [DBCustomer] SET CURSOR_CLOSE_ON_COMMIT OFF
- GO
-
- ALTER DATABASE [DBCustomer] SET CURSOR_DEFAULT GLOBAL
- GO
-
- ALTER DATABASE [DBCustomer] SET CONCAT_NULL_YIELDS_NULL OFF
- GO
-
- ALTER DATABASE [DBCustomer] SET NUMERIC_ROUNDABORT OFF
- GO
-
- ALTER DATABASE [DBCustomer] SET QUOTED_IDENTIFIER OFF
- GO
-
- ALTER DATABASE [DBCustomer] SET RECURSIVE_TRIGGERS OFF
- GO
-
- ALTER DATABASE [DBCustomer] SET DISABLE_BROKER
- GO
-
- ALTER DATABASE [DBCustomer] SET AUTO_UPDATE_STATISTICS_ASYNC OFF
- GO
-
- ALTER DATABASE [DBCustomer] SET DATE_CORRELATION_OPTIMIZATION OFF
- GO
-
- ALTER DATABASE [DBCustomer] SET TRUSTWORTHY OFF
- GO
-
- ALTER DATABASE [DBCustomer] SET ALLOW_SNAPSHOT_ISOLATION OFF
- GO
-
- ALTER DATABASE [DBCustomer] SET PARAMETERIZATION SIMPLE
- GO
-
- ALTER DATABASE [DBCustomer] SET READ_COMMITTED_SNAPSHOT OFF
- GO
-
- ALTER DATABASE [DBCustomer] SET HONOR_BROKER_PRIORITY OFF
- GO
-
- ALTER DATABASE [DBCustomer] SET RECOVERY SIMPLE
- GO
-
- ALTER DATABASE [DBCustomer] SET MULTI_USER
- GO
-
- ALTER DATABASE [DBCustomer] SET PAGE_VERIFY CHECKSUM
- GO
-
- ALTER DATABASE [DBCustomer] SET DB_CHAINING OFF
- GO
-
- ALTER DATABASE [DBCustomer] SET FILESTREAM( NON_TRANSACTED_ACCESS = OFF )
- GO
-
- ALTER DATABASE [DBCustomer] SET TARGET_RECOVERY_TIME = 0 SECONDS
- GO
-
- ALTER DATABASE [DBCustomer] SET READ_WRITE
- GO
- Create Tables
-
- USE [DBCustomer]
- GO
-
- /****** Object: Table [dbo].[Customer] Script Date: 3/19/2017 3:55:15 AM ******/
- SET ANSI_NULLS ON
- GO
-
- SET QUOTED_IDENTIFIER ON
- GO
-
- SET ANSI_PADDING ON
- GO
-
- CREATE TABLE [dbo].[Customer](
- [CustID] [int] IDENTITY(1,1) NOT NULL,
- [FirstName] [varchar](50) NULL,
- [LastName] [varchar](50) NULL,
- [Email] [varchar](50) NULL,
- [Country] [varchar](50) NULL,
- CONSTRAINT [PK_Customer] PRIMARY KEY CLUSTERED
- (
- [CustID] ASC
- )WITH (PAD_INDEX = OFF, STATISTICS_NORECOMPUTE = OFF, IGNORE_DUP_KEY = OFF, ALLOW_ROW_LOCKS = ON, ALLOW_PAGE_LOCKS = ON) ON [PRIMARY]
- ) ON [PRIMARY]
-
- GO
-
- SET ANSI_PADDING OFF
- GO
Create your MVC application
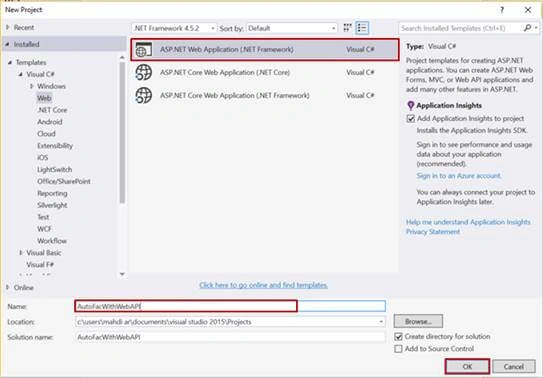
Open Visual Studio and select File >> New Project.
New Project Window will pop up. Select ASP.NET Web Application (.NET Framework), name your project and click OK.
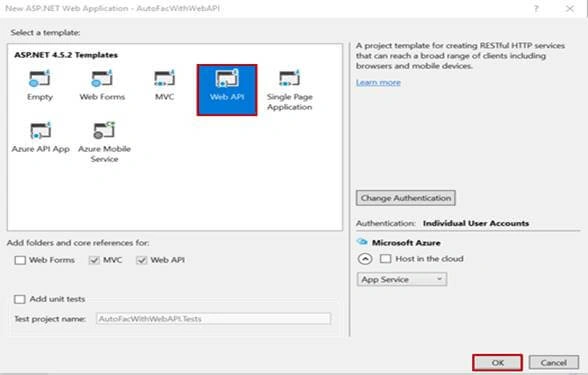
Now, new dialog will pop up to select the template. We are going to choose Web API template and click OK button.
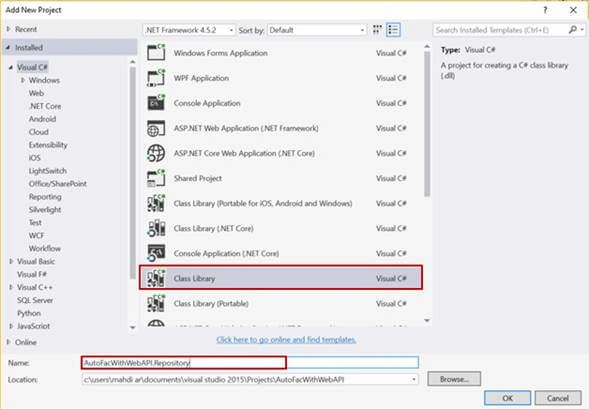
Now, we need to create a class library. To do this, right click on the project name > Add > New Item > select class library.
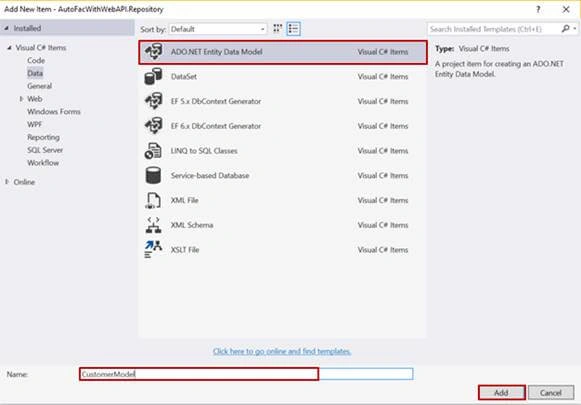
After creating our class library, we are going to add ADO.NET Entity Data Model.
Adding ADO.NET Entity Data Model
For this, right click on the class library name, click Add > Add New Item. The dialog box will pop up inside Visual C#, select Data, followed by ADO.NET Entity Data Model and enter the name for your DbContext model as CustomerModel. finally click Add.
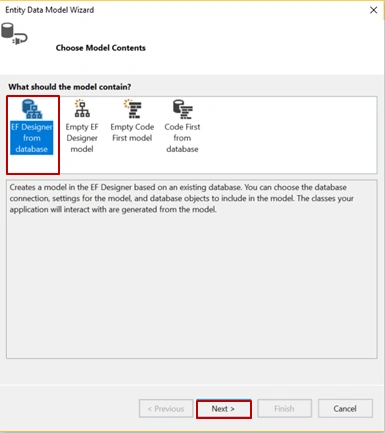
At this stage, we are going to choose EF Designer from the database, as given below.
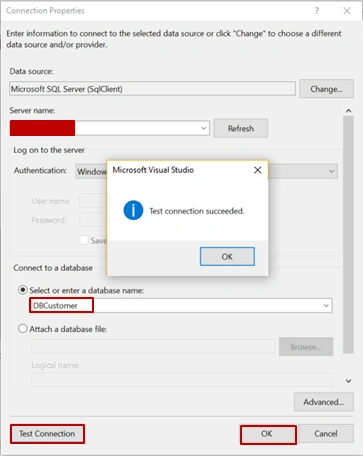
In the snapshot given below, we need to select your Server name, then via dropdown list in connect to a database section, you should choose your database name, finally click OK button.
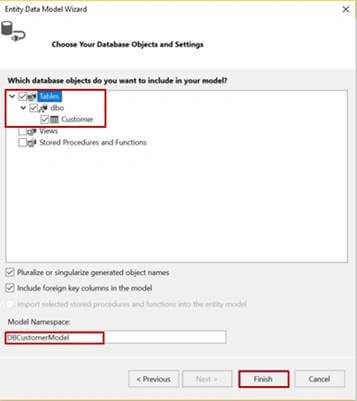
As given above, the dialog Entity Data Model Wizard will pop up to choose an object, which is used in the demo. In this example, we are going to select Customer table and click Finish button.
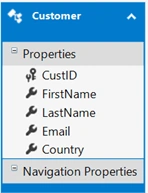
Finally, we see that EDMX model generates Customer entity, as shown below.
Now, we are going to create generic repository, which contains the method used to return all the data from customer table. I would like to say that the following repository can also include any other methods like (CRUD, etc.)
First of all, we are creating Db Factory class, which returns the instance of DbContext.
IDbFactory.cs
- using System;
- using System.Collections.Generic;
- using System.Linq;
- using System.Text;
- using System.Threading.Tasks;
-
- namespace AutoFacWithWebAPI.Repository.Common
- {
- public interface IDbFactory
- {
- DBCustomerEntities Init();
- }
- }
DbFactory.cs
- using System;
- using System.Collections.Generic;
- using System.Linq;
- using System.Text;
- using System.Threading.Tasks;
-
- namespace AutoFacWithWebAPI.Repository.Common
- {
- public class DbFactory : IDbFactory
- {
- DBCustomerEntities dbContext;
-
- public DBCustomerEntities Init()
- {
- return dbContext ?? (dbContext = new DBCustomerEntities());
- }
- }
- }
IGenericRepository.cs
- using System;
- using System.Collections.Generic;
- using System.Linq;
- using System.Text;
- using System.Threading.Tasks;
-
- namespace AutoFacWithWebAPI.Repository.Common
- {
- public interface IGenericRepository<T> where T : class
- {
- IQueryable<T> GetAll();
- }
- }
GenericRepository.cs
- using System;
- using System.Collections.Generic;
- using System.Linq;
- using System.Text;
- using System.Threading.Tasks;
-
- namespace AutoFacWithWebAPI.Repository.Common
- {
- public class GenericRepository<T> : IGenericRepository<T> where T : class
- {
-
- private DBCustomerEntities dbContext;
-
- protected IDbFactory DbFactory
- {
- get;
- private set;
- }
-
- protected DBCustomerEntities DbContext
- {
- get { return dbContext ?? (dbContext = DbFactory.Init()); }
- }
-
- public GenericRepository(IDbFactory dbFactory)
- {
- DbFactory = dbFactory;
- }
-
- public IQueryable<T> GetAll()
- {
- return DbContext.Set<T>();
- }
- }
- }
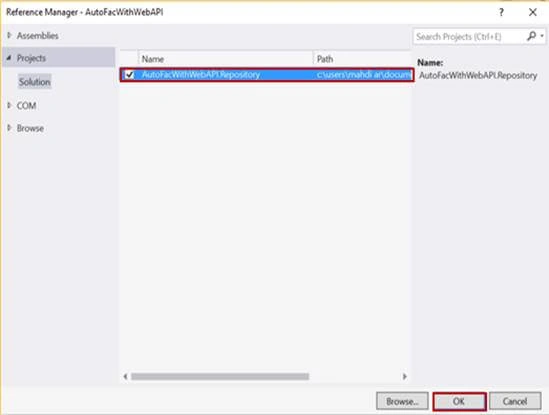
After implementing generic repository, we are adding reference of our class library to Web API project. To do this, right click on References > Add Reference.
Installing Autofac
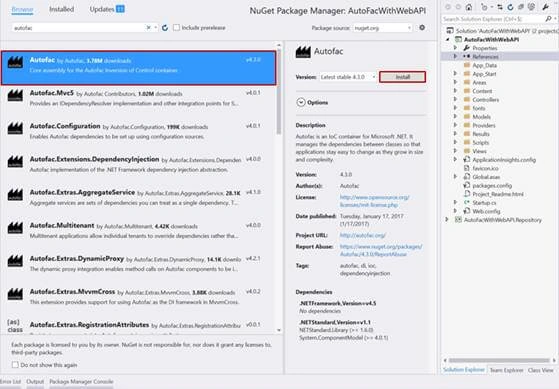
It’s simple to add Autofac. We can do this by using NuGet Packages or Package Manager Console. In this example, I used NuGet Packages. Thus, right click on References > Manage NuGet Packages.
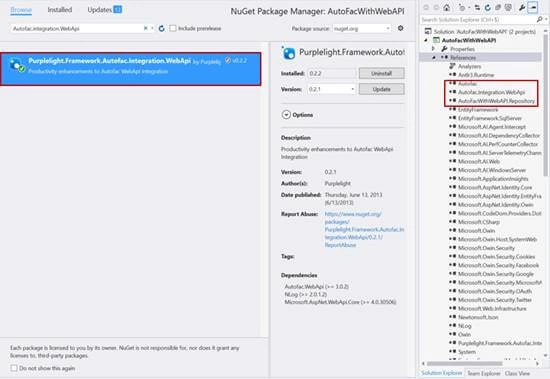
First, we are installing Autofac. Subsequently, install Autofac.integration.WebAPI, as shown below.
Note
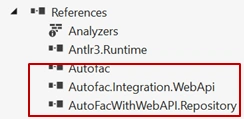
Please make sure that the references given below have been added successfully.
Create a controller
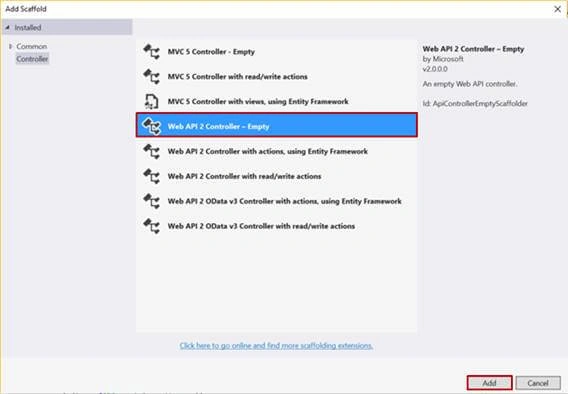
Now, we are going to create a controller. Right click on the controllers folder > Add > Controller> selecting Web API 2 Controller – Empty > click Add.
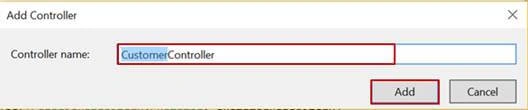
Enter Controller name (‘CustomerController’).
CustomerController.cs
- using AutoFacWithWebAPI.Repository;
- using AutoFacWithWebAPI.Repository.Common;
- using System;
- using System.Collections.Generic;
- using System.Linq;
- using System.Net;
- using System.Net.Http;
- using System.Web.Http;
-
- namespace AutoFacWithWebAPI.Controllers
- {
- public class CustomerController : ApiController
- {
- private readonly IGenericRepository<Customer> _customerRepository;
-
- public CustomerController(IGenericRepository<Customer> customerRepository)
- {
- _customerRepository = customerRepository;
- }
-
- public IQueryable<Customer> GetCustomerList()
- {
- return _customerRepository.GetAll();
- }
-
- }
- }
As you can see, we have injected our customer repository within constructor, and then we have defined method called Get Customer List which returns Customer list.
Configuring Autofac
At this point, from Solution Explorer section, we are going to add 2 classes, as shown below.
AutofacWebapiConfig.cs
- using Autofac;
- using Autofac.Integration.WebApi;
- using AutoFacWithWebAPI.Repository;
- using AutoFacWithWebAPI.Repository.Common;
- using System;
- using System.Collections.Generic;
- using System.Data.Entity;
- using System.Linq;
- using System.Reflection;
- using System.Web;
- using System.Web.Http;
-
- namespace AutoFacWithWebAPI.App_Start
- {
- public class AutofacWebapiConfig
- {
-
- public static IContainer Container;
-
- public static void Initialize(HttpConfiguration config)
- {
- Initialize(config, RegisterServices(new ContainerBuilder()));
- }
-
-
- public static void Initialize(HttpConfiguration config, IContainer container)
- {
- config.DependencyResolver = new AutofacWebApiDependencyResolver(container);
- }
-
- private static IContainer RegisterServices(ContainerBuilder builder)
- {
-
- builder.RegisterApiControllers(Assembly.GetExecutingAssembly());
-
- builder.RegisterType<DBCustomerEntities>()
- .As<DbContext>()
- .InstancePerRequest();
-
- builder.RegisterType<DbFactory>()
- .As<IDbFactory>()
- .InstancePerRequest();
-
- builder.RegisterGeneric(typeof(GenericRepository<>))
- .As(typeof(IGenericRepository<>))
- .InstancePerRequest();
-
-
- Container = builder.Build();
-
- return Container;
- }
-
- }
- }
Here, you register the components with Autofac by creating a container builder, which components expose, which services.
In RegisterServices() method, we have registered all the needed types that expose interfaces. Now, build the container to finalize the registrations and prepare for the object resolution.
In Initialize() method, after building your container, we need to pass it into new instance of the AutofacWebApiDependencyResolver class. Attach the new resolver to your config.DependencyResolver to allow Web API know that it should locate the Services, using the AutofacWebApiDependencyResolver.
Bootstrapper.cs
- using System;
- using System.Collections.Generic;
- using System.Linq;
- using System.Web;
- using System.Web.Http;
-
- namespace AutoFacWithWebAPI.App_Start
- {
- public class Bootstrapper
- {
-
- public static void Run()
- {
-
- AutofacWebapiConfig.Initialize(GlobalConfiguration.Configuration);
- }
-
- }
- }
Note
Please make sure that Run() has been added in Application_Start() method.
Global.asax.cs
- using AutoFacWithWebAPI.App_Start;
- using System;
- using System.Collections.Generic;
- using System.Linq;
- using System.Web;
- using System.Web.Http;
- using System.Web.Mvc;
- using System.Web.Optimization;
- using System.Web.Routing;
-
- namespace AutoFacWithWebAPI
- {
- public class WebApiApplication : System.Web.HttpApplication
- {
- protected void Application_Start()
- {
-
-
- AreaRegistration.RegisterAllAreas();
-
- Bootstrapper.Run();
-
- GlobalConfiguration.Configure(WebApiConfig.Register);
- FilterConfig.RegisterGlobalFilters(GlobalFilters.Filters);
- RouteConfig.RegisterRoutes(RouteTable.Routes);
- BundleConfig.RegisterBundles(BundleTable.Bundles);
- }
- }
- }
Output
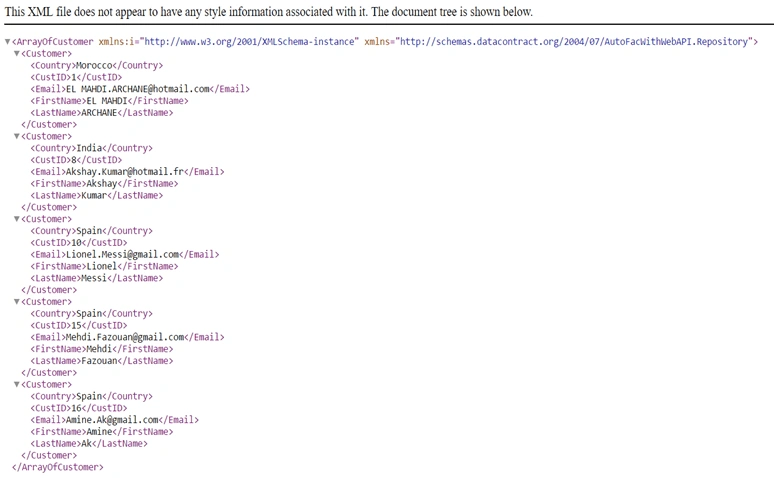
Now, you can run your Application and let’s see the output.

Smruti RanjanPosted Feb 7, 2019, 10:50 AM
Hi . I am created webapi2 with odata application and two external class library one for controller class and one business layer . I am not able resolve the dependency using autofac. I follow your solution it is working if you create controller in webApi solution . if you create a class library controller and use this reference to to touy webApi project then it is not working .please check this url https://github.com/Smruti54/Zero.git
Karan SainiPosted Aug 17, 2018, 7:38 AM
Hi there. In my webAPI, i have multiple projects. My Repository class is in separate project. Please suggest the code changes for the below code snippet :- builder.RegisterType<DBCustomerEntities>() .As<DbContext>() .InstancePerRequest();
Manish JainPosted Apr 26, 2018, 4:35 AM
If found issue like 'No connection string named '<NAME>' could be found in the application config file'.try to copy it in web.config
Abdelilah DouchePosted Aug 25, 2017, 7:40 PM
Tank you for this article
Can UrekPosted Mar 21, 2017, 9:13 AM
Can you share sample project?