

In this article, we are going to learn how to User Azure Face API with ASP.NET MVC in a step by step way.
You can download the Source code from here.
Why do we use Azure Face API?
By using Azure Face API, we can detect, identify, analyze, organize, and tag faces in photos. Before using Azure API, I used to use JavaScript library (jquery.facedetection) http://facedetection.jaysalvat.com/ which is only used to detect if it is a face or not but does not provide an analysis of faces, such as Gender, Smile, Age etc.
Using Azure Face API, we can get all face analysis and sentiments.
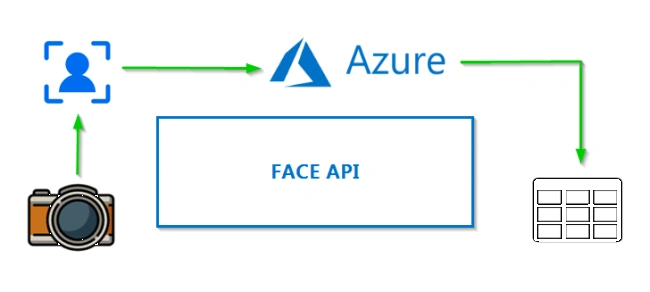
Icons made by Freepik from www.flaticon.com are licensed by CC 3.0 BY
Note
After downloading the source code, just change the “subscriptionKey” to make it work.
Process Flow
- Creating an ASP.NET MVC project.
- Get an API key for using Face API
- Using HTML Canvas to capture photo and detect faces
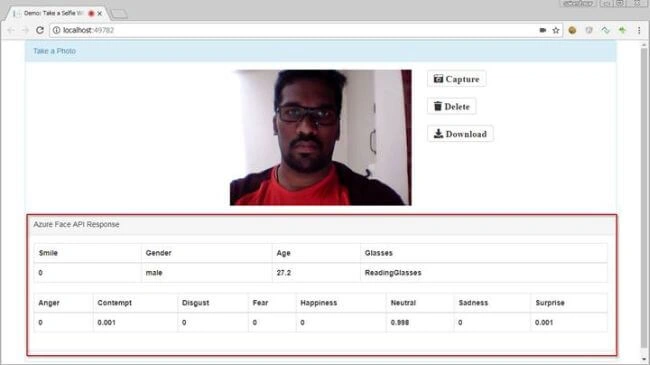
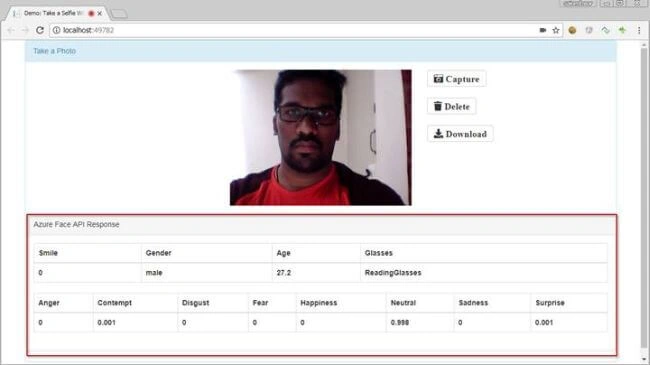
- Finally, displaying Azure Face API Response
Creating an ASP.NET MVC project
After opening IDE, next, we are going to create an ASP.NET MVC project. For doing that, just click File - New - Project.
After choosing a project, a new dialog will pop up with the name "New Project". In that, we are going to choose Visual C# Project TemplatesàWeb à ASP.NET Web Application. Then, we are going to name the project as " WebCamApp".
After naming the project, click on OK button to create the project. A new dialog will pop up with the name “New ASP.NET Project”; from that, we are going to choose “MVC” templates for creating "MVC" application and we are not going to use any authentication in this application. For that, we are going to choose “No Authentication”. After that, finally, click on the OK button to create the project.
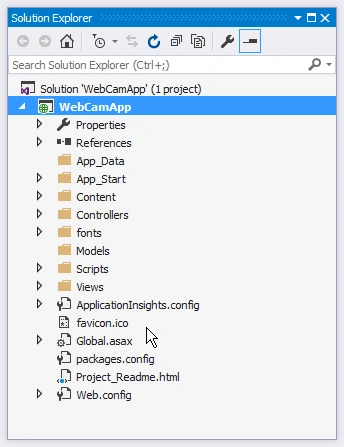
After completing with creating the project, next, we are going to get Face API Key from Azure portal.
Getting an API key for using Face API
Credit: Icons made by Round icons from www.flaticon.com is licensed by CC 3.0 BY.
In order to get an API key, you must register at Microsoft portal.
After registering yourself, just access cognitive-services at the below URL.
https://azure.microsoft.com/en-in/try/cognitive-services/
Below is a snapshot of the View which will appear after accessing the URL.
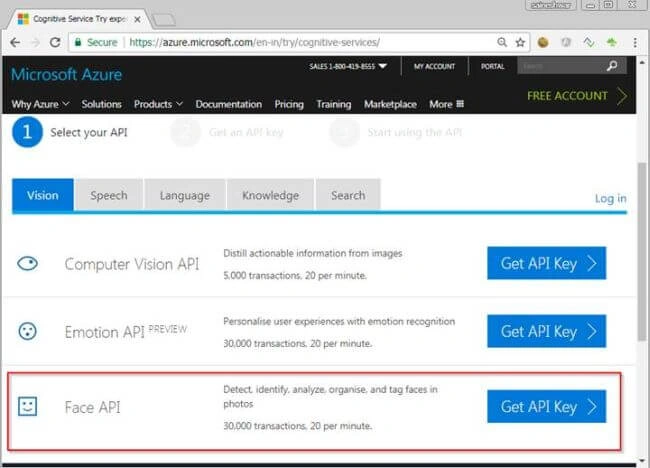
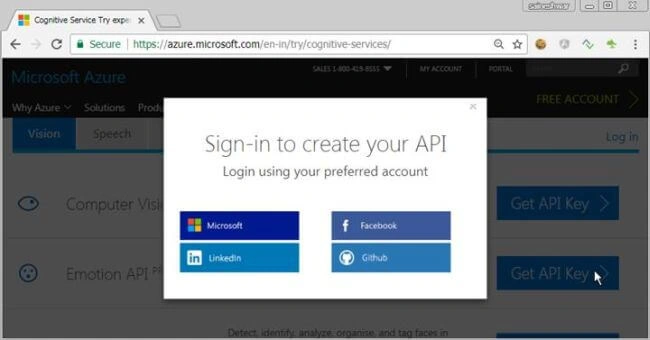
In the above View, you can see various cognitive-services. We are first going to work on Face API service. So, just click on Face API “Get API Key” button. A dialog will pop up for Sign-in with the various option. You can choose one and log in to the portal.
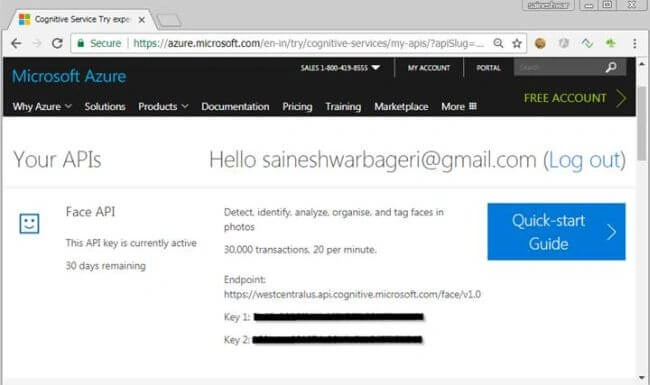
After logging in, you will see Face API service you subscribed along with the API keys.
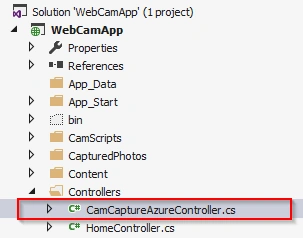
After getting the keys, we are going to add CamCaptureAzure Controller.
Adding CamCaptureAzure Controller
For adding a controller, just right click on Controller folder and then choose -> Add -> inside that, choose to Add New item. A new dialog will pop up for adding a new item. Inside that, choose "MVC Controller Class" and name your controller as " CamCaptureAzure " and click on the "Add" button to create a CamCaptureAzure Controller.
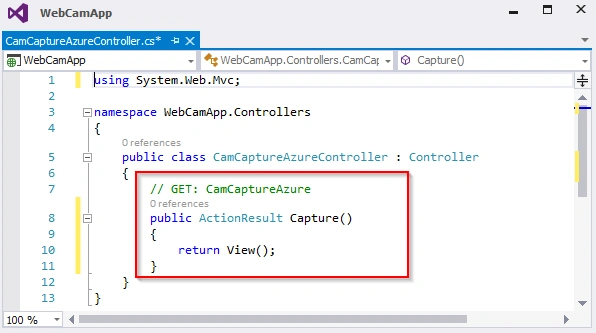
After adding a controller, we are going to add "Capture Action Method" in it for handling the HTTP GET Request.
Adding Capture Action Method
After adding Capture Action Method, we are going to add Capture View.
Adding Capture View
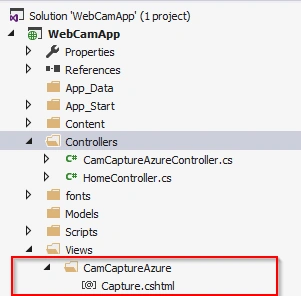
On this Capture view, we are going to Use Html 5 Video, Canvas Tag to capture Photo, and along with that I am also going to Add Capture, Delete, Download button on view along with ResponseTable div in which we are going to update Azure Face API Response.
Snapshot of view with video and canvas tag
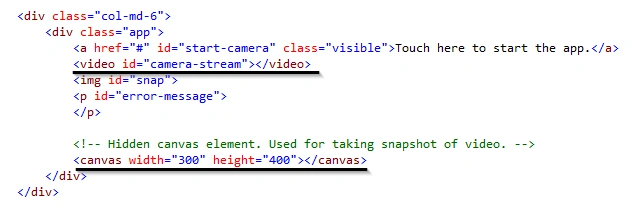
Complete Code Snippet of Capture View
- @{
- Layout = null;
- }
- <!DOCTYPE html>
- <html>
- <head>
- <meta charset="utf-8">
- <meta http-equiv="X-UA-Compatible" content="IE=edge">
- <meta name="viewport" content="width=device-width, initial-scale=1">
- <title>Demo: Take a Selfie with JavaScript</title>
- <link href="https://fonts.googleapis.com/icon?family=Material+Icons" rel="stylesheet">
- <link href="~/CamScripts/css/styles.css" rel="stylesheet" />
- <link href="~/Content/bootstrap.css" rel="stylesheet" />
- <link href="https://use.fontawesome.com/releases/v5.0.6/css/all.css" rel="stylesheet">
- </head>
- <body>
- <h3>
- Demo: Take a Photo
- </h3>
- <div class="container">
- <div class="row">
- <div class="col-md-2"></div>
- <div class="col-md-6">
- <div class="app">
- <a href="#" id="start-camera" class="visible">Touch here to start the app.</a>
- <video id="camera-stream"></video>
- <img id="snap">
- <p id="error-message">
- </p>
- <!-- Hidden canvas element. Used for taking snapshot of video. -->
- <canvas width="300" height="400"></canvas>
- </div>
- </div>
- <div class="row">
- <div class="controls">
- <div style="font-size:1.8em; color:Tomato">
- <a href="#" id="take-photo" title="Take Photo">
- <i class="fas fa-camera-retro fa-sm btn btn-default">
- Capture
- </i>
- </a>
- </div>
- <br />
- <div style="font-size:1.8em; color:Tomato">
- <a href="#" id="delete-photo" title="Delete Photo" class="disabled">
- <i class="fas fa-trash fa-sm btn btn-default">
- Delete
- </i>
- </a>
- </div>
- <br />
- <div style="font-size:1.8em; color:Tomato">
- <a href="#" id="download-photo" download="selfie.png" title="Save Photo"
- class="disabled">
- <i class="fas fa-download fa-sm btn btn-default">
- Download
- </i>
- </a>
- </div>
- </div>
- </div>
- <div class="col-md-2"></div>
- </div>
- <div class="row">
- <div class="col-md-12">
- <div id="ResponseTable">
- </div>
- </div>
- </div>
- </div>
- <style>
- .contant {
- border: 1px solid #ddd;
- border-radius: 4px;
- width: 500px;
- padding: 20px;
- margin: 0 auto;
- text-align: center;
- }
- </style>
- </body>
- </html>
After completing with adding view next we are going save application and test capture view by accessing it.
Snapshot of Capture View
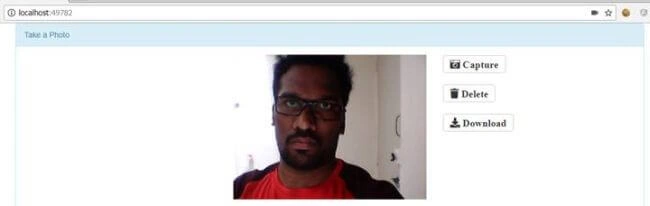
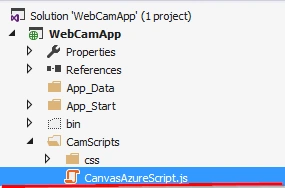
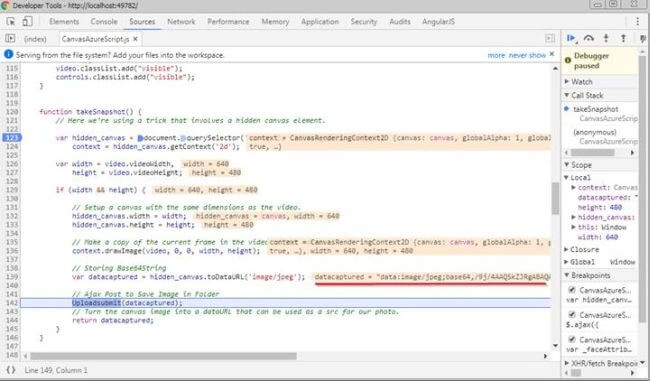
After accessing Capture View, next, we are going to add code for capturing a photo on click of capture button, on delete we are going to delete a photo which we have captured and on download, you can download your photo.
After adding View next, we are going to add [HttpPost] method Capture.
Adding [HttpPost] Capture Method
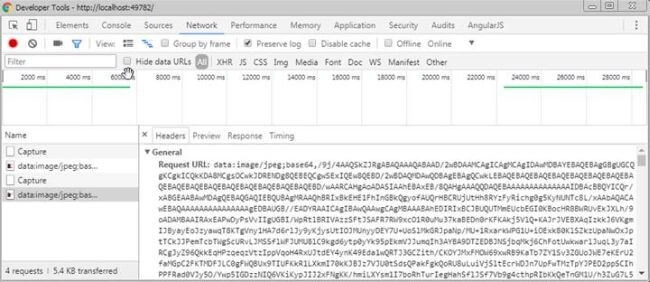
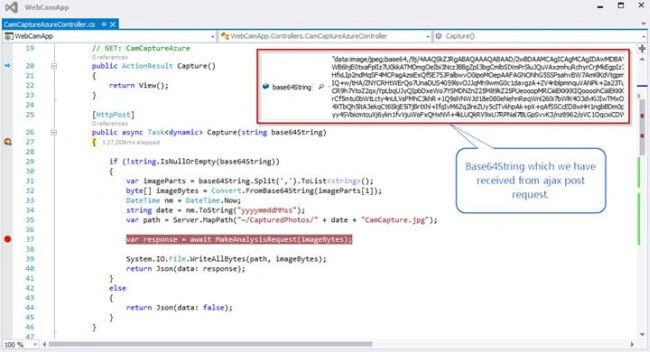
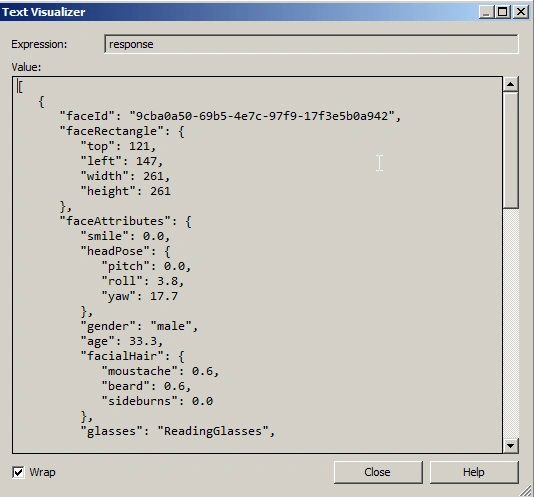
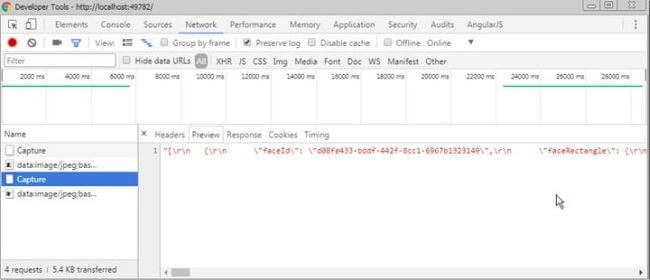
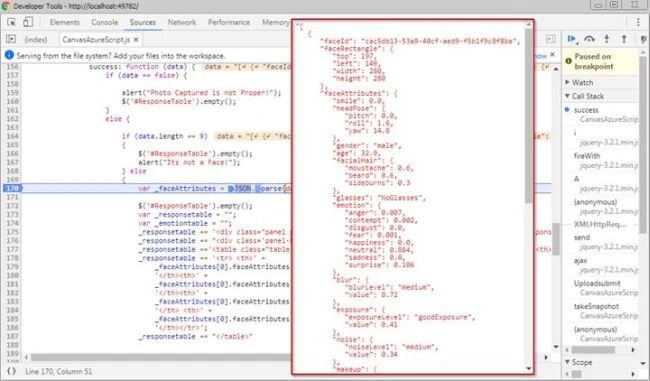
This method will take base64String as input and this string will be converted to bytes and then sent to MakeAnalysisRequest method for analyzing the photo, and also we are storing this image in CapturedPhotos folder.
Code Snippet of [HttpPost] Capture method
- [HttpPost]
- public async Task<dynamic> Capture(string base64String)
- {
- if (!string.IsNullOrEmpty(base64String))
- {
- var imageParts = base64String.Split(',').ToList<string>();
- byte[] imageBytes = Convert.FromBase64String(imageParts[1]);
- DateTime nm = DateTime.Now;
- string date = nm.ToString("yyyymmddMMss");
- var path = Server.MapPath("~/CapturedPhotos/" + date + "CamCapture.jpg");
- var response = await MakeAnalysisRequest(imageBytes);
- System.IO.File.WriteAllBytes(path, imageBytes);
- return Json(data: response);
- }
- else
- {
- return Json(data: false);
- }
- }
After understanding Capture method, next, we are going to understand MakeAnalysisRequest method.
MakeAnalysisRequest method which takes Bytes as an input parameter.
This method takes photo bytes as input,
- static async Task<string> MakeAnalysisRequest(byte[] imageBytes)
- {
Setting Subscription-Key and uriBase
After that we are providing subscriptionKey, uriBase parameters which we have received after subscribing to the Face API Service,
- const string subscriptionKey = "7b48c82#########################";
- const string uriBase = "https://westcentralus.api.cognitive.microsoft.com/face/v1.0/detect";
Next, we are going to create an instance of HttpClient class to send an async Post request to access FACE API service.
- HttpClient client = new HttpClient();
Setting headers for sending Subscription-Key
- // Request headers.
- client.DefaultRequestHeaders.Add("Ocp-Apim-Subscription-Key", subscriptionKey);
Setting Request parameters
In this part we are going to set the parameter which we want to receive as response.
- string requestParameters = "returnFaceId=true&returnFaceLandmarks=false&returnFaceAttributes=age, gender, headPose, smile, facialHair, glasses, emotion,hair,makeup,occlusion,accessories,blur,exposure,noise";
Creating URI
- // Assemble the URI for the REST API Call.
- string uri = uriBase + "?" + requestParameters;
Make POST Request call
- HttpResponseMessage response;
- // Request body. Posts a locally stored JPEG image.
- byte[] byteData = imageBytes;
- using (ByteArrayContent content = new ByteArrayContent(byteData))
- {
- // This example uses content type "application/octet-stream".
- // The other content types you can use are "application/json" and "multipart/form-data".
- content.Headers.ContentType = new MediaTypeHeaderValue("application/octet-stream");
- // Execute the REST API call.
- response = await client.PostAsync(uri, content);
- // Get the JSON response.
- string contentString = await response.Content.ReadAsStringAsync();
- // Display the JSON response.
- return JsonPrettyPrint(contentString);
- }
Formatting return json
- /// <summary>
- /// Formats the given JSON string by adding line breaks and indents.
- /// </summary>
- /// <param name="json">The raw JSON string to format.</param>
- /// <returns>The formatted JSON string.</returns>
- static string JsonPrettyPrint(string json)
- {
- if (string.IsNullOrEmpty(json))
- return string.Empty;
- json = json.Replace(Environment.NewLine, "").Replace("\t", "");
- StringBuilder sb = new StringBuilder();
- bool quote = false;
- bool ignore = false;
- int offset = 0;
- int indentLength = 3;
- foreach (char ch in json)
- {
- switch (ch)
- {
- case '"':
- if (!ignore) quote = !quote;
- break;
- case '\'':
- if (quote) ignore = !ignore;
- break;
- }
- if (quote)
- sb.Append(ch);
- else
- {
- switch (ch)
- {
- case '{':
- case '[':
- sb.Append(ch);
- sb.Append(Environment.NewLine);
- sb.Append(new string(' ', ++offset * indentLength));
- break;
- case '}':
- case ']':
- sb.Append(Environment.NewLine);
- sb.Append(new string(' ', --offset * indentLength));
- sb.Append(ch);
- break;
- case ',':
- sb.Append(ch);
- sb.Append(Environment.NewLine);
- sb.Append(new string(' ', offset * indentLength));
- break;
- case ':':
- sb.Append(ch);
- sb.Append(' ');
- break;
- default:
- if (ch != ' ') sb.Append(ch);
- break;
- }
- }
- }
- return sb.ToString().Trim();
- }
Junaid ShaikhPosted Feb 9, 2023, 7:45 AM
Does anyone have this project's download link?
FrozenPosted Apr 3, 2019, 4:26 AM
Dropbox download link is disabled. Is it possible to have a google link? Thanks
ikram wafiPosted Feb 10, 2019, 9:17 PM
Excellent article. Can you please share working download link? Thanks
Amanda KļaviņaPosted Feb 10, 2019, 10:40 AM
Great article! could you provide working download link?
re seowonPosted Mar 22, 2018, 12:39 AM
Great article Thanks Man! but.. broken download link :(
Mohsin AzamPosted Feb 21, 2018, 4:33 AM
Nice Article,I will try to implement this.
Sagar Pandurang KapPosted Feb 19, 2018, 10:47 PM
Great article.Very well exaplined...