

This chapter is taken from book "Programming Windows Phone 7" by Charles Petzold published by Microsoft press. http://www.charlespetzold.com/phone/index.html
Bitmap and Texture: Bitmap is an object which is appear in both Silverlight and XNA applications but in XNA, a bitmap has a data type of Texture2D and hence is often referred to as a texture. Bitmaps are used to symbolize your application on the phone. A new XNA or Silverlight project in Visual Studio results in the creation of three bitmaps for various purposes.
The native Windows bitmap format has an extension of BMP but it's become less popular in recent years as compressed formats have become widespread. At this time, the three most popular bitmap formats XNA supports all three (and more), and silverlight supports only JPEG and PNG, the formats are probably:
- JPEG (Joint Photography Experts Group)
- PNG (Portable Network Graphics)
- GIF (Graphics Interchange File)
XNA Texture Drawing
XNA 2D programming is almost entirely a process of moving sprites around the screen, you might expect that loading and drawing bitmaps in an XNA program is fairly easy, and you would be correct, you can create the bitmap in an external program, Windows Paint is often convenient.
The first project is called XnaLocalBitmap,to add this file as part of the program's content, right-click the XnaLocalBitmapContent project in Visual Studio, select Add and Existing Item, and then navigate to the file. Once the file shows up, you can right-click it to display Properties, and you'll see that it has an Asset Name of "Hello." The goal is to display this bitmap centered on the screen. Define a field in the Game1.cs file to store the Texture2D and another field for the position:
Example
public
class Game1 :
Microsoft.Xna.Framework.Game
{
GraphicsDeviceManager graphics;
SpriteBatch spriteBatch;
Texture2D helloTexture;
Vector2 position;
.....
}
Both fields are set during the LoadContent method. Use the same generic method to load the Texture2D as you use to load a SpriteFont.
The Texture2D class has properties named Width
and Height that provide the dimensions of the bitmap in pixels.
protected
override void
LoadContent()
{
spriteBatch = new
SpriteBatch(GraphicsDevice);
helloTexture = this.Content.Load<Texture2D>("Hello");
Viewport viewport =
this.GraphicsDevice.Viewport;
position = new
Vector2((viewport.Width - helloTexture.Width)
/ 2,
(viewport.Height - helloTexture.Height) / 2);
}
The SpriteBatch
class has seven Draw methods to render bitmaps. This one is certainly the simplest:
protected
override void
Draw(GameTime gameTime)
{
GraphicsDevice.Clear(Color.Navy);
spriteBatch.Begin();
spriteBatch.Draw(helloTexture, position,
Color.White);
spriteBatch.End();
base.Draw(gameTime);
}
The final argument to Draw is a color that can be used to attenuate the existing colors in the bitmap. Use Color.White if you want the bitmap's colors to display without any alteration, And here it is:

Silverlight Image Element
The equivalent program in Silverlight is even simpler. Let's create a project named SilverlightLocalBitmap. First create a directory in the project to store the bitmap. Right-click the project name and choose Add and then New Folder. Let's name it Images. Then right-click the folder name and choose Add and Existing Item. Navigate to the Hello.png file. From the Add button choose either Add or Add as Link. If you choose Add, a copy will be made and the file will be physically copied into a subdirectory of the project. If you choose Add as Link, only a file reference will be retained with the project but the file will still be copied into the executable. The final step: Right-click the bitmap filename and display Properties. Note that the Build Action is Resource. It's possible to change that Build Action to Content, but let's leave it for now and I'll discuss the difference shortly.
In Silverlight, you use the
Image
element to display bitmaps just as you use the TextBlock element to display text. Set the Source
property of Image to the folder and filename of the bitmap within the
project:
<Grid
x:Name="ContentPanel"
Grid.Row="1"
Margin="12,0,12,0">
<Image
Source="Images/Hello.png"
/>
</Grid>
The display looks a little different than the XNA program, and it's not just the titles, this is most noticeable if you set the SupportedOrientations attribute of the PhoneApplicationPage start tag to PortraitOrLandscape and turn the phone sideways:

Images Via the Web
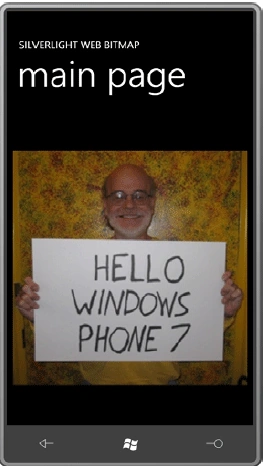
One feature that's really nice about the Image element is that you can set the Source property to a URL, such as in this Silverlight project:
<Grid
x:Name="ContentPanel"
Grid.Row="1"
Margin="12,0,12,0">
<Image
Source="http://www.charlespetzold.com/Media/HelloWP7.jpg"
/>
</Grid>
Here it is:
Join the conversation! Your thoughts help the community grow.