
When controls are added to FlowLayoutPanel, say in TopDown flow direction
without wrapping, width of the column in which controls are aligned incorporates
left and right margin of each control. Following code demonstrates how this is
done.
using
System;
using
System.Windows.Forms;
namespace
MarginsDemo
{
public class
MarginsTest: Form
{
public MarginsTest()
{
this.FormBorderStyle =
FormBorderStyle.FixedToolWindow;
FlowLayoutPanel flp =
new FlowLayoutPanel();
flp.FlowDirection = FlowDirection.TopDown;
flp.WrapContents = false;
flp.Dock = DockStyle.Fill;
Controls.Add(flp);
for (int i = 0;
i < 3; i++)
{
Button btn =
new Button();
btn.Name = btn.Text = string.Format("Button{0}",
i + 1);
btn.Margin = new
Padding(5, 5, 5, 5);
btn.LocationChanged += new
EventHandler(ButtonLocationChanged);
flp.Controls.Add(btn);
}
Console.WriteLine("FlowLayoutPanel.PreferredSize
= ({0}, {1})",
flp.PreferredSize.Width,
flp.PreferredSize.Height);
Size = SizeFromClientSize(flp.PreferredSize);
}
void ButtonLocationChanged(object
sender, EventArgs e)
{
Button btn = sender
as Button;
Console.WriteLine("{0}
Size=({1}, {2}) Location=({3}, {4})",
btn.Name, btn.Width, btn.Height, btn.Left,
btn.Top);
}
}
}
This test creates three buttons and
sets their margins to 5 pixels each. LocationChanged event on buttons is handled
to print current size and location of each button, which will help demonstrate
how FlowLayoutPanel handles margins. Output printed this application will look
something like this:
Button1 Size=(75, 23) Location=(5, 5)
Button2 Size=(75, 23) Location=(5, 38)
Button3 Size=(75, 23) Location=(5, 71)
FlowLayoutPanel.PreferredSize = (85, 99)
As expected, Left property of all buttons is 5, which is width of the left
margin (same amount of space is left on the right of each button). Vertically,
first button starts at Y=5 and ends above Y=28. Then bottom margin of Button1
comes (5 pixels), followed by top margin of Button2 (another 5 pixels). Only
then, Button2 is rendered starting at Y=38. Similarly, 10 pixels margins are
left below Button2, so Button3 starts at Y=71, ending 23 pixels lower. Total
preferred height of the FlowLayoutPanel is calculated as sum of vertical
dimensions (heights, top and bottom margins) of all controls. Since each button
occupies 23 pixels and has 5 pixels top and bottom margins, totaling out at 33
pixels, all three buttons require 99 pixels to draw.
Horizontally, each control requires own width plus left and right margin. Width
of the implied column is then found as maximum of required widths of all
controls. In our case, all three buttons require same width, which is 75 pixels
for the button and 5 pixels for left and right margin each, total of 85 pixels.
This can be verified as PreferredSize of the panel, after three buttons are
added, is 85x99 pixels, as we have shown.
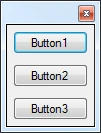
Picture: result of popping out the dialog with three buttons on a
FlowLayoutPanel.
This way of calculating width and height becomes important when controls with
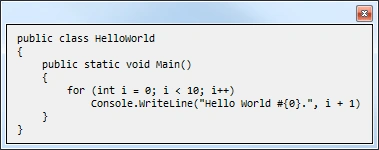
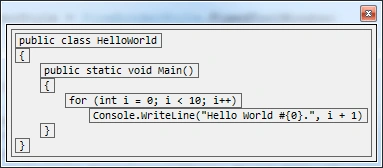
different sizes and margins are added to FlowLayoutPanel. For example, consider
following task. We wish to create a FlowLayoutPanel which would contain labels,
each label containing one line of C# source code. However, leading tabs in each
line of code should be converted to fixed-width tabbing, which in turn will be
implemented as left margin of the containing label. For example, if tab distance
is set to 30 pixels and line of code begins with three tabs, left margin of the
label would be 90. Source code of the Form class which implements this task
follows.
using
System;
using
System.Windows.Forms;
using
System.Drawing;
namespace
IndentationDemo
{
public partial
class MainForm:
Form
{
public MainForm()
{
FormBorderStyle = FormBorderStyle.FixedToolWindow;
Join the conversation! Your thoughts help the community grow.