
In this tutorial I will share experience how, just with the help of a few clicks and a few lines of code, to build a windows application with "Home" button, that allows to return to "Home" form (in fact to close all opened forms by one click). The examples are written using C#.
Before we jump into C# code we have to choose the best way to build solution of our Windows application.
(Thanks, thanks DOT.NET ! Now we have inheritance, user controls, and so on. And we must use that!).
I strongly recommend to include in our solution at least two projects with different "Output Type":
- Output Type of the first project is "Windows Aplication" ;
- Output Type of the second project is "Class Library".
Before using any control in the first project, you have to create a control in the second project (for example, to create Button_C control that inherits from standard Button control ) and to use only controls from the second project on your forms.
This process takes no more than 20 seconds but advantage is obvious: at any time just for some seconds you can add to your control all that you want ( properties, events, color, and so on ). And just in seconds all addings and changes work on every your form (ten forms or hundred - it doesn't matter!).
Let's create our test project.
Step 1. Make a new solution named " WinProjects_Test".
Step 2. Add a "Windows Application" project named "CloseForms".
Step 3. Add a "Windows Control Library" project named "CloseForms_Controls".
Step 4. Delete "UserControl1" from "CloseForms_Controls" project (we just don't need it).
Step 5. Add Windows Form named "FormBasic" to "CloseForms_Controls" project. Change property BackColor to "Cornsilk" (just to see that it is our form with our BackColor).
Step 6. Build "CloseForms_Controls" project (right-click and select Build). After every changes it is recommended to rebuild the project !
Step 7. Build "CloseForms" project.
Step 8. To References of "CloseForms" project add a reference to CloseForms_Controls.dll
(Right-click References of "CloseForms" project, select Add Reference, from a tabbed dialog box select .NET Framework and with the help of "Browse ...". Find out the physical CloseForms_Controls.dll on the disk. Double-click CloseForms_Controls.dll to add it to the selected components list. Click OK to add this reference to the project).
Step 9. Rebuild solution.
Step 10. All our forms have to be inherited from FormBasic form. So far there is only one form in our "CloseForms" project : this is Form1. Open code of Form1, find out the line
public class FormBasic : System.Windows.Forms.Form
and change it to
public class Form1 : CloseForms_Controls.FormBasic
Step 11. OK. Now our ship is ready for sailing off. We just have to add a few forms and user controls to make our travel more interesting. Add Form2, Form3, Form4 to "CloseForms" project and make them inherited from FormBasic. (To add inherited form to "CloseForms" project you can just right-click and select Add|Add Inherited Form ,then from Add New Item dialog box select Inherited Form and then from Inheritance Picker dialog box select our FormBasic).
Step 12. Add User Control , named Button_C, to CloseForms_Controls project. Open code of this control, find out line
public class Button_C : System.Windows.Forms.UserControl
and change it to
public class Button_C : Button
Now we have our own Button_C control with all properties, events of Button control. "To prove" that this is ours control let's change default property BackColor : double-click on Button_C.cs, right-click on the page (Button_C.cs[Design]) and select Properties, set BackColor to, for example, "AliceBlue". (Do you remember ?! After every changes it is recommended to rebuild the solution).
Step 13. Add one more User Control, named Buttons, to CloseForms_Controls project. Double-click on Button_C.cs, inside Toolbox click on "My User Controls" tab and drag and drop Button_C. Name it "button_CHome" with the text "Home". Drag and drop two more Button_C : button_CBack with the text "Back" and button_CNext with the text "Next". Pay attention ! We have created Buttons control with "Home" button. But, in fact, we could add "Home" button at any moment ("on demand" of the boss) without any serious problems (Don't forget to rebuild solution !).
Step 14. You should force to work buttons according to your desire on any form. With this purpose add to class Buttons three event Handlers:
#region "forClass"
public event EventHandler ClickNext;
public event EventHandler ClickBack;
public event EventHandler ClickHome;
#endregion
Open design of the Buttons.cs and double-click on the button_CNext button. Add the next code (to "private void button_CNext_Click"):
private void button_CNext_Click(object sender, System.EventArgs e)
{
if (ClickNext != null)
{
ClickNext(this, e);
}
}
Similar "process" have to be done for the button_CBack and button_CHome controls:
private void button_CBack_Click(object sender, System.EventArgs e)
{
if (ClickBack !=null)
{
ClickBack(this,e);
}
}
private void button_CHome_Click(object sender, System.EventArgs e)
{
if (ClickHome !=null)
{
ClickHome(this,e);
}
}
Our control is now ready to act.
And our solution you can see on Figure 1.
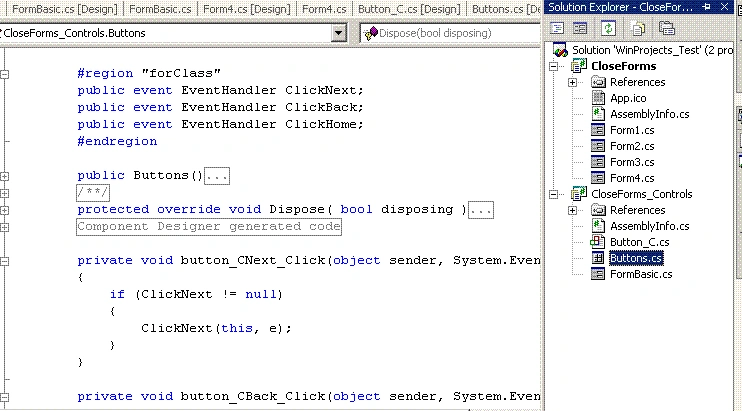
Figure 1.
Step 15. Now we can add some "actions" to our project. Inside CloseForms project from "My User Controls" tab drag and drop on every form Buttons control. Double-click on Form1.cs , right-click on Buttons1 control and select Properties, click "Events" button, double-click on "ClickBack", then - on "ClickHome", and then - on "ClickNext". Now Form1.cs code page has three new functions: buttons1_ClickBack, buttons1_ClickHome, buttons1_ClickNext.
Similar "clicks" have to be done for the Form2, Form3, Form4.
Step 16. Add a few lines of code to Form1.cs code page (to above mentioned functions):
private void buttons1_ClickBack(object sender, System.EventArgs e)
{
//Just to see that our ClickBack event can do something
MessageBox.Show ("This is ClickBack. There is no any 'Back' way ! " +
"We are on the Home Form ! ","CloseForms Project");
}
private void buttons1_ClickHome(object sender, System.EventArgs e)
{
vasiliPosted Apr 11, 2006, 3:33 PM
Michael, thank you for writing the article! It helped me in my work. Thanks again.