
Introduction : A Validation server control is used to validate the data of an input control. If the data does not pass validation,it will display an error message to the user. ASP.NET validation controls greatly improve the perfomance of a web application and may be used by WebDeveloper to reduce plenty of code that they used to write previously to validate input values using javascript or vbscript. ASP.NET validation control improve the performance of a web application and validate input value.
Types of Validation :
- Required FieldValidator.
- RegularExpressionValidator.
- CompareValidator.
- RangeValidator.
- CustomValidator.
- Validation Summary.
Note : In this article we use a RequiredFieldValidator. In the Validator control make sure that the input box is not left to blank. The RequiredFieldValidator control is used to make an input control a required field. In this control the validation fails. then input value does not change from its initial value. By default, the initial value is an empty string.
Step 1 : Open Visual Studio 2010.
- Go to File-> New-> WebSite.
- Select ASP.NET WebSite.
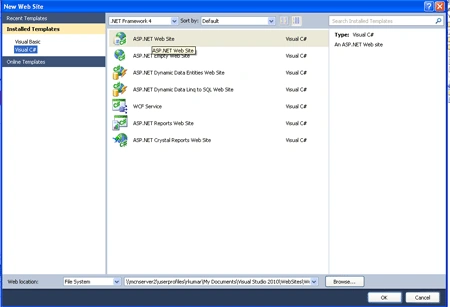
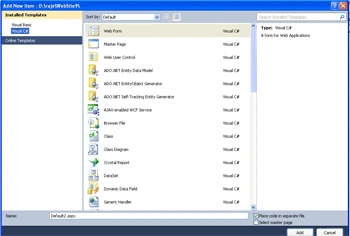
Step 2 : Go to Solution Explorer and right-click.
- Select Add->New Item.
- Select WebForm.
- Default.aspx page open.
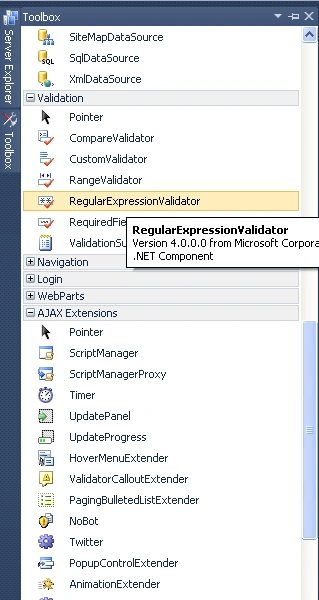
Step 3 : Now drag and drop controls from Toolbox.
- Drag ScriptManager, UpdatePanel, Button,Label, TextBox, RegularExpressionValidator.
Step 4 : Go to Default.aspx page and click in Design option.
- Go to Property window and define the property and set the value.
- Define the UpdatePanel property.
Step 5 : Go to Design Option and select Button.
- Right-click in Button and define the text and event property.
- In the text property define text value name Submit.
Step 6 : Define the CSS code.
Code :
<style
type="text/css">
.style1
{
height:
404px;
width: 978px;
}
.style2
{
z-index: 1;
left: 94px;
top: -12px;
position:
relative;
right: -94px;
}
.style3
{
z-index: 1;
left: 226px;
top: 236px;
position:
absolute;
}
.style4
{
}
.style5
{
position:
absolute;
z-index: 1;
left: 8px;
top: 93px;
}
.style6
{
z-index: 1;
top: 89px;
position:
absolute;
left: 98px;
right: 772px;
}
.style7
{
z-index: 1;
left: 229px;
top: 108px;
position:
absolute;
}
.style8
{
z-index: 1;
left: 111px;
top: 322px;
position:
absolute;
}
.style9
{
z-index: 1;
left: 99px;
top: 136px;
position:
absolute;
}
.style10
{
z-index: 1;
left: 223px;
top: 149px;
position:
absolute;
}
</style>
Step 7 : Go to Default.aspx page and click in Source option and Write the below code.



Bhaskar ParanjapePosted Jan 25, 2013, 12:19 PM
nice guidance