Microsoft Fabric provides several options for loading data into a Lakehouse, including Dataflow Gen2, Data pipelines, notebooks, shortcuts, and Eventstreams. However, when you need to upload a small dataset from your local computer without building a data pipeline, Upload Files is one of the simplest options.
In this article, we'll explore how to upload files into a Microsoft Fabric Lakehouse, where the uploaded files are stored, and how to convert a CSV file into a Delta table for further analysis.
What Is the Upload Files Feature?
The Upload Files feature allows you to transfer files directly from your local computer into the Files section of a Fabric Lakehouse.
This is particularly useful when working with sample datasets, reference files, CSV exports, JSON documents, or Parquet files that you want to use in your data engineering projects.
Once uploaded, the files are stored in OneLake, Microsoft Fabric's unified data lake. You can then access them through the Lakehouse Explorer and use supported Fabric tools to process the data.
It's important to understand that uploading a file does not automatically create a Lakehouse table. The file initially remains in the Files section until you load it into a table or process it using another supported method.
Step 1: Open Your Lakehouse
Sign in to the Microsoft Fabric portal and navigate to the workspace containing your Lakehouse.
If you haven't created one yet, select New item, search for Lakehouse, enter a name, and create it.
Open the Lakehouse to access the Explorer pane, which contains two main areas:
For this example, we'll use the Files section to upload a CSV file containing sales data.
Step 2: Select Upload Files
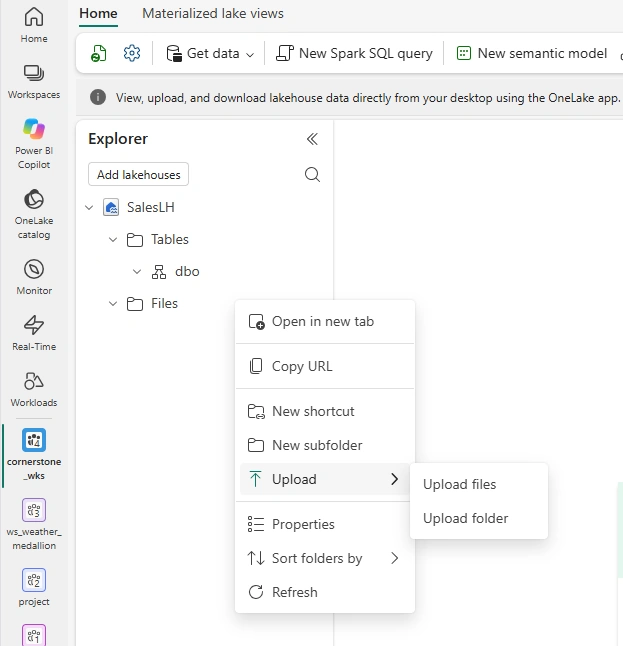
In the Lakehouse Explorer, locate the Files section.
Select the ellipsis (...) beside Files or the folder where you want to store the data. Choose Upload, followed by Upload files.
Alternatively, depending on the interface available in your Lakehouse, you can select Get data → Upload files from the Lakehouse menu.
The upload pane allows you to browse your local computer and select the file you want to upload.
Step 3: Choose and Upload Your File
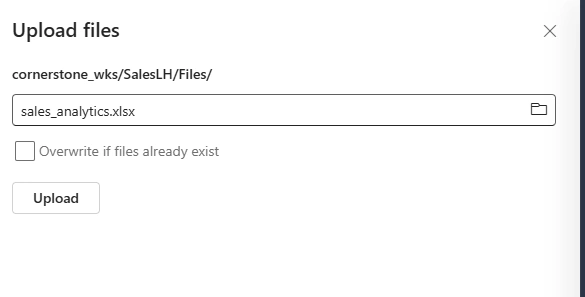
In the upload pane, select the folder icon and browse to the location of your source file.
For example, you might select a file named sales_analysis.xlsx.
Once you've selected the file, choose Upload and wait for the operation to complete.
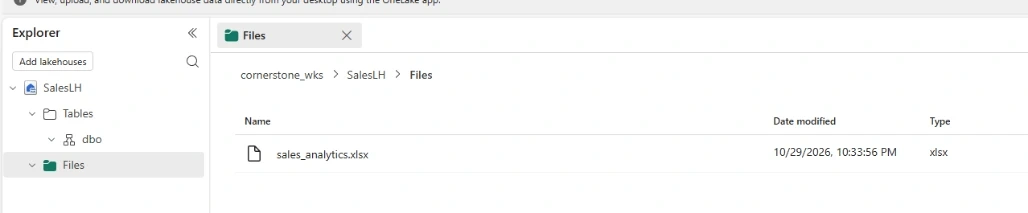
After the upload finishes, navigate to the destination folder in the Lakehouse Explorer and confirm that sales_analysis.xlsx appears in the file list.
You can select the uploaded file to preview its contents and check that the expected data is available.
At this stage, the CSV file is stored in OneLake, but it hasn't yet been converted into a structured Delta table.
Step 4: Load the Uploaded File into a Delta Table
If your goal is to query the data using SQL or use it in Power BI, you can load the uploaded CSV into a Lakehouse table.
To do this:
Expand the Files section in the Lakehouse Explorer.
Locate sales.csv.
Select the ellipsis (...) beside the file.
Choose Load to Tables → New table.
Enter a suitable table name, such as sales.
Review the available settings and select Load.
Fabric reads the source file, determines the schema based on the selected settings, and creates a Delta table containing the data.
Once the operation completes, expand the Tables section and select the new sales table to inspect its contents.
The original CSV remains in the Files section, while the new table is available for structured data access.
Step 5: Work with the Data
After loading the file into a Delta table, you can use it in other parts of Microsoft Fabric.
For example, you can:
Query the table using the Lakehouse SQL analytics endpoint.
Read and transform the data using a Fabric notebook and Apache Spark.
Use the data as part of a broader data engineering pipeline.
Build a Power BI report using an appropriate semantic model.
This makes the Upload Files feature a useful starting point for learning how data moves from a local file into a Lakehouse and eventually becomes available for analytics.
When Should You Use Upload Files?
The Upload Files feature is best suited to relatively small datasets that you need to bring into a Lakehouse manually.
For larger datasets, recurring ingestion, or transformations that need to run automatically, consider using Data pipelines, Dataflow Gen2, or notebooks instead.
If the data already exists in another supported storage location and you don't want to copy it, a OneLake shortcut may be a better option.
Choosing the right ingestion method depends on the size of your data, where it originates, and whether the process needs to be repeated or automated.
In conclusion, the Upload Files feature provides a straightforward way to bring local data into a Microsoft Fabric Lakehouse without writing code or creating a pipeline.
By uploading a file into the Files section and then loading it into a Delta table, you can move from raw data storage to structured, queryable data in just a few steps.
For beginners exploring Microsoft Fabric, this is an excellent way to understand the relationship between Lakehouse files, Delta tables, OneLake, and downstream analytics.


Join the conversation! Your thoughts help the community grow.