

This chapter
is taken from book "Programming Windows Phone 7" by Charles Petzold published by
Microsoft press.
http://www.charlespetzold.com/phone/index.html
The most common way for an XNA program to obtain a Texture2D object is by
loading it as program content. It is also possible to create a Texture2D object entirely in code using this constructor:
Texture2D texture = new Texture2D(this.GraphicsDevice, width, height);
The width and height arguments are integers that indicate the desired size of the Texture2D in pixels; this size cannot be changed after the Texture2D is created. The total number of pixels in the bitmap is easily calculated as width * height. The result is a bitmap filled with zeros. So now the big question is: How do you get actual stuff onto the surface of this bitmap?
You have two ways:
- Draw on the bitmap surface just as you draw on the video display.
- Algorithmically manipulate the actual pixel bits that make up the bitmap.
You can use these two techniques separately, or in combination with each other. You can also begin with an existing image, and modify it using these techniques.
The Render Target
Strictly speaking, you actually can't use the first of the two techniques with a Texture2D object. You need to create an instance of a class that derives from Texture2D called RenderTarget2D:
RenderTarget2D renderTarget = new RenderTarget2D(this.GraphicsDevice, width, height);
As with any code that references the GraphicsDevice property of the Game class, you'll want to wait until the LoadContent method to create any Texture2D or RenderTarget2D objects your program needs. You'll usually be storing the objects in fields so you can display them later on in the Draw override.
If you're creating a RenderTarget2D that remains the same for the duration of the program, you'll generally perform this entire operation during the LoadContent override. If the RenderTarget2D needs to change, you can also draw on the bitmap during the Update override. Because RenderTarget2D derives from Texture2D you can display the RenderTarget2D on the screen during your Draw override just as you display any other Texture2D image.
Of course, you're not limited to one RenderTarget2D object. If you have a complex series of images that form some kind of animation, you can create a series of RenderTarget2D objects that you then display in sequence as a kind of movie.
Suppose you want to display something that looks like this:
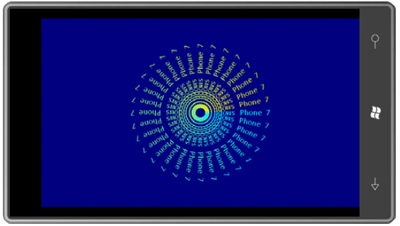
That's a bunch of text strings all saying "Windows Phone 7" rotated around a center point with colors that vary between cyan and yellow. Of course, you can have a loop in the Draw override that makes 32 calls to the DrawString method of SpriteBatch, but if you assemble those text strings on a single bitmap, you can reduce the Draw override to just a single call to the Draw method of SpriteBatch. Moreover, it becomes easier to treat this assemblage of text strings as a single entity, and then perhaps rotate it like a pinwheel.
That's the idea behind the PinwheelText program. The program's content includes the 14point Segoe UI Mono SpriteFont, but a SpriteFont object is not included among the program's fields, nor is the text itself:
public
class Game1 :
Microsoft.Xna.Framework.Game
{
GraphicsDeviceManager graphics;
SpriteBatch spriteBatch;
Vector2 screenCenter;
RenderTarget2D renderTarget;
Vector2 textureCenter;
float rotationAngle;
...
}
The LoadContent method is the most involved part of the program, but it only
results in setting the screenCenter, renderTarget, and textureCenter fields. The
segoe14 and textSize variables set early on in the method are normally saved as
fields but here they're only required locally:
protected
override void
LoadContent()
{
// Create a new SpriteBatch, which can be
used to draw textures.
spriteBatch = new
SpriteBatch(GraphicsDevice);
// Get viewport info
Viewport viewport =
this.GraphicsDevice.Viewport;
screenCenter = new
Vector2(viewport.Width / 2, viewport.Height /
2);
// Load font and get text size
SpriteFont segoe14 =
this.Content.Load<SpriteFont>("Segoe14");
string text =
" Windows Phone 7";
Vector2 textSize =
segoe14.MeasureString(text);
// Create RenderTarget2D
renderTarget =
new
RenderTarget2D(this.GraphicsDevice, 2 * (int)textSize.X,
2 * (int)textSize.X);
// Find center
textureCenter = new
Vector2(renderTarget.Width / 2,
renderTarget.Height / 2);
Vector2 textOrigin =
new Vector2(0,
textSize.Y / 2);
// Set the RenderTarget2D to the
GraphicsDevice
this.GraphicsDevice.SetRenderTarget(renderTarget);
// Clear the RenderTarget2D and render the
text
this.GraphicsDevice.Clear(Color.Transparent);
spriteBatch.Begin();
for (float
t = 0; t < 1; t += 1f / 32)
{
float angle = t *
MathHelper.TwoPi;
Color clr =
Color.Lerp(Color.Cyan,
Color.Yellow, t);
spriteBatch.DrawString(segoe14, text, textureCenter, clr,
angle, textOrigin, 1,
SpriteEffects.None, 0);
}
spriteBatch.End();
// Restore the GraphicsDevice back to
normal
this.GraphicsDevice.SetRenderTarget(null);
}
The RenderTarget2D is created with a width and height that is twice the width of the text string. The RenderTarget2D is set into the GraphicsDevice with a call to SetRenderTarget and then cleared to a transparent color with the Clear method. At this point a sequence of calls on the SpriteBatch object renders the text 32 times on the RenderTarget2D. The LoadContent call concludes by restoring the GraphicsDevice to the normal back buffer.
The Update method calculates a rotation angle for the resultant bitmap so it rotates 360° every eight seconds:
protected
override void
Update(GameTime gameTime)
{
// Allows the game to exit
if (GamePad.GetState(PlayerIndex.One).Buttons.Back
== ButtonState.Pressed)
this.Exit();
rotationAngle =
(MathHelper.TwoPi * (float)
gameTime.TotalGameTime.TotalSeconds / 8) %
MathHelper.TwoPi;
base.Update(gameTime);
}
As promised, the Draw override can
then treat that RenderTarget2D as a normal Texture2D in a single Draw call on
the SpriteBatch. All 32 text strings seem to rotate in unison:
protected
override void Draw(GameTime
gameTime)
{
GraphicsDevice.Clear(Color.Navy);
spriteBatch.Begin();
spriteBatch.Draw(renderTarget, screenCenter,
null, Color.White,
rotationAngle, textureCenter, 1,
SpriteEffects.None, 0);
spriteBatch.End();
base.Draw(gameTime);
}
Preserving Render Target Contents
The pixels in the Windows Phone 7 back buffer-and the video display itself-were only 16 bits wide. What is the color format of the bitmap created with RenderTarget2D?
By default, the RenderTarget2D is created with 32 bits per pixel-8 bits each for red, green, blue, and alpha-corresponding to the enumeration member SurfaceFormat.Color. I'll have more to say about this format before the end of this chapter, but this 32-bit color format is now commonly regarded as fairly standard.
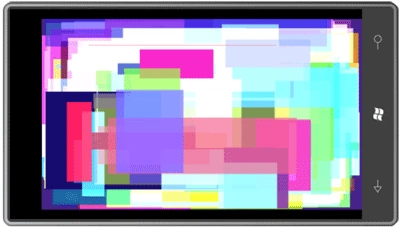
You probably want to build up the random rectangles on a RenderTarget2D that's the size of the back buffer. The rectangles you successively plaster on this RenderTarget2D can be based on the same 1×1 white bitmap used in DragAndDraw.
These two bitmaps are stored as fields of the RandomRectangles program together with a Random object and the LoadContent method creates the two RenderTarget2D objects. The big one requires an extensive constructor, Update method determines some random coordinates and color values, sets the large RenderTarget2D object in the GraphicsDevice, and draws the tiny texture over the existing content with random Rectangle and Color valuesand the last Draw override simply displays that entire large RenderTarget2D on the display.
namespace
RandomRectangles
{
public class
Game1 : Microsoft.Xna.Framework.Game
{
GraphicsDeviceManager graphics;
SpriteBatch spriteBatch;
Random rand =
new Random();
RenderTarget2D tinyTexture;
RenderTarget2D renderTarget;
public Game1()
{
graphics = new
GraphicsDeviceManager(this);
Content.RootDirectory = "Content";
// Frame rate is 30 fps by default for
Windows Phone.
TargetElapsedTime = TimeSpan.FromTicks(333333);
}
protected
override void Initialize()
{
base.Initialize();
}
protected
override void LoadContent()
{
// Create a new SpriteBatch, which can be
used to draw textures.
spriteBatch = new
SpriteBatch(GraphicsDevice);
tinyTexture = new
RenderTarget2D(this.GraphicsDevice,
1, 1);
this.GraphicsDevice.SetRenderTarget(tinyTexture);
this.GraphicsDevice.Clear(Color.White);
this.GraphicsDevice.SetRenderTarget(null);
renderTarget = new
RenderTarget2D(
this.GraphicsDevice,
this.GraphicsDevice.PresentationParameters.BackBufferWidth,
this.GraphicsDevice.PresentationParameters.BackBufferHeight,
false,
this.GraphicsDevice.PresentationParameters.BackBufferFormat,
DepthFormat.None, 0,
RenderTargetUsage.PreserveContents);
}
protected
override void UnloadContent()
{
}
protected
override void Update(GameTime
gameTime)
{
// Allows the game to exit
if (GamePad.GetState(PlayerIndex.One).Buttons.Back
== ButtonState.Pressed)
this.Exit();
int x1 =
rand.Next(renderTarget.Width);
int x2 =
rand.Next(renderTarget.Width);
int y1 =
rand.Next(renderTarget.Height);
int y2 =
rand.Next(renderTarget.Height);
int r = rand.Next(256);
int g = rand.Next(256);
int b = rand.Next(256);
int a = rand.Next(256);
Rectangle rect =
new Rectangle(Math.Min(x1,
x2), Math.Min(y1, y2),
Math.Abs(x2
- x1), Math.Abs(y2 - y1));
Color clr =
new Color(r,
g, b, a);
this.GraphicsDevice.SetRenderTarget(renderTarget);
spriteBatch.Begin();
spriteBatch.Draw(tinyTexture, rect, clr);
spriteBatch.End();
this.GraphicsDevice.SetRenderTarget(null);
base.Update(gameTime);
}
protected
override void Draw(GameTime
gameTime)
{
spriteBatch.Begin();
spriteBatch.Draw(renderTarget, Vector2.Zero,
Color.White);
spriteBatch.End();
base.Draw(gameTime);
}
}
}
After almost no time at all, the display looks
something like this:
Join the conversation! Your thoughts help the community grow.