
Introduction
In this article we are going to see the most useful control on the Windows Phone
7 development, yes the BING Map Control. The BING Map Silverlight control for
Windows Phone 7 development combines the power of Silverlight and Bing maps to
get the best mapping experience for the developers and the real users to create
location based application.
BING Map control in Windows Phone 7 application development are derived from the
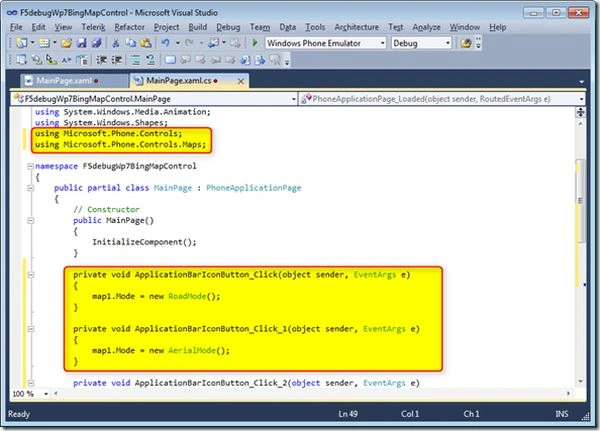
name spaces Microsoft.Phone.Controls Microsoft.Phone.Controls.Maps.
Developers need to register for the BING Map developers account to get the keys
which are used in developing the application with the Bing Maps. Here in this
article we will see the step by step process on how to make use of the BING Maps
control and get the most enriching map application.
Steps:
Open Visual Studio 2010 and create a new Silverlight for Windows Phone 7
application with a valid project name as shown in the screen below.

Note – To get the BING Map Keys first we need to register to the BING Map
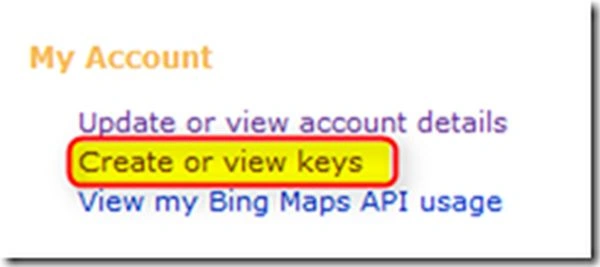
account using the below URL Once we register with our valid Windows Live ID we need to login again and go to
the section Create or View Keys under the My Account category.
Now we will be requested to provide the application details like below
Application name: a valid application name
Application URL: a valid application URL to access
Application type: a valid application type to be selected from the list
Once we provided the details we will be provided with the BING Maps key as shown
in the screen below.

Now we need to go back to the Visual Studio 2010 F5debugWp7BingMapControl
project and start designing the application by dragging and dropping the BING
Map control from the tool box and some buttons as shown in the screen below.
XAML Code:
<phone:PhoneApplicationPage
x:Class="F5debugWp7BingMapControl.MainPage"
xmlns="<a
href="http://schemas.microsoft.com/winfx/2006/xaml/presentation"">http://schemas.microsoft.com/winfx/2006/xaml/presentation"</a>
xmlns:x="<a
href="http://schemas.microsoft.com/winfx/2006/xaml"">http://schemas.microsoft.com/winfx/2006/xaml"</a>
xmlns:phone="clr-namespace:Microsoft.Phone.Controls;assembly=Microsoft.Phone"
xmlns:shell="clr-namespace:Microsoft.Phone.Shell;assembly=Microsoft.Phone"
xmlns:d="<a
href="http://schemas.microsoft.com/expression/blend/2008"0">http://schemas.microsoft.com/expression/blend/2008"</a>
xmlns:mc="<a
href="http://schemas.openxmlformats.org/markup-compatibility/2006"">http://schemas.openxmlformats.org/markup-compatibility/2006"</a>
mc:Ignorable="d" d:DesignWidth="480" d:DesignHeight="696"
FontFamily="{StaticResource PhoneFontFamilyNormal}"
FontSize="{StaticResource PhoneFontSizeNormal}"
Foreground="{StaticResource PhoneForegroundBrush}"
SupportedOrientations="Portrait" Orientation="Portrait"
shell:SystemTray.IsVisible="True" xmlns:my="clr-namespace:Microsoft.Phone.Controls.Maps;assembly=Microsoft.Phone.Controls.Maps"
Loaded="PhoneApplicationPage_Loaded">
<!--LayoutRoot is the root grid where all page content is
placed-->
<Grid
x:Name="LayoutRoot"
Background="Transparent">
<Grid.RowDefinitions>
<RowDefinition
Height="Auto"/>
<RowDefinition
Height="*"/>
</Grid.RowDefinitions>
<!--TitlePanel contains the name of the application and page
title-->
<StackPanel
x:Name="TitlePanel"
Grid.Row="0"
Margin="12,17,0,28">
<TextBlock
x:Name="ApplicationTitle"
Text="F5DEBUG
WP7 TUTORIALS"
Style="{StaticResource
PhoneTextNormalStyle}"/>
<TextBlock
x:Name="PageTitle"
Text="Bing
Maps"
Margin="9,-7,0,0"
Style="{StaticResource
PhoneTextTitle1Style}"/>
</StackPanel>
<!--ContentPanel - place additional content here-->
<Grid
x:Name="ContentPanel"
Grid.Row="1"
Margin="12,0,12,0">
<my:Map
Height="523"
CredentialsProvider="At7uQrXAsuZLAGFyv2pz6MGQ6-EhRIqjd1l0zTto9HhHzV2VcClvIQBbumcUz74S"
HorizontalAlignment="Left"
Margin="6,6,0,0"
Name="map1"
VerticalAlignment="Top"
Width="444"
/>
</Grid>
</Grid>
<!--Sample code showing usage of ApplicationBar-->
<phone:PhoneApplicationPage.ApplicationBar>
<shell:ApplicationBar
IsVisible="True"
IsMenuEnabled="True">
<shell:ApplicationBarIconButton
IconUri="/Images/appbar.share.rest.png"
Text="Road
View"
Click="ApplicationBarIconButton_Click"/>
<shell:ApplicationBarIconButton
IconUri="/Images/appbar.feature.video.rest.png"
Text="Aerial
View"
Click="ApplicationBarIconButton_Click_1"/>
<shell:ApplicationBarIconButton
IconUri="/Images/appbar.back.rest.png"
Text="Zoom
In"
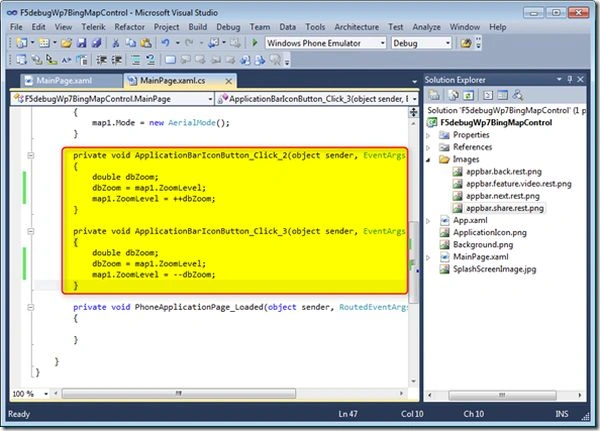
Click="ApplicationBarIconButton_Click_2"/>
<shell:ApplicationBarIconButton
IconUri="/Images/appbar.next.rest.png"
Text="Zoom
Out"
Click="ApplicationBarIconButton_Click_3"/>
</shell:ApplicationBar>
</phone:PhoneApplicationPage.ApplicationBar>
</phone:PhoneApplicationPage>

Working with BING Map Control in WP7
Join the conversation! Your thoughts help the community grow.
Sign in to leave a comment
It is the same account you read, post and publish with — and you will come straight back to this page.





Pranav ShahPosted Mar 12, 2013, 5:22 AM
sir, i want code of this project..
Arjun PanwarPosted Apr 23, 2012, 11:53 PM
Hi,How will you use solutions Created in SharePoint 2007 in SharePoint 2010 ?
Shubham SrivastavaPosted Apr 23, 2012, 7:14 PM
Hi Karthikeyan Can we use Google map in windows phone 7 instead of Bing map ?