

In this article I explain how to use layouts in ASP.Net MVC3 using Razor view, for this use the following steps.
Step 1 : First open Visual Studio and then select File->New->Project.
Step 2 : A window is appear from this Select ASP.NET MVC 3 Web application inside the Web template, give the name of the project that you want to give and then click on ok button.
Step 3 : In the new window select Empty and view as a Razor view and click ok.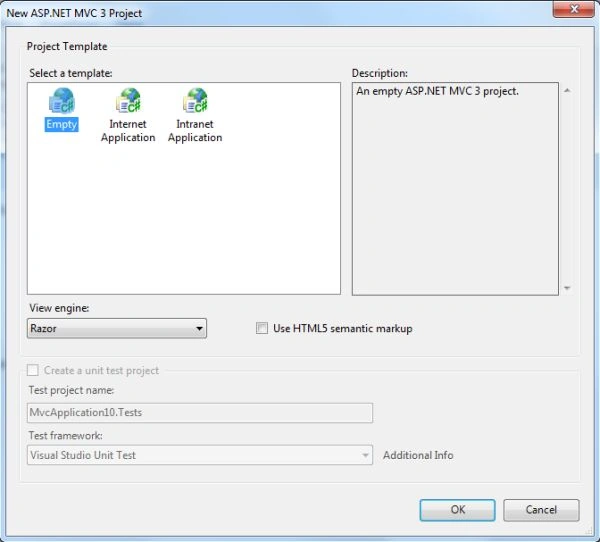
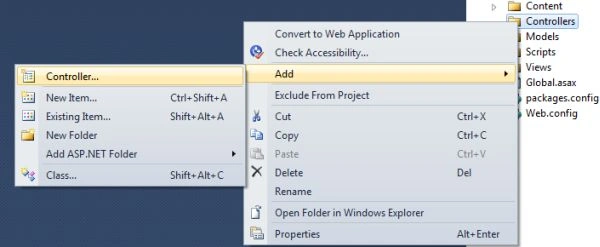
Step 4 : Now add a controller by right-clicking on the controller in the Solution Explorer.
Step 5 : Give the name of the controller and click ok.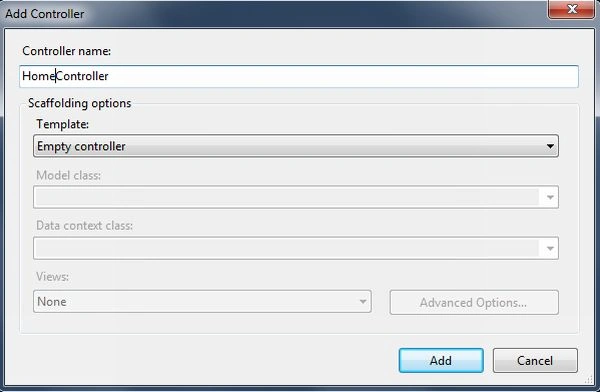
Step 6 : The controller contains the code:
namespace MvcApplication9.Controllers
{
public class HomeController : Controller
{
public ActionResult Index()
{
return View();
}
}
}
Step 7 : Click on _Layouts.cshtml: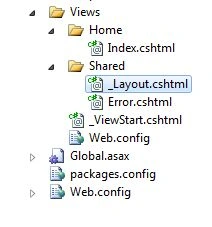
In this write the code as:
<!DOCTYPE html>
<html>
<head>
<title>@ViewBag.Title</title>
<link href="@Url.Content("~/Content/Site.css")" rel="stylesheet" type="text/css" />
<script src="@Url.Content("~/Scripts/jquery-1.5.1.min.js")" type="text/javascript"></script>
</head>
<body>
<div id="header">
<h1>
Welcome to the DOT NET world</h1>
<div class="topLink">
<div class="autoCenter">
<ul class="link">
<li class="first"><a href="#">Home</a></li>
<li><a href="#">Technologies</a></li>
<li><a href="#">Article </a></li>
<li><a href="#">Blog</a></li>
<li><a href="#">Interview questions</a></li>
</ul>
</div>
</div>
</div>
<div id="sidebar">
<p>
Must Read</p>
<ul>
<li><a href="#">ASP.NET</a></li>
<li><a href="#">C#</a></li>
<li><a href="#">Window Phone</a></li></ul>
</div>
<div id="content">
@RenderBody()
</div>
<div id="footer">
<div class="autoCenter">
<ul class="link">
<li class="first"><a href="#">Contact Us</a></li>
<li><a href="#">Privacy & Policy</a></li>
<li><a href="#">Conditions </a></li>
</ul>
</div>
</div>
</body>
</html>
Step 8 : Now add some style in Content/site.css as:
#header
{
background-color:Blue;
color:White;
padding:1px;
}
#content
{
float:left;
margin:10px;
}
#sidebar
{
float:right;
margin:10px;
padding:10px;
border:dotted 5px red;
width:180px;
}
#footer
{
text-align:center;
clear:both;
}
.topLink
{
width: 100%;
overflow: hidden;
background: #db4c2c;
border-bottom: 1px solid #d3330f;
}
.autoCenter
{
width: 1024px;
margin: 0px auto;
overflow: hidden;
}
ul.link
{
list-style: none;
margin: 0px;
padding: 0px;
}
Step 9 : Now add a view by right-clicking on the action method and write the code in it as:
@{
ViewBag.Title = "Index";
}
<h2>Latest Topic</h2>
<p>Working with ASP.NET</p>
<p>Working with CSS and JavaScript</p>
<p>jQuery</p>
Step 10 : Run the application by pressing F5. The output is shown as:
Summary : In this article I explained how to use layouts in MVC3 Razor view.
vivek kuamrPosted Apr 5, 2013, 2:58 AM
@Richa, If we talk about of seven step after completing 6 step,How we get "Shared" and ViewStart.cshtml.