

This
chapter is taken from book "Programming Windows Phone 7" by Charles
Petzold published by Microsoft press.
http://www.charlespetzold.com/phone/index.html
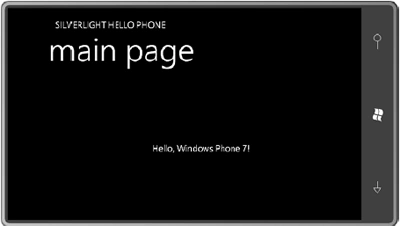
When you run the SilverlightHelloPhone program, and you
turn the phone or emulator sideways, you'll discover that the display
doesn't change to accommodate the new orientation, To fix that problem
you have to make change in the root PhoneApplicationPage tag, of MainPage.xaml
change the attribute.
SupportedOrientations="Portrait" to: SupportedOrientations="PortraitOrLandscape"
SupportedOrientations is a property of PhoneApplicationPage. It's set to a member of the SupportedPageOrientation enumeration, either Portrait, Landscape, or PortraitOrLandscape. Now when you turn the phone or emulator sideways, the contents of the page shift around accordingly:
Two of the most important properties in working with dynamic layout are HorizontalAlignment and VerticalAlignment. on the other hand, if you now needed to stack a bunch of text strings, you would probably find it straightforward in XNA, but not so obvious in Silverlight. Rest assured that there are ways to organize elements in Silverlight. A whole category of elements called panels exist solely for that purpose. You can even position elements based on pixel coordinates, if that's your preference.
Normally a Grid organizes its content into cells identified by row and column, but this program puts nine TextBlock elements in a single-cell Grid to demonstrate the use of HorizontalAlignment and VerticalAlignment in nine different combinations:
Example
<Grid
x:Name="ContentPanel"
Grid.Row="1"
Margin="12,0,12,0">
<TextBlock
Text="Top-Left"
VerticalAlignment="Top"
HorizontalAlignment="Left" />
<TextBlock
Text="Top-Center"
VerticalAlignment="Top"
HorizontalAlignment="Center" />
<TextBlock
Text="Top-Right"
VerticalAlignment="Top"
HorizontalAlignment="Right" />
<TextBlock
Text="Center-Left"
VerticalAlignment="Center"
HorizontalAlignment="Left" />
<TextBlock
Text="Center"
VerticalAlignment="Center"
HorizontalAlignment="Center" />
<TextBlock
Text="Center-Right"
VerticalAlignment="Center"
HorizontalAlignment="Right" />
<TextBlock
Text="Bottom-Left"
VerticalAlignment="Bottom"
HorizontalAlignment="Left" />
<TextBlock
Text="Bottom-Center"
VerticalAlignment="Bottom"
HorizontalAlignment="Center" />
<TextBlock
Text="Bottom-Right"
VerticalAlignment="Bottom"
HorizontalAlignment="Right" />
</Grid>
Output
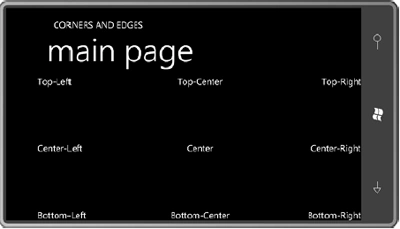
Although this screen appears to show all the combinations, the
program does not actually show the default
settings of the HorizontalAlignment and VerticalAlignment
properties. The default settings are enumeration members named
Stretch. The HorizontalAlignment and VerticalAlignment
properties are very important in the layout system in Silverlight. So is Margin. Try adding a Margin setting to the first
TextBlock in this program:
<TextBlock
Text="Top-Left"
VerticalAlignment="Top"
HorizontalAlignment="Left"
Margin="100" />
Now there's a 100-pixel breathing room between the TextBlock and the left and top edges of the client area. The Margin property is of type Thickness, a structure that has four properties named Left, Top, Right, and Bottom. If you specify only one number in XAML, that's used for all four sides.
Padding: is also of type Thickness, and when used with the TextBlock, Padding is visually indistinguishable from Margin. But they are definitely different: Margin is space on the outside of the TextBlock; Padding is space inside the TextBlock not occupied by the text itself.
You're second guessing the size of the TextBlock without knowing as much about the element as the TextBlock itself. In some cases, setting Width and Height is appropriate, but not here. The Width and Height properties are of type double, and the default values are those special floating-point values called Not a Number or NaN.
Some useful events are also available for obtaining information involving element sizes. The Loaded event is fired when visuals are first arranged on the screen; SizeChanged is supported by elements to indicate when they've changed size; LayoutUpdated is useful when you want notification that a layout cycle has occurred, such as occurs when orientation changes.
You can associate a particular event with an event handler right in XAML, but the actual event handler must be implemented in code. When you type an event name in XAML (such as SizeChanged) Visual Studio will offer to create an event handler for you. That's what I did with the SizeChanged event for the content grid:
<Grid
x:Name="ContentPanel"
Grid.Row="1"
Margin="12,0,12,0"
SizeChanged="ContentPanel_SizeChanged">
<TextBlock
Name="txtblk"
HorizontalAlignment="Center"
VerticalAlignment="Center"
/>
</Grid>
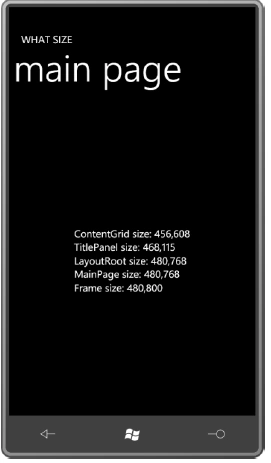
Assigning names to elements is one of two primary ways in which code and XAML interact. The second way is for the element defined in XAML to fire an event that is handled in code. Here's the handler for the SizeChanged event of the content grid as Visual Studio created it:
Example
private
void ContentPanel_SizeChanged(object sender, SizeChangedEventArgs e)
{
txtblk.Text = String.Format("ContentPanel
size: {0}\n" +
"TitlePanel size: {1}\n"
+
"LayoutRoot size: {2}\n"
+
"MainPage size: {3}\n"
+
"Frame size: {4}",
e.NewSize,
new
Size(TitlePanel.ActualWidth,
TitlePanel.ActualHeight),
new
Size(LayoutRoot.ActualWidth,
LayoutRoot.ActualHeight),
new Size(this.ActualWidth,
this.ActualHeight),
Application.Current.RootVisual.RenderSize);
}
Mike GoldPosted Nov 19, 2010, 2:43 PM
Wow. It's an honor having you write for our site, Charles. I'm a big fan or your detailed articles on MSDN as well all the way back to your books describing the Windows SDK (Programming Windows). Thanks for posting. Best, -Mike Gold