

WPF IntegerUpDown Control
I am sure you have used a NumericUpDown control in your
application in which the current value of the control increases or decreases by
using an up and down keys. WPF team has done a great job by extending this
feature in WPF Toolkit and now up and down keys can be used on DateTime,
decimal, double, and integer data types.
An IntegerUpDown control allows us to display, increment or
decrement integer values.
This article demonstrates how to use the IntegerUpDown control
in a WPF application
using C#
and XAML.
Adding Reference to WPF Toolkit
Extended Assembly
The IntegerUpDown control is a part of the WPF Toolkit Extended and does not come with Visual Studio 2010. To use the Calculator control in your application, you must add reference to the WPFToolkit.Extended.dll assembly. You can download Extended WPF Tookit from the CodePlex or you can use the WPFToolkit.Extended.dll available with this download. All you need is the DLL. See Downloads section of this article. You can find more details in my blog Adding Reference to WPF Toolkit Extended.
Creating a IntegerUpDown
The IntegerUpDown element represents a WPF IntegerUpDown control in XAML. The IntegerUpDown control is defined in the System.Windows.Controls namespace. Listing 1 creates a simple IntegerUpDown control. The Value property is a numeric value. The FormatString property is used to format a value.
<wpfx:IntegerUpDown Height="30" Value="12895" FormatString="F" Margin="221,26,143,254" />
Listing 1
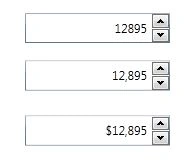
Format Types
To format a value, the IntegerUpDown
control provides C, F, G, N, and P for Currency, Floating Point, General,
Number, and Percent respectively.
The code Listing 2 creates three IntegerUpDown controls and
displays three different formats.
Join the conversation! Your thoughts help the community grow.