

Proper layout and positioning are a vital part of interactive, high-performance and user-friendly Windows applications. This series of articles explains the layout process in WPF. The series starts with an understanding of the WPF layout process. The next part of this series will cover the basics of layout and positioning such as size, margin, padding and alignment of elements. Later in this series, I will cover various panels and related parent controls available in WPF.
Table of Contents
- WPF Layout System: An Introduction
- WPF Layout: Size, Width and Height
- WPF Layout: Margins
- WPF Layout: Horizontal and Vertical Alignment
- WPF Layout: Content Alignments
- WPF Layout: Dealing with Percentage Size in WPF
- WPF Layout: Panels
- WPF Layout: Canvas
- WPF Layout: DockPanel
- WPF Layout: Grid
- WPF Layout: StackPanel
- WPF Layout: WrapPanel
- WPF Layout: Border
- WPF Layout: VirtualizingStackPanel
Introduction
In the previous article, WPF Layout: StackPanel, I discussed the StackPanel. This article focuses on the WrapPanel in details.
WrapPanel
WrapPanel is similar to StackPanel but it has an additional feature. If elements that are stacked horizontally or vertically don't fit in the row or column they are in, the remaining elements will wrap around in the same sequence.
The WrapPanel element in XAML represents a WrapPanel. The following code snippet creates a WrapPanel and sets its height, width and background properties at design-time using XAML.
- <WrapPanel Width="300" Height="200" Background="LightBlue" />
- <WrapPanel Width="300" Height="200" Background="LightBlue" Orientation="Vertical" ItemHeight="100" ItemWidth="100" />
The code snippet in Listing 1 creates a WrapPanel control and keeps its orientation to horizontal by default.
- <WrapPanel >
- <Ellipse Width="100" Height="100" Fill="Red" />
- <Ellipse Width="90" Height="90" Fill="Orange" />
- <Ellipse Width="80" Height="80" Fill="Yellow" />
- <Ellipse Width="70" Height="70" Fill="LightGreen" />
- <Ellipse Width="60" Height="60" Fill="Green" />
- <Ellipse Width="50" Height="50" Fill="LightBlue" />
- <Ellipse Width="40" Height="40" Fill="Blue" />
- <Ellipse Width="30" Height="30" Fill="Black" />
- </WrapPanel>
Listing 1
The output looks as in Figure 1 where all the child controls are wrapped horizontally.

Figure 1
Now if you change the orientation to vertical as in the following code, the output looks as in Figure 2.
- <WrapPanel Orientation="Vertical">
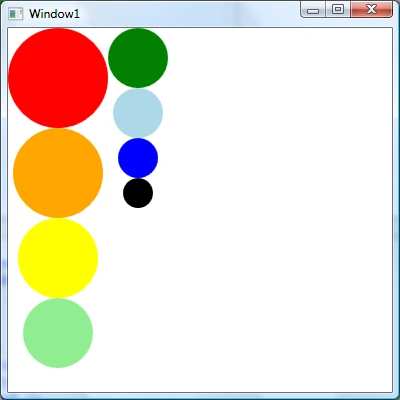
Figure 2
- private void CreateDynamicWrapPanel()
- {
- // Create a WrapPanel and set its properties
- WrapPanel dynamicWrapPanel = new WrapPanel();
- dynamicWrapPanel.Background = new SolidColorBrush(Colors.LightBlue);
- dynamicWrapPanel.Orientation = Orientation.Horizontal;
- // Create Ellipses and add to StackPanel
- Ellipse redCircle = new Ellipse();
- redCircle.Width = 100;
- redCircle.Height = 100;
- redCircle.Fill = new SolidColorBrush(Colors.Red);
- dynamicWrapPanel.Children.Add(redCircle);
- Ellipse orangeCircle = new Ellipse();
- orangeCircle.Width = 80;
- orangeCircle.Height = 80;
- orangeCircle.Fill = new SolidColorBrush(Colors.Orange);
- dynamicWrapPanel.Children.Add(orangeCircle);
- Ellipse yellowCircle = new Ellipse();
- yellowCircle.Width = 60;
- yellowCircle.Height = 60;
- yellowCircle.Fill = new SolidColorBrush(Colors.Yellow);
- dynamicWrapPanel.Children.Add(yellowCircle);
- Ellipse greenCircle = new Ellipse();
- greenCircle.Width = 40;
- greenCircle.Height = 40;
- greenCircle.Fill = new SolidColorBrush(Colors.Green);
- dynamicWrapPanel.Children.Add(greenCircle);
- Ellipse blueCircle = new Ellipse();
- blueCircle.Width = 20;
- blueCircle.Height = 20;
- blueCircle.Fill = new SolidColorBrush(Colors.Blue);
- dynamicWrapPanel.Children.Add(blueCircle);
- // Display WrapPanel into a Window
- RootWindow.Content = dynamicWrapPanel;
- }
Listing 2
Summary
In this article, I discussed the WrapPanel in WPF. In the next article of this series, I will focus on Borders of WPF elements in details.
Nayan PatelPosted May 15, 2015, 5:35 PM
I am using automation tool HP UFT 12.02 for automation testing. I had issue on object recolonization on WPF grid and WPFLIST. When I spy I am not able to get in sub tree objects information under WPFLIST(Custom Object). I tried other third party spy tool(Automation spy) and it was recognize child object under WPFList. Can you give me some idea how to dis-wrap this object under grid. Attached screen shot for more information. Thank you so much for your co-operation. Have a nice day.
Gowtham RajamanickamPosted Apr 6, 2015, 9:59 AM
simply sooperb sir