

In the previous article "Your first animations using xaml and silverlight - Color animation: Part I", we've exposed a technique of how to deal with color animation. In this article, I will do same thing but with a different animation. I mean the DoubleAnimation class this time.
Remember if you have already deal with some Ajax frameworks, when under certain conditions you can obtain rounded corners div or panel. We will do the same thing through using a double animation to perform an interpolation between two states. I mean, we will transform the four sharp corners of a given rectangle to rounded corners when the mouse enters the rectangle and the inverse animation will be performed if the mouse leaves the rectangle. We do so using the both RadiusX and RadiusY properties.
If you run both XAML and C# pieces of code, you will observe this phenomenon:
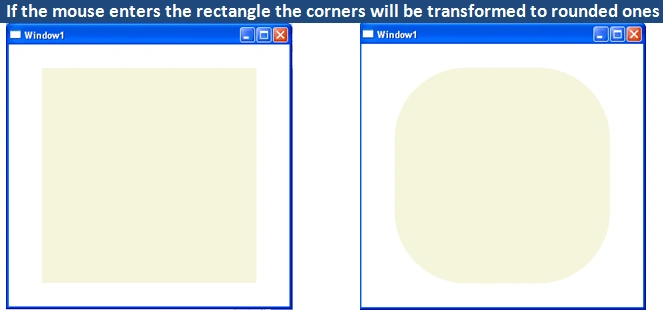
Figure 1
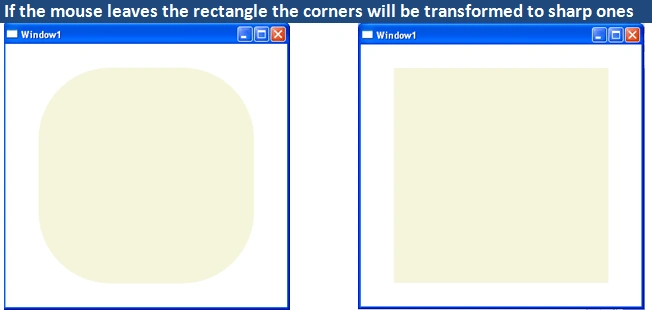
Figure 2
To perform this I propose both codes:
XAML code
- <Window x:Class="myWpfApplication.Window1"
- xmlns="http://schemas.microsoft.com/winfx/2006/xaml/presentation" xmlns:x="http://schemas.microsoft.com/winfx/2006/xaml" Title="Window1" Height="400" Width="400" Loaded="Window_Loaded">
- <!—The rectangle extends the Animatable class so it can be target of an Animation therefore a chose it -->
- <Rectangle Name="myRectangle" Width="300" Height="300">
- <Rectangle.Triggers>
- <!—The mouse enter event is the one that triggers the animation -->
- <EventTrigger RoutedEvent="Rectangle.MouseEnter">
- <BeginStoryboard>
- <!—The Storyboard is a sort of aniamtion container-->
- <Storyboard>
- <!—The duration and the targeted properties witch are RadiusX, RadiusY, will Be subject of the aniamtions, all parameters are set within the animations tag -->
- <DoubleAnimation Storyboard.TargetName="myRectangle"
- Storyboard.TargetProperty="(Rectangle.RadiusX)"
- From="0" To="100"
- Duration="0:0:8"/>
- <DoubleAnimation Storyboard.TargetName="myRectangle"
- Storyboard.TargetProperty="(Rectangle.RadiusY)"
- From="0" To="100"
- Duration="0:0:8"/>
- </Storyboard>
- </BeginStoryboard>
- </EventTrigger>
- <EventTrigger RoutedEvent="Rectangle.MouseLeave">
- <BeginStoryboard>
- <Storyboard>
- <DoubleAnimation Storyboard.TargetName="myRectangle"
- Storyboard.TargetProperty="(Rectangle.RadiusX)"
- From="100" To="0"
- Duration="0:0:8"/>
- <DoubleAnimation Storyboard.TargetName="myRectangle"
- Storyboard.TargetProperty="(Rectangle.RadiusY)"
- From="100" To="0"
- Duration="0:0:8"/>
- </Storyboard>
- </BeginStoryboard>
- </EventTrigger>
- </Rectangle.Triggers>
- </Rectangle>
- </Window>
In order to perform the same task, open a new project > WPFApplication then drag and drop a new rectangle.
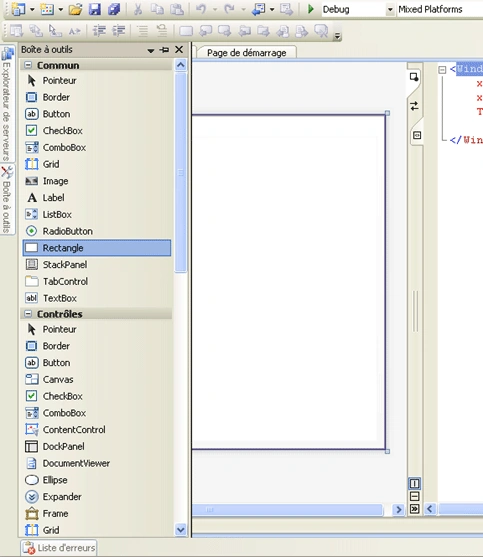
Figure 3
Then right click on it and choose the properties menu.
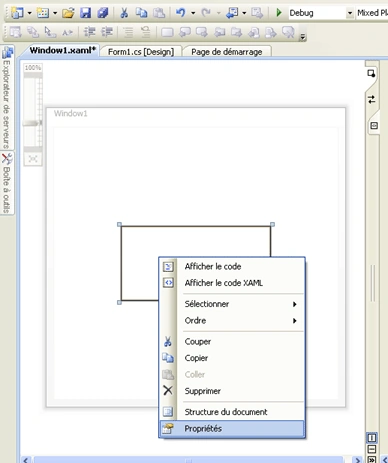
Figure 4
Then, select the properties menu item and set it property name to "myRectangle" width to "250" and it height to "250".
Then implement the code as below, but don't forget to append System.Windows.Media.Animation namespace to the project:
- //This animation is for RadiusX
- DoubleAnimation oDoubleAnimation1;
- //This animation is for RadiusY
- DoubleAnimation oDoubleAnimation2;
- private void Window_Loaded(object sender, RoutedEventArgs e)
- {
- //Change the rectangle back color to beige
- myRectangle.Fill = Brushes.Beige;
- //Those two lines are responsibles for triggering events MouseEnter and MouseLeave
- myRectangle.MouseEnter += new MouseEventHandler(myRectangle_MouseEnter);
- myRectangle.MouseLeave += new MouseEventHandler(myRectangle_MouseLeave);
- }
- private void myRectangle_MouseEnter(object sender, RoutedEventArgs e)
- {
- //Set the oDoubleAnimation1
- oDoubleAnimation1 = new DoubleAnimation();
- //Set the transformation duration to 8 seconds
- oDoubleAnimation1.Duration = TimeSpan.FromSeconds(8);
- //The initial RadiusX value
- oDoubleAnimation1.From = 0;
- //The final RadiusX value
- oDoubleAnimation1.To = 100;
- //Trigger the animation
- myRectangle.BeginAnimation(Rectangle.RadiusXProperty, oDoubleAnimation1);
- //Set the oDoubleAnimation2
- oDoubleAnimation2 = new DoubleAnimation();
- //Set the transformation duration to 8 seconds
- oDoubleAnimation2.Duration = TimeSpan.FromSeconds(8);
- //The initial RadiusY value
- oDoubleAnimation2.From = 0;
- //The final RadiusY value
- oDoubleAnimation2.To = 100;
- //Trigger the animation
- myRectangle.BeginAnimation(Rectangle.RadiusYProperty, oDoubleAnimation2);
- }
- private void myRectangle_MouseLeave(object sender, RoutedEventArgs e)
- {
- //Set the oDoubleAnimation1
- oDoubleAnimation1 = new DoubleAnimation();
- //Set the transformation duration to 8 seconds
- oDoubleAnimation1.Duration = TimeSpan.FromSeconds(8);
- //The initial RadiusX value
- oDoubleAnimation1.From = 100;
- //The final RadiusX value
- oDoubleAnimation1.To = 0;
- //Trigger the animation
- myRectangle.BeginAnimation(Rectangle.RadiusXProperty, oDoubleAnimation1);
- //Set the oDoubleAnimation2
- oDoubleAnimation2 = new DoubleAnimation();
- //Set the transformation duration to 8 seconds
- oDoubleAnimation2.Duration = TimeSpan.FromSeconds(8);
- //The initial RadiusY value
- oDoubleAnimation2.From = 100;
- //The final RadiusY value
- oDoubleAnimation2.To = 0;
- //Trigger the animation
- myRectangle.BeginAnimation(Rectangle.RadiusYProperty, oDoubleAnimation2);
- }
Good Dotneting!!!
Marty DavisPosted Mar 25, 2011, 6:10 PM
I think that there was something left out of the xaml part of the code.
Frank PattonPosted Feb 9, 2009, 3:46 PM
Did You use WPF or Silverlight to get this example to Work?