
Introduction
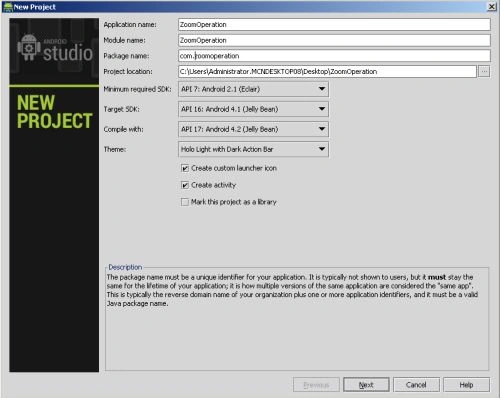
Step 1
Create a new project like this:
Step 2
Create an XML file and write the following code.
In this, you will use an ImageView and two Buttons inside the LinearLayout of which the orientation is set to vertical.
- <RelativeLayout xmlns:android="http://schemas.android.com/apk/res/android"
- xmlns:tools="http://schemas.android.com/tools"
- android:layout_width="match_parent"
- android:layout_height="match_parent"
- android:paddingLeft="@dimen/activity_horizontal_margin"
- android:paddingRight="@dimen/activity_horizontal_margin"
- android:paddingTop="@dimen/activity_vertical_margin"
- android:paddingBottom="@dimen/activity_vertical_margin"
- tools:context=".MainActivity"
- android:background="#E0A51B">
- <LinearLayout
- android:layout_height="wrap_content"
- android:layout_width="fill_parent"
- android:orientation="vertical">
- <ImageView
- android:id="@+id/imageVIEW"
- android:layout_width="fill_parent"
- android:layout_height="150dp"
- android:background="@drawable/man_of_steel"
- android:layout_centerHorizontal="true"
- >
- </ImageView>
- <Button
- android:id="@+id/btnZoom_In"
- android:layout_height="wrap_content"
- android:layout_width="150dp"
- android:text="StartZoomIn"
- android:layout_centerHorizontal="true"
- android:layout_marginLeft="70dp"
- android:layout_marginTop="40dp"
- />
- <Button
- android:id="@+id/btn_Zoom_out"
- android:layout_height="wrap_content"
- android:layout_width="150dp"
- android:text="StartZoomOut"
- android:layout_centerHorizontal="true"
- android:layout_marginLeft="70dp"
- android:layout_marginTop="40dp"
- />
- </LinearLayout>
- </RelativeLayout>
Step 3
Now you will create a folder named anim inside the res folder. And inside the res folder, you will create two XML files, zoom_in, and zoom_out.
In the zoom_in.xml file you will write this:
- <?xml version="1.0" encoding="utf-8"?>
- <set xmlns:android="http://schemas.android.com/apk/res/android"
- android:fillAfter="true" >
- <scale
- xmlns:android="http://schemas.android.com/apk/res/android"
- android:duration="2000"
- android:fromXScale="1"
- android:fromYScale="1"
- android:pivotX="50%"
- android:pivotY="50%"
- android:toXScale="3"
- android:toYScale="3" >
- </scale>
- </set>
In zoom_out XML file you will write this
- <?xml version="1.0" encoding="utf-8"?>
- <set xmlns:android="http://schemas.android.com/apk/res/android"
- android:fillAfter="true" >
- <scale
- xmlns:android="http://schemas.android.com/apk/res/android"
- android:duration="1000"
- android:fromXScale="1.0"
- android:fromYScale="1.0"
- android:pivotX="50%"
- android:pivotY="50%"
- android:toXScale="0.5"
- android:toYScale="0.5" >
- </scale>
- </set>
Step 4
Create a Java class file and write the following code.
In this class file first, you will create the id of the image view, button, and an Animation reference variable. The Animation reference variable will hold the object that will be returned by the loadAnimation method() method. After getting the object of the animation call setAnimationListener () will set the listener to the animation. Use a button and set it on setonClicklIstener to perform the animation on button click. Inside the OnClick method set the imageview on startAniamtion() method to start the animation on the button click.
Step 5
When you run your project:
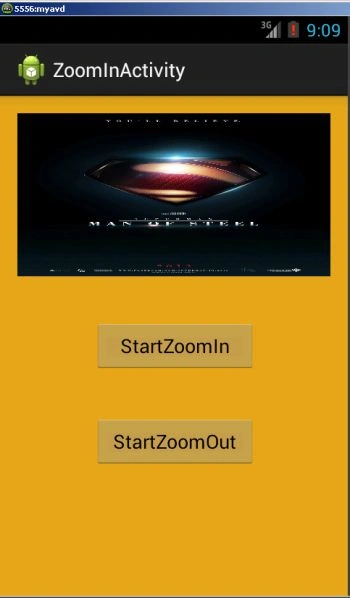 Step 6
After clicking on the zoomin button:
Step 6
After clicking on the zoomin button:
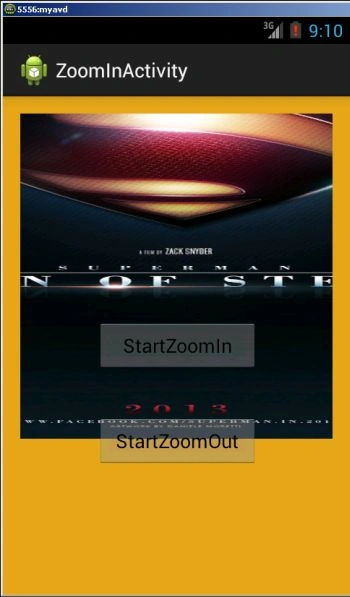 Step 7
After clicking on the zoomout button:
Step 7
After clicking on the zoomout button:
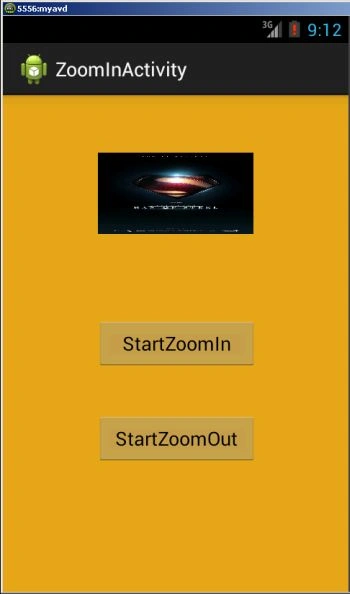 So in this article, you have learned how to perform zoom in and zoom out operations on Imaheview on a button click.
- package com.zoominactivity;
- import android.app.Activity;
- import android.os.Bundle;
- import android.view.View;
- import android.view.animation.Animation;
- import android.view.animation.AnimationUtils;
- import android.widget.Button;
- import android.widget.ImageView;
- public class MainActivity extends Activity implements Animation.AnimationListener {
- ImageView imageview;
- Button button1,button2;
- Animation animation,animation2;
- @Override
- protected void onCreate(Bundle savedInstanceState) {
- super.onCreate(savedInstanceState);
- setContentView(R.layout.activity_main);
- imageview=(ImageView)findViewById(R.id.imageVIEW);
- button1=(Button)findViewById(R.id.btnZoom_In);
- button2=(Button)findViewById(R.id.btn_Zoom_out);
- animation= AnimationUtils.loadAnimation(getApplicationContext(),R.anim.zoom_in);
- animation2= AnimationUtils.loadAnimation(getApplicationContext(),R.anim.zoom_out);
- animation.setAnimationListener(this);
- button1.setOnClickListener(new View.OnClickListener() {
- @Override
- public void onClick(View view) {
- imageview.startAnimation(animation);
- }
- });
- button2.setOnClickListener(new View.OnClickListener() {
- @Override
- public void onClick(View view) {
- imageview.startAnimation(animation2);
- }
- });
- }
- @Override
- public void onAnimationStart(Animation animation) {
- }
- @Override
- public void onAnimationEnd(Animation animation) {
- }
- @Override
- public void onAnimationRepeat(Animation animation) {
- }
- }
Join the conversation! Your thoughts help the community grow.