
In this guide, we will create a virtual machine in Azure to deploy a web server.
Prerequisites
An Azure subscription. If you don’t have an Azure subscription, you can create a free account.
here we go!
1. Creating a Resource Group
Steps
- Go to Azure Services and click on “Create a Resource” and then
let’s look for Resource Groups. - Click on the Resource Group and then and then click on Create.
- We want to give it a name in order to find it later.
- In the Resource Group name, type RG-USE-NextCloud(RG-Resource Group and USE-US-EAST).
- Now, click on Review + Create and then click on Create.
- That’s it. You have created a Resource Group.
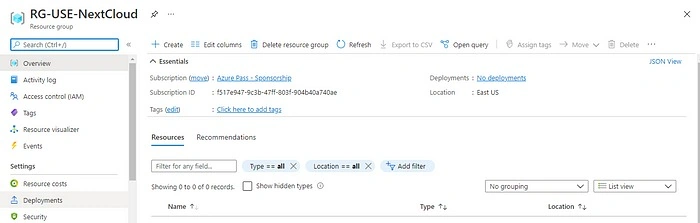
Resource Group
You will get a Screen like this. So, you have created your first resource inside Azure, specifically a Resource Group, that’s going to contain
all resources related to our Virtual Machine.
2. Creating a Virtual Network and a Subnet
What is a Virtual Network?
A virtual network is a network where all devices, servers, virtual machines, and data centers that are connected are done so through software and wireless technology.
Steps
- Click on Create and then search for Virtual Network.
- Click on the Virtual Network and then click Create.
- In the Instance details give the name for the Virtual Network: VNET-USE-NextCloud.
- Leave the default region.
- Next, Click on IP Addresses. In the IPv4 address space, type 172.10.0.0/16.
- Then click on Add subnet and under the subnet name type SNET-USE-NextCloud and in the subnet address range type 172.10.0.0/24.
- Now click on Add and then click on Review + Create and then Create.
- Now you can see that our Virtual Network has been created.

3. Protecting a Subnet Using a Network Security Group
Network Security Group
A network security group contains security rules that allow or deny inbound network traffic to, or outbound network traffic from, several types of Azure resources. It also provides control over network traffic flowing in and out of your services running in Azure.
Steps
- Go back to Resource Group, Click on Create, and then search for Network Security Group.
- Click on the Network Security Group and then click on Create.
- In the Instance details give the name for the Resource: NSG-USE-NextCloud.
- Now click on Review + Create and then click again on Create.
- Now you can see that Azure created some Inbound and Outbound security rules.
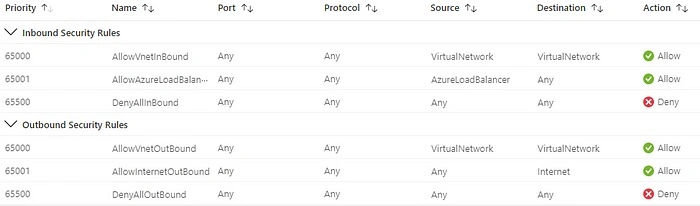
Inbound and Outbound security rules
Now let us assign these rules to our subnets.
- Again go back to the Resource Group.
- Now go to the Virtual Network that we have created and then click on subsets and then click on the subnet that we have created i.e. SNET-USE-NextCloud.
- Then click on Network Security Group and add the Network Security Group that we have created i.e. NSG-USE-NextCloud and then click on Save.
4. Deploying Bastion to Connect to a Virtual Machine
In order to use Bastion to connect to our virtual machine, we need to create a subnet for it.
- Now go back to Virtual Network and click on Subnet.
- We can now create a new subnet by clicking on +subnet.
- Now set the name to AzureBastionSubnet, leave the subnet address range as default, and then click on save.
Now let us create the Bastion Resource.
Steps
- Now go to Resource Group, i.e. RG-USE-NextCloud, and click on create and then search for Bastion and click on create.
- In the Instance details give the name for the Bastion: BASTION-USE-NextCloud.
- Now Select the Virtual Network that we have created in the Virtual Network.
- Then change the Public IP address name to BASTIONIP-USE-NextCloud and then click on Review + create and then click on create.
5. Creating a Ubuntu Server Virtual Machine
Steps
- Go to Resource Group and click on Create and in the popular you can find the Ubuntu Server 20.04 LTS. Click on it.
- In the Instance details give the name for the Virtual Machine: VM-USE-NextCloud.
- In the Availability options, choose Availability Zone and the Availability Zone as Zone 1.
- In the Size click on see all the sizes. Now choose the B1s and click on select.
- In the Username, I am giving my name Gowtham.
- Set the public inbound ports to None.
- Now click on Next: Disks
- Leave the defaults and click on Next: Networking
- In the Network Interface set the Public IP to None and now click on Review + Create and then click on Create.
- Azure will show a Generate Key Pair tab, as we have requested the key pair before. Click on the Download private key and create a resource.
6. Installing Nextcloud by Connecting Via SSH Using Bastion
- Now go to the Virtual Machine that we have created, i.e VM-USE-NextCloud, and then click on connect, and then choose BASTION.
- Click on Use Bastion.
- In the username, type the name that you have used before. In my case, it is Gowtham.
- In the Authentication, choose SSH Private Key from Local File.
- In the Local File choose the SSH private key file that you have downloaded before and then click on connect.
- If your Pop-ups are blocked click on the browser tab and then always allow pop-ups and then try to connect again.
- Now let’s do a basic next cloud installation by typing: $ sudo snap install nextcloud
- Let us create a simple administrative account with a sample username and password by typing $ sudo nextcloud.manual-install admin azure.
- In this case, the username is admin, and the password is Azure.
- Let’s encrypt the certificate by typing $ sudo nextcloud.enable-https self-signed
- Now, we can exit from the SSH by using $ exit and then click on close.
7. Publishing an IP
- Now go to the networking tab and then click on the network interface.
- Then, go to IP configurations click on ipconfig1 click on Associate, and click on Create new, let us give it a name: VMIP-USE-NextCloud, select the standard SKU and then click on OK.
- Next, click on save to save this new configuration.
- Now go back to the Virtual Machine that you have created, i.e. VM-USE-NextCloud.
- Now go to overview, click on the public IP address in the networking, and copy it.
- Now open a new tab in your browser type https:// and paste the IP address that you have copied.
- It will not work because we didn’t have a rule in order to allow the inbound HTTPS traffic in our Network Security Group.
- So we want to open the inbound traffic to our NextCloud Server, but we want the traffic to be allowed only when it is coming from our current IP.
- In order to find your current IP go to https://whatismyipaddress.com/ and copy your current IP address.
- Now again, go back to the Virtual Machine that you have created and click on networking.
- Then, click on the Add inbound security rule. The source should be the IP Address and in the source IP Address paste the Current IP that we have copied. The destination should be IP Addresses the Destination IP Addresses should be 172.10.0.4 and the service should be HTTPS edit the name of the rule to HTTP_NextCloud and then click on add.
- Now again, go to the Networking in the Virtual Network and then copy the NIC Public IP.
- Now go to a new tab, type https://, and copy the NIC Public IP.
- Ignore the warning and then proceed to it.
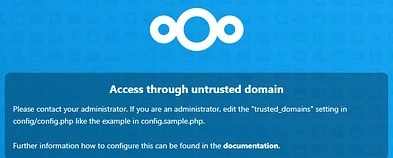
8. Creating a DNS Label
- Now go to the Virtual Network that you have created and then click on the public IP, i.e. VMIP-USE-NextCloud.
- Then, go to Configurations, and in the DNS name label, give a name, in my case gowthamnextcloud and then click on save.
- Now go back to your Resource Group and then click on Virtual Machine where you can find the public IP and the DNS name.
- Now, click on connect choose Bastion, and then use Bastion and give a username in my case it is Gowtham then upload the private key from the local file as done before, and then click on connect.
- Now lets us communicate our DNS Label to NextCloud by typing $ sudo nextcloud.occ config:system:set trusted_domains 1 — value=gowthamnextcloud.eastus.cloudapp.azure.com in my case and then click enter.
- Type exit and then close the Bastion.
- Now go to a new tab and type http:// your DNS name.
- Now ignore the warning, click on Advanced and then proceed to it.
- Now type the credentials that you have created before.
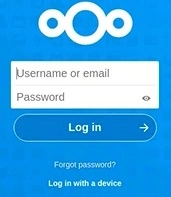
Congratulations!! You have done this Project and learned a lot of Azure Basics.
Follow me on LinkedIn! Did you like the guide? Leave a comment below and share it in your socials!
Also any comment on anything missing or not right is very welcome. Long live the Azure Learning community!
Join the conversation! Your thoughts help the community grow.