

Master Page
Master Page is a layout which will give you the consistent look, feel and behavior for all the pages (or group of pages) in your web site or application.
Basically Master page is a template for other pages which shared layout and functionality with the pages. Master Page contains the ContentPlaceHolder, which is overridden by the content pages. Content page contains only the content. The output is a combination of Master page and content page.Step 1: Create a New Web Site
Go to File menu then
New then Web Site then Select ASP.Net Empty
Web Site like the following.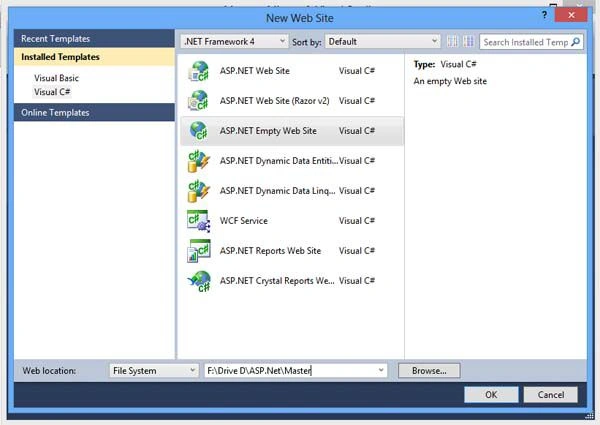
Step 2: Take a Master Page
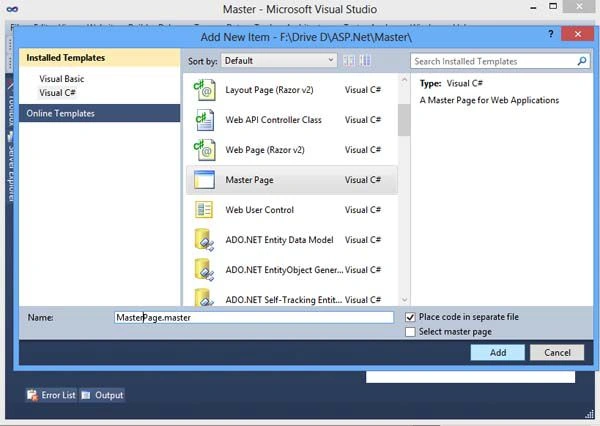
Right click on the project in the solution bar Select Add New Item and Select Master Page from the Template and give a name or leave the name and click Add.
Step 3: Write Code as follows
<html xmlns="http://www.w3.org/1999/xhtml">
<head id="Head1" runat="server">
<title>
<asp:ContentPlaceHolder ID="title" runat="server">
</asp:ContentPlaceHolder>
</title>
<link href="Styles/main.css" rel="stylesheet" type="text/css" />
<asp:ContentPlaceHolder ID="head" runat="server">
</asp:ContentPlaceHolder>
</head>
<body>
<form id="form1" runat="server">
<div class="wrapper">
<div class="menu">
<ul>
<li class="navigation_first_item"><a href="Default.aspx">Home</a></li>
<li><a href="Category.aspx">Category</a></li>
<li><a href="#">Contact Us</a></li>
<li><a href="#">About Us</a></li>
</ul>
</div>
<div class="clear">
</div>
<div class="content">
<asp:ContentPlaceHolder ID="contentBody" runat="server">
</asp:ContentPlaceHolder>
</div>
<div class="clear">
</div>
<div class="footer">
<h2>
[email protected]</h2>
</div>
</div>
</form>
</body>
</html>
Step 4: Take Default and Category page
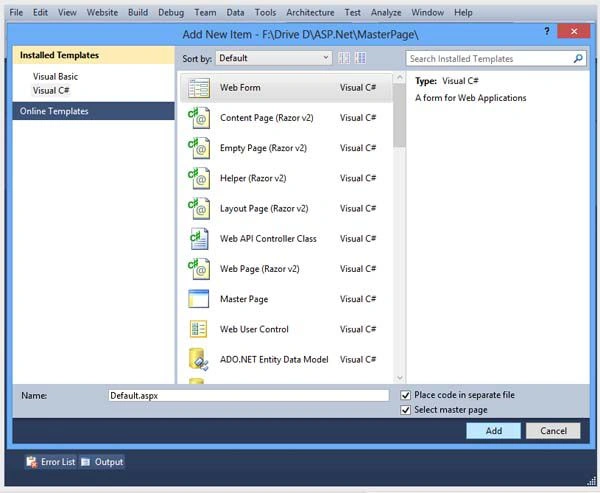
Right Click on the project and click Add New Item and then select Web Form and make sure you are selecting the check box “Select Master Page“.
Style Sheet
/* --------- RESET --------- */
body,div,dl,dt,dd,ul,ol,li,h1,h2,h3,h4,h5,h6,pre,form,fieldset,textarea,p,blockquote,th,td
{
padding: 0;
margin: 0;
}
/*body*/
body
{
background-color: rgb(237, 237, 237);
font-family: "Arial",Helvetica,sans-serif;
font-size: 12px;
}
/*Page*/
.wrapper
{
width: 950px;
margin: auto;
}
/* Home Page */
.content
{
width: 100%;
background-color: rgb(254, 254, 254);
border: 1px solid rgb(224, 224, 224);
border-radius: 5px 5px 5px 5px;
float: left;
margin-top: 8px;
margin-bottom: 8px;
min-height: 400px;
}
/*Menu*/
.menu {
background-color: rgb(10, 110, 178);
width: 100%;
margin: 0px 0px 10px;
padding: 0px;
height: 40px;
color: rgb(243, 243, 243);
border-radius: 5px 5px 5px 5px;
}
.navigation_first_item{
border-left:0px;
/*-moz-border-radius: 5px 0 0 5px;
-webkit-border-radius: 5px 0 0 5px;*/
border-radius: 5px 0 0 5px;
}
.navitem_s {
float: left;
border-right: 1px solid rgb(10, 85, 125);
border-left: 1px solid rgb(67, 153, 200);
height: 40px;
background-color: rgb(14, 79, 114);
}
.menu ul {
}
.menu ul li {
float: left;
display: block;
list-style: none;
border-right: 1px solid rgb(10, 85, 125);
border-left: 1px solid rgb(67, 153, 200);
}
.menu ul li.navigation_first_item:hover {
border-radius: 5px 0px 0px 5px;
}
.menu ul li a
{
font-size: 13px;
font-weight: bold;
line-height: 40px;
padding: 8px 20px;
color: rgb(255,255,255);
text-decoration: none;
}
.menu ul li:hover {
background-color: rgb(14, 79, 114);
border-right: 1px solid rgb(14, 89, 130);
}
.clear
{
clear: both;
}
/*Footer*/
.footer {
height: 50px;
background-color: rgb(10, 110, 178);
color: rgb(255,255,255);
border-radius: 5px 5px 5px 5px;
}
.footer h2
{
padding: 15px;
text-align: center;
}
Martin vonSteinPosted Nov 16, 2018, 3:48 AM
Hi Ripon, I really like that template and your tutoriol on YouTube. Could you point out how one could highlight the list item that had been clicked on in the menu? That would make the site navigation easier. Thanks. Martin