

Introduction
Support Library Setup


However I have Installed them when Android Studio was installed in my PC but there is no need to worry, the procedure is clearly specified above. After downloading the Support library to your application then use the following procedure.
After following the preceding procedure now we need to understand how to add the commands or lines of code in the Fragment class. To use a Support Library, we must modify the application's project's classpath dependencies within the development environment.
Some Support Libraries contain resources beyond compiled code classes, such as images or XML files. For example, the" v7 appcompat" and "v7 gridlayout" libraries include resources.
Adding the support library
How to add the support libraries?
- Without Resource
In the Android studio, there is a different procedure because of Gradle in the build.gradle file. All the dependencies must be put here. Now add the Android support repository here with the following line of code.However, this plus signifies the use of the version higher than this.
- dependencies {
- ...
- compile "com.android.support:support-v4:18.0.+"
- }
- With Resource
In the Android Studio as said previously there is a different scenario. Here now add code to the dependencies in Android Studio 1.0 as shown below.
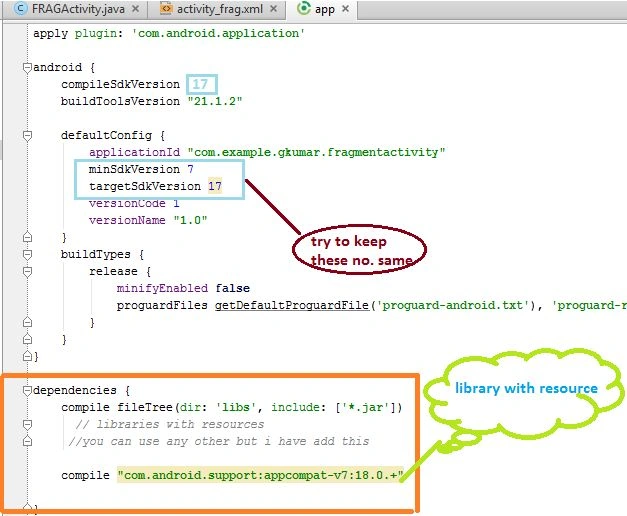
Creating the Fragment Class
- package com.example.gkumar.fragmentactivity;
- import android.app.Fragment;
- import android.support.v7.app.ActionBarActivity;
- import android.os.Bundle;
- import android.view.LayoutInflater;
- import android.view.Menu;
- import android.view.MenuItem;
- import android.view.View;
- import android.view.ViewGroup;
- public class FRAGActivity extends Fragment {
- @Override
- public View onCreateView(LayoutInflater inflater, ViewGroup container,Bundle savedInstanceState) {
- // Inflate the layout for this fragment
- return inflater.inflate(R.layout.FRAGActivit_view, container, false);
- }
- }
- <LinearLayout xmlns:android="http://schemas.android.com/apk/res/android"
- xmlns:tools="http://schemas.android.com/tools"
- android:orientation="horizontal"
- android:layout_width="fill_parent"
- android:layout_height="fill_parent">
- <fragment android:name="com.example.gkumar.fragmentactivity"
- android:id="@+id/headlines_fragment"
- android:layout_weight="1"
- android:layout_width="0dp"
- android:layout_height="match_parent" />
- <fragment android:name="com.example.gkumar.fragmentactivity"
- android:id="@+id/article_fragment"
- android:layout_weight="2"
- android:layout_width="0dp"
- android:layout_height="match_parent" />
- <TextView android:text="@string/hello_world"
- android:layout_width="wrap_content"
- android:layout_height="wrap_content" />
- </LinearLayout>
- import android.os.Bundle;
- import android.support.v4.app.FragmentActivity;
- public class FRAGActivity extends FragmentActivity {
- @Override
- public void onCreate(Bundle savedInstanceState) {
- super.onCreate(savedInstanceState);
- setContentView(R.layout.news_articles);
- }
- }
Note: If you are using the v7 appcompat library, your activity should instead extend ActionBarActivity that is a subclass of FragmentActivity
Gowtham RajamanickamPosted Apr 7, 2016, 4:26 AM
Good Show.
Kashif SohailPosted Mar 26, 2016, 11:26 PM
Nice share
Vithal WadjePosted Jan 21, 2015, 12:03 PM
nice