

This article will demonstrate the Insert, Update and Delete Operations in a Telerik Grid View.
It is a continuation of my earlier article - Telerik Grid View in ASP.NET MVC2- Part 1 (
http://www.c-sharpcorner.com/uploadfile/2124ae/9566/ ) - in which I
have shown how to display data in a Telerik Grid.
So if you are coming directly to this article - I would recommend you go
through Telerik
Grid View - Part 1. I will be using the project I created in Part 1
So you can download it and follow the below steps to include the Insert , Update
and Delete functionality in Telerik Grid View.
1. Model - Update Repsitory Class
- Open Models-> DataRepository.cs
- Include the below lines of Code for Insert
operations.
//Insert Record from Telerik Grid View
public int MyArticles_InsertRecord(IndexTelerikGridViewModel tempVM)
{
try
{
entities.MyArticles.AddObject(new
MyArticle()
{
Title = tempVM.sTitle,
Section = tempVM.sSection,
Views = tempVM.iViews,
Downloads = tempVM.iDownloads,
Status = tempVM.sStatus
});
entities.SaveChanges();
return 1;
}
catch (Exception
ex)
{
return 0;
}
}
-
Include the below lines of Code for Update operations.
//Update Record from Telerik Grid View
public int MyArticles_UpdateRecord(IndexTelerikGridViewModel tempVM)
{
try
{
var toUpdate = (from MyArticle in entities.MyArticles where MyArticle.ArticleID == tempVM.iArticleID select MyArticle).FirstOrDefault();
if (toUpdate != null)
{
toUpdate.Title=tempVM.sTitle;
toUpdate.Section=tempVM.sSection;
toUpdate.Views=tempVM.iViews;
toUpdate.Downloads=tempVM.iDownloads;
toUpdate.Status = tempVM.sStatus;
}entities.SaveChanges();
return 1;
}catch(Exception ex)
{
return 0;
}
}
-
Include the below lines of Code for Delete operations.
//Delete Record from Telerik Grid View
public int MyArticles_DeleteRecord(IndexTelerikGridViewModel tempVM)
{
try
{
var toDelete = (from MyArticle in entities.MyArticles where MyArticle.ArticleID == tempVM.iArticleID select MyArticle).FirstOrDefault();
if (toDelete != null)
{
entities.DeleteObject(toDelete);
entities.SaveChanges();
}return 1;
}catch (Exception ex)
{
return 0;}
}
2. Controller - Include methods for Insert, Update and Delete Action
-
Open Controllers-> HomeController.cs
-
In part 1 - we have defined one action which populated our Telerik Grid based from the database.
-
Here we will add 3 more actions which would respond for Insert, Update and Delete operations.
-
Action for Insert
//Telerik GridView-Insert Action
[AcceptVerbs(HttpVerbs.Post)]
public ActionResult ArticlesTGVInsert()
{
IndexTelerikGridViewModel objArticles = new IndexTelerikGridViewModel();
//route
values defining the grid state - current page, sort expression, filter etc.
RouteValueDictionary
routeValues=this.GridRouteValues();
if (TryUpdateModel(objArticles))
{
int success_Insert =
objRepository.MyArticles_InsertRecord(objArticles);
if (success_Insert == 1)
{
TempData["UploadValidationMessage_Success"]
= "Insert Operation Succeded!!";
}
else
{
TempData["UploadValidationMessage_Failure"]
= "Insert Operation Failded!!";
}
}
return RedirectToAction("Index",routeValues);
}
-
Action for Update
//Telerik GridView-Update Action
[AcceptVerbs(HttpVerbs.Post)]
public ActionResult ArticlesTGVUpdate(int id)
{
IndexTelerikGridViewModel objArticles = new IndexTelerikGridViewModel
{
iArticleID = id
};if (TryUpdateModel(objArticles))
{
int success_Update = objRepository.MyArticles_UpdateRecord(objArticles);
//route values defining the grid state - current page, sort expression, filter etc.
RouteValueDictionary routeValues = this.GridRouteValues();
if (success_Update == 1)
{TempData["UploadValidationMessage_Success"] = "Update Operation Succeeded";
return RedirectToAction("Index", routeValues);
}
else
{
TempData["UploadValidationMessage_Failure"] = "Update Operation Failed";
return RedirectToAction("Index", routeValues);}
}
//The model is invalid - render the current view to show any validation errors
return RedirectToAction("Index");
-
Action for Delete
//Telerik GridView-Delete Action
[AcceptVerbs(HttpVerbs.Post)]
public ActionResult ArticlesTGVDelete(int id)
{
IndexTelerikGridViewModel objArticles = new IndexTelerikGridViewModel
{
iArticleID=id
};//route values defining the grid state - current page, sort expression, filter etc.
RouteValueDictionary routeValues = this.GridRouteValues();if (objArticles == null)
{
routeValues = this.GridRouteValues();
return RedirectToAction("Index", routeValues);
}
//Delete the Record
int success_Delete = objRepository.MyArticles_DeleteRecord(objArticles);
if (success_Delete == 1)
{
routeValues = this.GridRouteValues();
TempData["UploadValidationMessage_Success"] = "Delete Operation Succeeded";
return RedirectToAction("Index", routeValues);
}
else
{
TempData["UploadValidationMessage_Failure"] = "Delete Operation Failed";
}
return RedirectToAction("Index", routeValues);
}
3. View - Update Telerik Grid View
-
Open Views->Home->Index.aspx - where we inlcuded our Telerik Grid View in part1
-
Update the Telerik Grid View Code-code in yellow background - new lines of code added to inlcude the Insert, Update and Delete button with the corresponding Actions being called.
<%=
Html.Telerik().Grid(Model)
.Name("tgvArticle")
.DataKeys(keys=>keys.Add(c=>c.iArticleID))
.ToolBar(commands => commands.Insert().ButtonType(GridButtonType.ImageAndText))
.DataBinding(databinding => databinding.Server()
.Insert("ArticlesTGVInsert", "Home")
.Update("ArticlesTGVUpdate", "Home")
.Delete("ArticlesTGVDelete", "Home"))
.Columns(columns=>
{
columns.Bound(p=>p.sTitle).Title("Title").Width(100);
columns.Bound(p=>p.sSection).Title("Section").Width(200);
columns.Bound(p=>p.iViews).Title("Views").Width(100);
columns.Bound(p=>p.iDownloads).Title("Downloads").Width(100);
columns.Bound(p=>p.sStatus).Title("Status").Width(120);
columns.Command(commands =>
{
commands.Edit().ButtonType(GridButtonType.ImageAndText);
commands.Delete().ButtonType(GridButtonType.ImageAndText);
}).Width(180).Title("Commands");
}).Pageable()
.Sortable()
.Filterable()
%>
4. Update Index.aspx - to include the Success or Faliure message
<span
style="color:Red;font-weight:bold">
<%=TempData["UploadValidationMessage_Failure"]%>
</span>
<span
style="color:Green;font-weight:bold">
<%=TempData["UploadValidationMessage_Success"]%>
</span>
5. Run the application
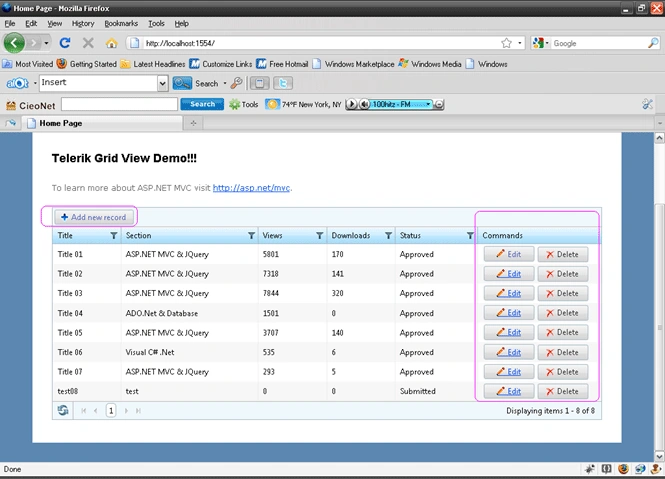
Here we have seen how to perform Insert , Update and Delete operations in
Telerik Grid View.
Happy Learning!
Sujono SiauwPosted Apr 8, 2013, 11:49 PM
Hello there, can u add : using telerik.web.mvc.extentions in homecontroller in your example above. Thx.
sunil patelPosted Nov 16, 2011, 9:53 AM
Binding ComboBox inside Grid when click edit button Like this http://demos.telerik.com/aspnet-mvc/grid/clientedittemplates
sunil pateleditedPosted Nov 16, 2011, 9:51 AMEdited Nov 21, 2011, 2:01 AM
Binding ComboBox inside Grid when click edit button