

In this article I will be demonstrating how to populate a Telerik Grid View in
ASP.NET MVC2 using Entity Framework 4.
Please go through my artcle - Working with Telerik Controls in ASP.NET - This article will
explain all of the prerequisites for working with Telerik controls in APS.NET
MVC Projects.
For demonstration here, I will be using here Visual Studio 2010(MVC2.0)
1. Create a new ASP.NET MVC2 Web application - name it as MVCTelerikGridViewDemo
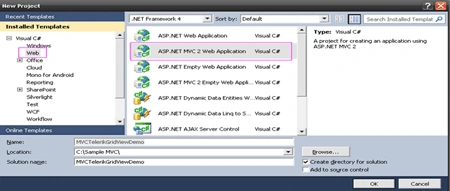
2. For this sample application - Let's not create the unit test project.- So
select the radio button - No, Do not create a unit Test Project.
3. Now we have the readymade/default ASP.Net MVC2 Project template with few
files already existing in each of the folders Model , View and Controller.
4. For this Demo - We will be placing the Telerik Grid View in existing default
View ( Views ->Home->Index.aspx)
This View is called from HomeController.cs(Controller -> HomeController.cs)
5. Create ViewModel
- ViewModel can be thought as a Model - which is responsible to supply information to a View.
- ViewModels helps us to create Strongly Typed Views.
- Right Click solution explorer -> MVCTelerikGridViewDemo -> Add -> New Folder(ViewModel) = This folder can be used for placing all the ViewModel classes of the entire project.
- Right Click ViewModels -> Add Class ->
IndexTelerikGridViewModel.cs
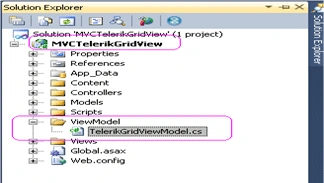
- Open IndexTelerikGridViewModel.cs -Include automatic properties representing each of the columns of the GridView.
Code - IndexTelerikGridViewModel.cs
using
System;
using
System.Collections.Generic;
using
System.Linq;
using
System.Web;
using
System.Web.Mvc;
using
System.ComponentModel.DataAnnotations;
namespace
MVCTelerikGridViewDemo.ViewModel
{
public class
IndexTelerikGridViewModel
{
public int iArticleID {
get; set; }
[Required]
public String sTitle {
get; set; }
[Required]
public string sSection {
get; set; }
[Required]
public int iViews {
get; set; }
[Required]
public int iDownloads {
get; set; }
[Required]
public string
sStatus { get; set;
}
}
}
6. Database Part
-
We will create a sample SQL Server database - create a table and insert some sample data which would be reflected in our Telerik GridView.
-
For this sample app - Let us create table by
1. Right Click the App_Data folder -> Add -> New Item -> Select SQL Server database and give it some name- TestDatabase.mdf - Click Add.
2. Double Click TestDatabase.mdf to open the Server Explorer.
3. Right Click Table - Add New Table -
- ArticleID- Primary Key(set to autoincrement by 1)
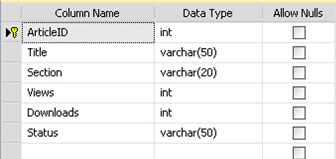
4. Save- (CTRL+S) -> Give Table Name -> MyArticles
5. Insert Sample Data - Right-click the tblState table and select option Show Table Data- and you can enter sample data.
7. Setting up the Models
-
Adding Entity Framework classes
- Entity Framework is an ORM(object relational mapper) that ships as part of .Net 4
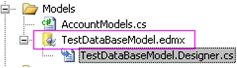
- From the Solution explorer -> Go to Models folder -> Right Click Models -> Add New Item -> Select ADO.Net Entity Data Model -> Name it -> TestDataBaseModel.edmx -> Click Add -
- Below Screenshots depicts the stepwise creation of Entity Framework Class.
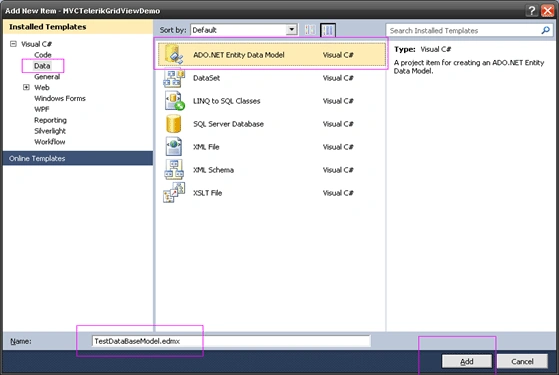
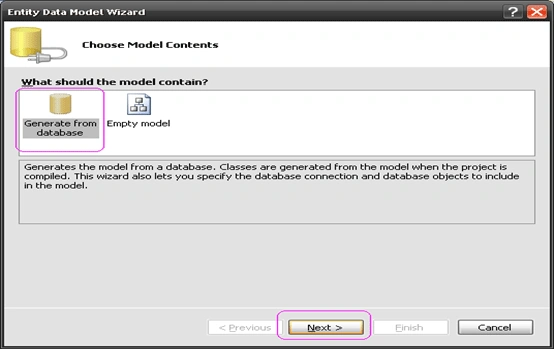
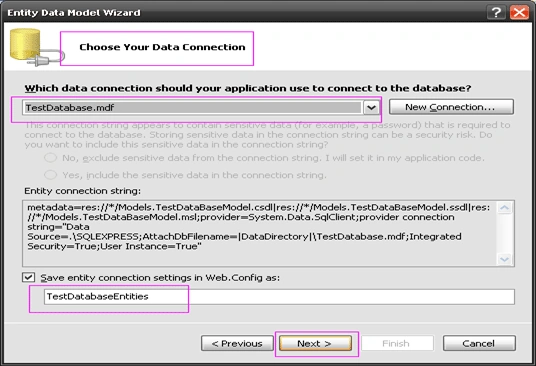
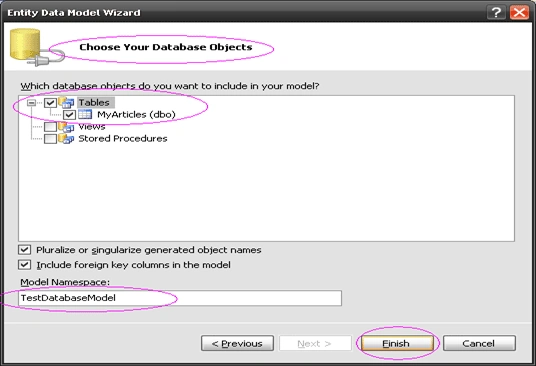
- With the Click on Finish - Our Entity Data Model is created.
-
Creating a Repository Class
- This approach using a Repository class helps encapsulate data querying and persistence logic.
- In the Repository Class - We can specify all the Querying methods required in our application
- Right Click Models-Add Class - DataRepository.cs
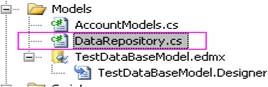
- Open DataRepository.cs
- Add the following using Statement
using
System.Web.Mvc; - Create the object of TestDatabaseEntities
- Include a function which would fetch the records to be displayed in Telerik Grid View
Code-DataRepository.cs
using System;
using System.Collections.Generic;
using System.Linq;
using System.Web;
using System.Web.Mvc;
using MVCTelerikGridViewDemo.ViewModel;namespace MVCTelerikGridViewDemo.Models
{
public class DataRepository
{
//Create an instance of TestDatabaseEntities
public TestDatabaseEntities entities = new TestDatabaseEntities();
//Fetching Records from database to be displayed in Telerik Grid
public IEnumerable<IndexTelerikGridViewModel> MyArticles_DisplayRecords()
{
try
{
var records = from MyArticle in entities.MyArticles
select new IndexTelerikGridViewModel
{
iArticleID=MyArticle.ArticleID,
sTitle=MyArticle.Title,
sSection=MyArticle.Section,
iViews=MyArticle.Views,
iDownloads=MyArticle.Downloads,
sStatus=MyArticle.Status
};
return records;
}
catch (Exception ex)
{
return null;
}
}}
}
using MVCTelerikGridViewDemo.ViewModel;
8. Now you need to perform all the steps which I
have mentioned as prerequisites before including a Telerik Control in your Views
- Working with Telerik Controls in ASP.NET
9. Views
Open Index.aspx (default View already existing in Views->Home folder)
• We can strongly type this View to our ViewModel class we created by updating
the Page directive as below-
<%@ Page Language="C#" MasterPageFile="~/Views/Shared/Site.Master" Inherits="System.Web.Mvc.ViewPage<IEnumerable<MVCTelerikGridViewDemo.ViewModel.IndexTelerikGridViewModel>>" %>
-
Include Telerik Grid View in Index.aspx
<%=
Html.Telerik().Grid(Model)
.Name("tgvArticle")
.DataKeys(keys=>keys.Add(c=>c.iArticleID))
.Columns(columns=>
{
columns.Bound(p=>p.sTitle).Title("Title");
columns.Bound(p=>p.sSection).Title("Section");
columns.Bound(p=>p.iViews).Title("Views");
columns.Bound(p=>p.iDownloads).Title("Downloads");
columns.Bound(p=>p.sStatus).Title("Status");
}).Pageable()
.Sortable()
.Filterable()
%>
10. Controller
-
Our View Index.aspx is called from HomeController.cs (Controller -> HomeController.cs)
-
Open HomeController.cs
-
Add the following using statement
using MVCTelerikGridViewDemo.Models;
using MVCTelerikGridViewDemo.ViewModel;
-
Create an instance of Repository Class which we created in Model.
DataRepository objRepository = new DataRepository();
-
Update the ActionResult Index to pass the fetched records to be displayed in the View - Index.aspx
public ActionResult Index()
{
ViewData["Message"] = "Telerik Grid View Demo!!!";
return View(objRepository.MyArticles_DisplayRecords());
}
-
Code HomeController.cs
using System;
using System.Collections.Generic;
using System.Linq;
using System.Web;
using System.Web.Mvc;
using MVCTelerikGridViewDemo.Models;
using MVCTelerikGridViewDemo.ViewModel;namespace MVCTelerikGridViewDemo.Controllers
{
[HandleError]
public class HomeController : Controller
{
DataRepository objRepository = new DataRepository();public ActionResult Index()
{
ViewData["Message"] = "Telerik Grid View Demo!!!";
return View(objRepository.MyArticles_DisplayRecords());
}
}
}
11. Output - Run the application
Telerik Grid View would be displayed on the page as -
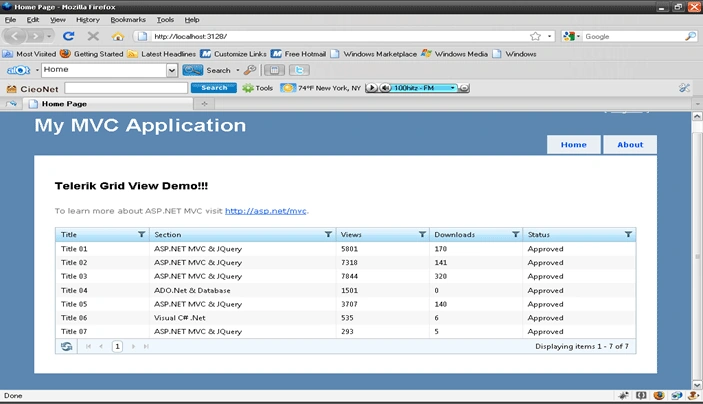
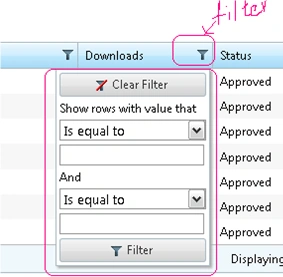
Since we have mentioned out Telerik Grid View as Pageable,Sotable and Filterable
in code (refer Telerik Grid View Code added in the View)- So all these
functionality come with this Grid.
Example - Records can be filtered based on column values
I will come soon with Part 2 of Telerik Grid View - with the Insert,Update and
Delete Operations
Happy Learning!!
nilesh mondePosted Mar 8, 2013, 2:43 AM
thanx Sourabh finally did it thanx a lot ..
nilesh mondePosted Mar 4, 2013, 7:56 AM
how to bind simple gridview in mvc 2 not telerik grid . i read somewhere mvc 2 doesn't support gridview. thanx
Kumar SaurabhPosted Mar 3, 2013, 1:33 PM
@Nilesh - not sure if its because of Entity Framework installations. I googled it and came across this issue - Please have a look - http://social.msdn.microsoft.com/Forums/en/adodotnetentityframework/thread/600014a4-c02e-465e-bc15-329a5d848899 http://forums.asp.net/t/1499854.aspx
nilesh mondePosted Mar 3, 2013, 11:34 AM
yes i attempted step 7 but in my vs 2010 ultimate verrsion that icon not shown? to display tat icon in list what can i do?
Kumar SaurabhPosted Mar 3, 2013, 3:27 AM
@Nilesh - As mentioned in Point no - 7 - Please follow this step- Add New Item -> Select ADO.Net Entity Data Model .This demo is in VS2010 Ultimate. Please let me know if you still face the issue.
nilesh mondePosted Mar 2, 2013, 5:28 AM
In my vs 2010 ultimate i m unable to find template ADO.NET ENTITY DATA MODEL. WHAT CAN I DO
Kumar SaurabhPosted Nov 17, 2012, 10:46 PM
Rajesh : Did you tried following the entire article. Telerik Grid in this article and in the attached sample demo gets populated from the Database using Entity Framework.Please see point # 5-8.
Rajesh SeditedPosted Oct 6, 2012, 10:11 AMEdited Oct 6, 2012, 10:11 AM
Hello..How to Binding a data from database to grid please explain me..Thanking you
chandra prakashPosted Mar 1, 2012, 4:28 AM
How to include teleriic grid view in index view please make it clear.
Kumar SaurabheditedPosted Oct 15, 2011, 4:35 AMEdited Oct 15, 2011, 4:36 AM
Link for Part 2 of this article -expalining Insert, Update and Delete Operations - http://www.c-sharpcorner.com/UploadFile/2124ae/9600/
sujith monyPosted Oct 14, 2011, 10:23 AM
Thanks,Saurabh
Dinesh BeniwalPosted Oct 13, 2011, 2:57 AM
Good work Saurabh