

This article explains how to insert Select, Update and Delete data into a MySQL database from an ASP.NET web application.
So, let's proceed with the following procedure:
- ASP.NET web page
- Grid View Data Control and MySQL Database
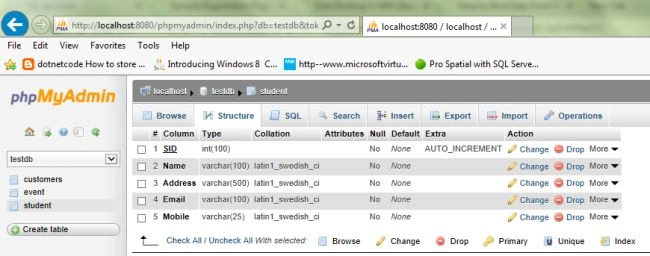
Now, open a MySQLAdmin Page then select "Create A New Table” -> "View" -> ”Table Structure for Table `student`”.
- CREATE TABLE IF NOT EXISTS `student` (
- `SID` int(100) NOT NULL AUTO_INCREMENT,
- `Name` varchar(100) NOT NULL,
- `Address` varchar(500) NOT NULL,
- `Email` varchar(100) NOT NULL,
- `Mobile` varchar(25) NOT NULL,
- PRIMARY KEY (`SID`)
- ) ENGINE=InnoDB DEFAULT CHARSET=latin1 AUTO_INCREMENT=31 ;
Open your instance of Visual Studio 2012, and create a new ASP.NET Web application. Name the project “MYSQLCRUDApplication ", as shown in the following figure:

In the code behind file (Student.aspx.cs) write the code as in the following.
Student.aspx
- <%@ Page Title="" Language="C#" MasterPageFile="~/Site.Master" AutoEventWireup="true"
- CodeBehind="Student.aspx.cs" Inherits="MYSQLCRUDApplication.Student" %>
- <asp:Content ID="Content1" ContentPlaceHolderID="titleContent" runat="server">
- Simple Insert Select Update and Delete in ASP.NET using MySQL Database
- </asp:Content>
- <asp:Content ID="Content2" ContentPlaceHolderID="head" runat="server">
- </asp:Content>
- <asp:Content ID="Content3" ContentPlaceHolderID="MainContent" runat="server">
- <table>
- <tr>
- <td class="td">Name:</td>
- <td>
- <asp:TextBox ID="txtName" runat="server"></asp:TextBox></td>
- <td>
- <asp:Label ID="lblSID" runat="server" Visible="false"></asp:Label> </td>
- </tr>
- <tr>
- <td class="td">Address:</td>
- <td>
- <asp:TextBox ID="txtAddress" runat="server"></asp:TextBox></td>
- <td> </td>
- </tr>
- <tr>
- <td class="td">Mobile:</td>
- <td>
- <asp:TextBox ID="txtMobile" runat="server"></asp:TextBox></td>
- <td> </td>
- </tr>
- <tr>
- <td class="td">Email ID:</td>
- <td>
- <asp:TextBox ID="txtEmail" runat="server"></asp:TextBox></td>
- <td> </td>
- </tr>
- <tr>
- <td></td>
- <td>
- <asp:Button ID="btnSubmit" runat="server" Text="Submit" OnClick="btnSubmit_Click" />
- <asp:Button ID="btnUpdate" runat="server" Text="Update" Visible="false"
- OnClick="btnUpdate_Click" />
- <asp:Button ID="btnCancel" runat="server" Text="Cancel" OnClick="btnCancel_Click" /></td>
- <td></td>
- </tr>
- </table>
- <div style="padding: 10px; margin: 0px; width: 100%;">
- <p>
- Total Student:<asp:Label ID="lbltotalcount" runat="server" Font-Bold="true"></asp:Label>
- </p>
- <asp:GridView ID="GridViewStudent" runat="server" DataKeyNames="SID"
- OnSelectedIndexChanged="GridViewStudent_SelectedIndexChanged"
- OnRowDeleting="GridViewStudent_RowDeleting">
- <Columns>
- <asp:CommandField HeaderText="Update" ShowSelectButton="True" />
- <asp:CommandField HeaderText="Delete" ShowDeleteButton="True" />
- </Columns>
- </asp:GridView>
- </div>
- </asp:Content>
In the Web.config file create the connection string as in the following.
Web.config
- <connectionStrings>
- <add name="ConnectionString"
- connectionString="Server=localhost;userid=root;password=;Database=Testdb"
- providerName="MySql.Data.MySqlClient"/>
- </connectionStrings>
Now, in the code behind file “Student.aspx.cs “ use the following code.
Student.aspx.cs
- using System;
- using System.Collections.Generic;
- using System.Configuration;
- using System.Data;
- using System.Linq;
- using System.Web;
- using System.Web.UI;
- using System.Web.UI.WebControls;
- using MySql.Data.MySqlClient;
- namespace MYSQLCRUDApplication
- {
- public partial class Student : System.Web.UI.Page
- {
- #region MySqlConnection Connection and Page Lode
- MySqlConnection conn = new
- MySqlConnection(ConfigurationManager.ConnectionStrings["ConnectionString"].ConnectionString);
- protected void Page_Load(object sender, EventArgs e)
- {
- Try
- {
- if (!Page.IsPostBack)
- {
- BindGridView();
- }
- }
- catch (Exception ex)
- {
- ShowMessage(ex.Message);
- }
- }
- #endregion
- #region show message
- /// <summary>
- /// This function is used for show message.
- /// </summary>
- /// <param name="msg"></param>
- void ShowMessage(string msg)
- {
- ClientScript.RegisterStartupScript(Page.GetType(), "validation", "<script
- language='javascript'>alert('" + msg + "');</script>");
- }
- /// <summary>
- /// This Function is used TextBox Empty.
- /// </summary>
- void clear()
- {
- txtName.Text = string.Empty; txtAddress.Text = string.Empty; txtMobile.Text = string.Empty;
- txtEmail.Text = string.Empty;
- txtName.Focus();
- }
- #endregion
- #region bind data to GridViewStudent
- private void BindGridView()
- {
- Try
- {
- if (conn.State == ConnectionState.Closed)
- {
- conn.Open();
- }
- MySqlCommand cmd = new MySqlCommand("Select * from Student ORDER BY SID DESC;",
- conn);
- MySqlDataAdapter adp = new MySqlDataAdapter(cmd);
- DataSet ds = new DataSet();
- adp.Fill(ds);
- GridViewStudent.DataSource = ds;
- GridViewStudent.DataBind();
- lbltotalcount.Text = GridViewStudent.Rows.Count.ToString();
- }
- catch (MySqlException ex)
- {
- ShowMessage(ex.Message);
- }
- Finally
- {
- if (conn.State == ConnectionState.Open)
- {
- conn.Close();
- }
- }
- }
- #endregion
- #region Insert Data
- /// <summary>
- /// this code used to Student Data insert in MYSQL Database
- /// </summary>
- /// <param name="sender"></param>
- /// <param name="e"></param>
- protected void btnSubmit_Click(object sender, EventArgs e)
- {
- Try
- {
- conn.Open();
- MySqlCommand cmd = new MySqlCommand("Insert into student (Name,Address,Mobile,Email )
- values (@Name,@Address,@Mobile,@Email)", conn);
- cmd.Parameters.AddWithValue("@Name",txtName.Text);
- cmd.Parameters.AddWithValue("@Address", txtAddress.Text);
- cmd.Parameters.AddWithValue("@Mobile",txtMobile.Text);
- cmd.Parameters.AddWithValue("@Email",txtEmail.Text);
- cmd.ExecuteNonQuery();
- cmd.Dispose();
- ShowMessage("Registered successfully......!");
- clear();
- BindGridView();
- }
- catch (MySqlException ex)
- {
- ShowMessage(ex.Message);
- }
- Finally
- {
- conn.Close();
- }
- }
- #endregion
- #region SelectedIndexChanged
- /// <summary>
- /// this code used to GridViewRow SelectedIndexChanged value show textbox
- /// </summary>
- /// <param name="sender"></param>
- /// <param name="e"></param>
- protected void GridViewStudent_SelectedIndexChanged(object sender, EventArgs e)
- {
- GridViewRow row = GridViewStudent.SelectedRow;
- lblSID.Text = row.Cells[2].Text;
- txtName.Text = row.Cells[3].Text;
- txtAddress.Text = row.Cells[4].Text;
- txtEmail.Text = row.Cells[5].Text;
- txtMobile.Text = row.Cells[6].Text;
- btnSubmit.Visible = false;
- btnUpdate.Visible = true;
- }
- #endregion
- #region Delete Student Data
- /// <summary>
- /// This code used to GridViewStudent_RowDeleting Student Data Delete
- /// </summary>
- /// <param name="sender"></param>
- /// <param name="e"></param>
- protected void GridViewStudent_RowDeleting(object sender, GridViewDeleteEventArgs e)
- {
- Try
- {
- conn.Open();
- int SID = Convert.ToInt32(GridViewStudent.DataKeys[e.RowIndex].Value);
- MySqlCommand cmd = new MySqlCommand("Delete From student where SID='" + SID + "'",
- conn);
- cmd.ExecuteNonQuery();
- cmd.Dispose();
- ShowMessage("Student Data Delete Successfully......!");
- GridViewStudent.EditIndex = -1;
- BindGridView();
- }
- catch (MySqlException ex)
- {
- ShowMessage(ex.Message);
- }
- Finally
- {
- conn.Close();
- }
- }
- #endregion
- #region student data update
- /// <summary>
- /// This code used to student data update
- /// </summary>
- /// <param name="sender"></param>
- /// <param name="e"></param>
- protected void btnUpdate_Click(object sender, EventArgs e)
- {
- Try
- {
- conn.Open();
- string SID = lblSID.Text;
- MySqlCommand cmd = new MySqlCommand("update student Set
- Name=@Name,Address=@Address,Mobile=@Mobile,Email=@Email where SID=@SID", conn);
- cmd.Parameters.AddWithValue("@Name", txtName.Text);
- cmd.Parameters.AddWithValue("@Address", txtAddress.Text);
- cmd.Parameters.AddWithValue("@Mobile", txtMobile.Text);
- cmd.Parameters.AddWithValue("@Email", txtEmail.Text);
- cmd.Parameters.AddWithValue("SID",SID);
- cmd.ExecuteNonQuery();
- cmd.Dispose();
- ShowMessage("Student Data update Successfully......!");
- GridViewStudent.EditIndex = -1;
- BindGridView(); btnUpdate.Visible = false;
- }
- catch (MySqlException ex)
- {
- ShowMessage(ex.Message);
- }
- Finally
- {
- conn.Close();
- }
- }
- #endregion
- #region textbox clear
- protected void btnCancel_Click(object sender, EventArgs e)
- {
- clear();
- }
- #endregion
- }
- }
Now run the page, it will look like the following.

Now, enter the student data insert and Grid view Show Data. Message box “Registered successfully”.

Now, select the Student then show the data TextBox and update the data shown in the Message box “Student Data update successfully”.

Now, delete the Student data shown in the Message box “Student Data Delete Successfully”.

I hope this article is useful. If you have any other questions then please provide your comments below.
Affan ShaikhPosted Aug 5, 2021, 6:00 AM
Write ASP.NET and CSprogram to create Student table having RollNo, Name, Class, DOBas attributes. Insert the record in student table. Accept the values using the form
Soumik MahajanPosted Feb 17, 2020, 10:42 AM
Thank you sir
Former memberPosted Mar 5, 2018, 3:26 AM
Your good knowledge and kindness in playing with all the pieces were very useful. I don’t know what I would have done if I had not encountered such a step like this. https://www.besanttechnologies.com/dot-net-training-in-jaya-nagar-bangalore
Murali VPosted Jun 21, 2017, 9:55 PM
Nice one, can i get this hole project for my study.?
Avinash PatilPosted May 3, 2017, 3:43 PM
Very helpful for me Thank you sirrrrrrrrr......!!!!
Sonali MathurPosted Jan 9, 2017, 1:22 AM
update button-> Cmd.ExecuteNonQuery(); No mapping exists from object type System.Web.UI.WebControls.Label to a known managed provider native type. Error show Please help me...
Sunil PawarPosted Mar 11, 2016, 12:31 PM
very nice and useful article...thanks sanjay kumar
Sanjay KumarPosted Jul 16, 2015, 5:53 AM
mysql phpmyadmin used by wamp server Meg Marcaida
Anupam DighePosted Dec 24, 2014, 10:51 PM
nice artical thx