

This article explains how to create a zip file in ASP.NET using C#. First we download Ionic.Zip.dll from the following link or attachment.
The following is the procedure.
Step 1
Open Visual Studio 2012 and click "File" -> "New" -> "Web site...". A window is opened. In this window, click "Empty Web Site Application" under Visual C#.

Give your application the name "Create_Zip" and then click "Ok".
Step 2
Right-click on your Web Site then select "New folder" and give it the name "Zipa". Our Web Site will be like this:
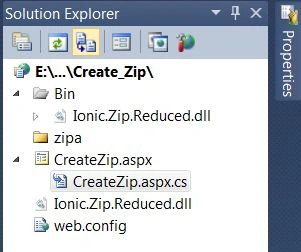
Complete Program
CreateZip.aspx
- <%@ Page Language="C#" AutoEventWireup="true" CodeFile="CreateZip.aspx.cs" Inherits="CreateZip" %>
- <!DOCTYPE html PUBLIC "-//W3C//DTD XHTML 1.0 Transitional//EN" "http://www.w3.org/TR/xhtml1/DTD/xhtml1-transitional.dtd">
- <html xmlns="http://www.w3.org/1999/xhtml">
- <head runat="server">
- <title></title>
- </head>
- <body>
- <form id="form1" runat="server">
- <h3 style="color: #0000FF; font-style: italic"> Create Zip in ASP.NET</h3>
- <div style="height: 121px">
- <asp:FileUpload ID="FileUpload" runat="server" />
- <br />
- <br />
- <asp:Button ID="bttnupload" runat="server" Text="Upload File" Font-Bold="True" onclick="bttnupload_Click" /
- <asp:Button ID="bttnzip" runat="server" Text="Create Zip" Font-Bold="True" onclick="bttnzip_Click" />
- <br />
- <br />
- <asp:Label ID="lbltxt" runat="server" ForeColor="#CC0000"></asp:Label>
- </div>
- </form>
- </body>
- </html>
CreateZip.aspx.cs
- using System;
- using System.Collections.Generic;
- using System.Linq;
- using System.Web;
- using System.Web.UI;
- using System.Web.UI.WebControls;
- using Ionic.Zip;
- using System.IO;
- public partial class CreateZip : System.Web.UI.Page
- {
- protected void Page_Load(object sender, EventArgs e)
- {
- }
- protected void bttnupload_Click(object sender, EventArgs e)
- {
- if (FileUpload.HasFile)
- {
- string filename = Path.GetFileName(FileUpload.PostedFile.FileName);
- string pathname = Server.MapPath("~/zipa/" + filename);
- FileUpload.SaveAs(pathname);
- lbltxt.Text = "File Upload Successfully";
- }
- }
- protected void bttnzip_Click(object sender, EventArgs e)
- {
- try
- {
- string pathname = Server.MapPath("~/zipa/");
- string[] filename = Directory.GetFiles(pathname);
- using (ZipFile zip = new ZipFile())
- {
- zip.AddFiles(filename, "file");
- zip.Save(Server.MapPath("~/zipa.zip"));
- lbltxt.Text = "Zip File Created";
- }
- }
- catch (Exception ex)
- {
- lbltxt.Text = ex.Message;
- }
- }
- }
Output 1

Click on "Choose File" and select any file from any drive.

Output 2
Click on the "Upload" Button.

Output 3
Now click on the "Create Zip" button.

Output 4
Now see that the Solution Explorer contains a Zip folder.

For more information, download the attached sample application.
Barath Kumar MPosted Feb 9, 2021, 12:12 PM
Wow, Thank for sharing !!!
Anil KumarPosted Jun 23, 2017, 3:31 AM
Thanks for sharing.
Morteza AshouriPosted Dec 24, 2016, 2:08 PM
I found this and it worked: zip.AlternateEncoding = System.Text.Encoding.UTF8; zip.AlternateEncodingUsage = ZipOption.AsNecessary;
Morteza AshouriPosted Dec 24, 2016, 1:50 PM
Cool but it does not support uni-code file names or may another trick is needed.
Shubham KumarPosted Jan 19, 2016, 5:00 AM
nice one
Saineshwar BageriPosted Dec 21, 2013, 1:04 PM
nice post