
Follow exactly the same steps as in the previous article.
Now lets get into the xaml code: The xaml should now look like :
<!-- Visual State Created -->
<VisualStateManager.VisualStateGroups>
<VisualStateGroup x:Name="PageTrans">
<VisualStateGroup.Transitions>
<VisualTransition GeneratedDuration="0:0:1">
<ei:ExtendedVisualStateManager.TransitionEffect>
<ee:SlideInTransitionEffect/>
</ei:ExtendedVisualStateManager.TransitionEffect>
<VisualTransition.GeneratedEasingFunction>
<CubicEase EasingMode="EaseInOut"/>
</VisualTransition.GeneratedEasingFunction>
</VisualTransition>
</VisualStateGroup.Transitions>
<VisualState x:Name="Start"/>
<VisualState x:Name="New"/>
</VisualStateGroup>
</VisualStateManager.VisualStateGroups>
<VisualStateManager.CustomVisualStateManager>
<ei:ExtendedVisualStateManager/>
</VisualStateManager.CustomVisualStateManager>
<!-- Visual State End-->
Note that Blend SDK not only offers Slide In Effect but there are more as well.
Please find the list of Effects offered by Blend 4 sdk.
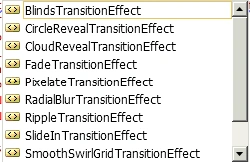
Just replace the Slide In Effect with each one and run them one by one.
Excellent transition Effects without doing anything great. Blend is Great.
Join the conversation! Your thoughts help the community grow.