

Introduction
If you develop web applications then surely you know about the Div <div> tag but
many of you guys never have a usuful look on it. As i know div tag
is the backbone of a consistent css used website.
Basically div is a section you can say which separate the sections in a webpage. But div not only separate the contents but it also provides the different formating for each section.
If you are using Cascading Style Sheet for formating your website then you can use these css by including its id in div tag. Every div tag contains a unique attribute name for id. Div make the webpage design sections like if you are using css for creating a side menu list then you can define a div as the setting its properties to left or right, that means by using div tag you can group the large html contents.
From my side: I like the div tag because it separte my web page contents which are handy to format and looks always cool.
Now we will talk about the attributes of div tag
As we discussed in the intro, that div tag contains an id attribute.
ID:
ID attribute always contains a unique name as the name suggests id.Eg:
<div
id="content"
align="left"
bgcolor="white">
Content goes here.
</div>
Explanation
Here you can see that we used properties like aligh and bgcolor so here we have formated this div tag means a separate section not the full webpage.
ID For CSS:
If you are creating a CSS like then you can use ID attribute for div tag. Like if you require to create many headings for your webpage with different styles then, a single style will not enough.
CSS:
body
{
background-color:Silver;
}
div#head1
{
background-color:Maroon;
font-family:Comic
Sans MS;
font-size:medium;
}
div#head2
{
background-color:Blue;
font-family:Book
Antiqua;
font-size:medium;
}
Now you can use these in your aspx page. Like.
.aspx:
<div
id="head1">
This is heading one.
</div>
<div
id="head2">
This is heading two.
</div>
ALIGN:
As we have used this property in our previous example.
But even take an example of google.com notice that there are some links on the right top when you resize the page they even appear in that resized window.
Different alignments are:
left:
center:
right:
justify:
Example:
<div
id="menu"
align="right"
>
<a
href="login.aspx">Login</a>
|
<a
href="register.aspx">Register</a>
</div>
Output goes like this.
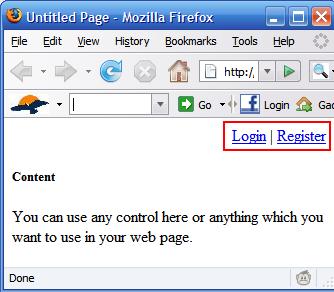
Just notice the red box there are two links which we have created before when you resize your window as it is already these links will also resize to be visible in the webpage.
STYLE:
As the name suggests
style tag is used to format the div tag.
Like setting it's background color, font etc.
Example :
<div
id="content"
style="border:
3px inset
Red; background-color:Silver;
">
<h3>Content</h3>
<p>This
is a formated div tag by using its style attribute.
you can define anything here like controls or which you want in your webpage.</p>
</div>
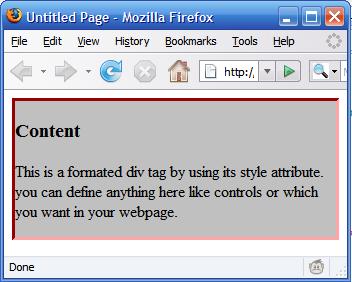
Here
the part of code which you have to notice is underlined.
First we use style then its properties like background-color:silver etc.
When you type a keyword then AI will open to help you ahead.JUST TRY.
OutPut:
DIR
Specifies the text direction for the content in an element.
rtl: for right side.
ltr : for left side.
Example:
<div
dir="rtl">
This is a example of dir attribute of div.
</div>
Try this line of code, and this line will appear in the right side of the web page.
TITLE:
Title tag is used to give the more information to the
div tag
In the browser, you can say it a tooltip for another
controls.
Example:
<div dir="rtl" title="this is right side">
</div>
LANG:
Simply specifies a language code for the content in an
element.
When you type lang= in the div tag a list will appear in AI.
Example:
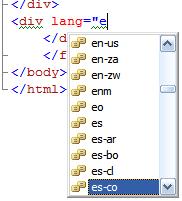
Choose
the language code for which you want for your content.
CLASS:
This
div attribute is very attrative, I like to work with this.
Okay, if you have craeted a text/css in your page then you
give the reference this desing by using class attribute.
See.
<style
type="text/css">
.heading
{
font-family:Bookman
Old Style;
font-size:medium;
font-style:oblique;
background-color:Gray;
}
</style>
You have created css in your .aspx page and now you can use this by using class attribute of div.
Example:
<div
class="heading">
This is a heading.
</div>
Now we
have done the attributes part of div.
Okay now you should take a small rest with a hot coffee J.
Events:
Now we are going to talk about events of div.
Okay, first of all here is a list of events.
* ONCLICK, -When the mouse button is clicked on an element of a
web page.
* ONDBLCLICK -When the mouse button is double-clicked on an
element of a web page.
* ONMOUSEDOWN -When the mouse button is pressed over an element ofa web page.
* ONMOUSEUP -When the mouse button is released over an element of
a web page.
* ONMOUSEOVER -When the mouse is moved onto an element of a web
Page.
* ONMOUSEMOVE -When the mouse is moved while over an element of aweb page.
* ONMOUSEOUT -When the mouse is moved away from an element of a
web page
* ONKEYPRESS -When a key is pressed and released over an element
of a web page.
* ONKEYDOWN -When a key is pressed down over an element of a
web page.
* ONKEYUP -When a key is released over an element of a web
page.
OnMouseMove:
Here we have crated a div tag as footer of a page and when the cursor moves over this div (section) an alert message will appear saying "This is a mousemove click event".
Code:
<div
id="footer"
onmousemove="alert('This
is a mousemove click event');">This is bottom of a page.
</div>
OnClick:
This event occurs
when you click on the part of webpage where you have defined this event to be
occur.
Here we have defined a div tag as header and when you click on this header a
alert box will appear "It's a mouseclick event".
Code:
<div onclick="alert( 'it's a mouseclick event' );" id="header" >This is a header</div>
This is not necessary to use alert message box on every event you can do many other task by using the javascript(we'll talk about it later).
Transparency for an image (mouseover and mouseout event):
This is a nice example of mouseover and mouseout event.
Here when your mousepoint come over the image the image will look as with 100 % clearity and when your mouse pointer come out over the image then image opacity will discrease so that image will look a bit faded.
Code:
<div>
<img
src="fighter.gif"
onmouseover="this.style.MozOpacity=1;this.filters.alpha.opacity=100"
onmouseout="this.style.MozOpacity=0.5;this.filters.alpha.opacity=50"
/>
</div>
Web Design with DIV:
Now we will see some example of div tag which is very attractive and usefull to create a fanciful webpage.
1- Center Fixed Div:
In this example, a div section in the center of a web page will appear with the fixed css style, means when you resize yourwebpage this div will not disappear it will reamin in the center point and always visible to you on scrolling.
Code:
<style type="text/css">
#fixdiv
{
position:
fixed;
top:
95px;
left:
0;
right:
0;
border:none;
z-index:
50;
}
#centerdiv
{
width:
250px;
margin:
auto;
background-color:
#f0ffff;
}
</style>
Now inside the form tag use these line.
<div
id="fixdiv">
<div
id="centerdiv">This
is a center div tag</div>
</div>
Now for a attractive output try this.
2- CSS Menu:
In this example we are going to create a css menu bar. Output like this.
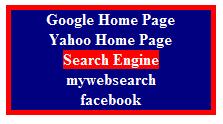
For
creating this menu bar you have to use css, you can create a css or you can
define style tag inside your webpage.
I'm using style tag inside my page because here is no need to give
reference the css.
<style type="text/css">
a:link
{
text-decoration:none;
color:#FFFFFF;
background:navy;
font-weight
: bold;
width:
200px;
}
a:active
{
text-decoration:none;
color:#FFFFFF;
background: red;
font-weight:bold;
width:
200px;
}
a:visited
{
text-decoration:none;
color:#FFFFFF;
background:navy;
font-weight:bold;
width:
200px;
}
a:hover
{
text-decoration:none;
color:#FFFFFF;
font-weight:bold;
width:
200px;
background: red;
}
.Border
{
background:navy;
border-style:solid;
border-color: red;
border-width:5px;
width:200px;
}
</style>
Now this is the time to use this style by using div tag,
CODE:
<div class="Border" align="center">
<a
href="http://www.google.com">Google
Home Page</a><br
/>
<a
href="http://www.yahoo.com">Yahoo
Home Page</a><br
/>
<a
href="http://www.bing.com">Search
Engine</a><br
/>
<a
href="http://www.mywebsearch.com">mywebsearch</a><br
/>
<a
href="http://www.facebook.com">facebook</a>
</div>
3- ColorFull DropDownList:
Here in this example we're going to create a colorfull dropdownlist, as you have seen in many places a dropdownlist is provided for choosing the font color with name and that color as background.
Output:
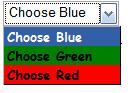
For creating
this you need to use the style :
<style
type="text/css">
option
{
font-family:Comic
Sans MS;
font-size:12;
font-weight:bold;
}
option.first
{
background-color:Blue;
}
option.second
{
background-color:Green;
}
option.third
{
background-color:
Red;
}
</style>
Now inside the div tag use this code.
<div>
<select size="1">
<option
class="first">Choose
Blue</option>
<option
class="second">Choose
Green</option>
<option
class="third">Choose
Red</option>
</select>
</div>
4- Embed audio and video file in a webpage:
How to embed a audio file or video file in a webpage. Its simple using a embed tag
Code:
<embed
src="fires.mp3"
autostart="false"
loop="false"
volume="60"
style="height:
53px; width:
394px" />
This tag includes a audio file named "fires.mp3" with the properties loop, volume and autostart. You can modify as per your requirements.
Output:
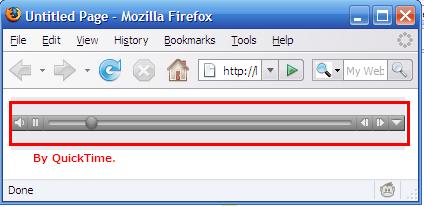
For a video file just change the src only.
Code:
<embed
src="fires.3gp"
autostart="true"
style="height:
235px; width:
419px" />
Conclusion:
We learn how to use div
tag, its events, its attributes with examples so now we can utilise this in our
webpage.
We learn some attractive example by using events, CSS, Style tag etc.
If you need any help feel free to ask.
Cheers !
-Nikhil Kumar
Yashwanth SannithiPosted May 18, 2012, 3:18 AM
hiiiiiiiiiiiiiiiiiiiiiiiiiii