

Steps Involved:
I. Open Visual Studio 2010.
ii. Go to File => New =>Project.
iii. Select Empty SharePoint project template from the installed template SharePoint => 2010.
iv. Enter the Name and click OK.
v. Check the option "Deploy as a Sandbox solution".
vi. Click Ok.
vii. Right click on the solution and select "Add a new item".
viii. Select Empty Element template, enter the Name and click Ok.
ix. In the Elements.xml replace the code with the following.
<?xml version="1.0" encoding="utf-8"?>
<Elements xmlns="http://schemas.microsoft.com/sharepoint/">
<CustomAction Id="SiteActionsToolbar" GroupId="SiteActions" Location="Microsoft.SharePoint.StandardMenu" Sequence="1000" Title="Solution Gallery">
<UrlAction Url="/_catalogs/solutions/Forms/AllItems.aspx"/>
</CustomAction>
</Elements>
x. Go to the SharePoint site where you have deployed your solution.
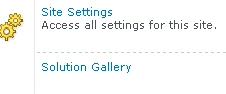
xi. Go to Site Actions, you will see an option for Solution Gallery.
Gowtham RajamanickamPosted Apr 12, 2016, 2:16 AM
Good One, Thanks for sharing