

Content: In this application I will create a Blog post with a post comment application. This application will be Object Class Mapping using Entity Framework. That means with the mapping of classes the database with table will be created automatically.
Step 1:
Create a new ASP.Net MVC3 application with empty web application. While creating the project check the radio button "UnitTest".
Step 2:
Now under the "Model" folder create two classes.
- Blog
- Comments
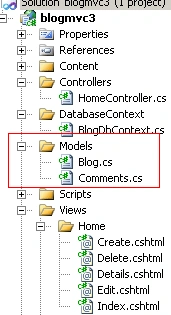
Step 3:
Now In the Blog Class, copy the following code:
public class Blog
{
[Key]
public int BlogId { get; set; }
[Required(ErrorMessage = "BlogName is required")]
public string BlogName { get; set; }
[Required(ErrorMessage = "Description is required")]
[StringLength(120, ErrorMessage = "Description Name Not exceed more than 120 words")]
public string Description { get; set; }
public string Body { get; set; }
public virtual List<Comments > Comments_List { get; set; }
}
See here we did the validation of each property. And also hold the list of comments. That means 1 blog contains many posts. So that is a one to many relationship.
The "Virtual" keyword means it will make the relationship.
Step 4:
Now in the Comments class write the following code:
public class Comments
{
[Key ]
public int CommentId { get; set; }
public string Comment { get; set; }
//[ForeignKey]
public int BlogId { get; set; }
public virtual Blog Blog { get; set; }
}
See here also we have the object reference of "blog" class. Before that I have used the virtual keyword.
Step 5:
Now it's time to make the entity class by which the database and the table will be created.
Create a "DatabaseContext" folder under the project. After that create a class named "BlogDbContext.cs" under the folder. This class is an entity class.
Step 6:
Now add a reference of the Entity Framework by clicking "Add New Reference" under the project.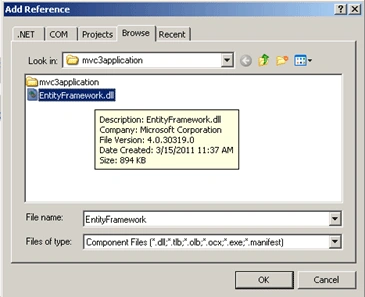
In my project I already gave the dll. Without the dll the table will not be created in the database by object class mapping.
Now into the "BlogDbContext" class paste the following code:
using System;
using System.Collections.Generic;
using System.Linq;
using System.Web;
using System.Data.Entity;
using blogmvc3.Models;
namespace blogmvc3.DatabaseContext
{
public class BlogDbContext:DbContext
{
public DbSet<Blog> Blog { get; set; }
public DbSet<Comments> Comments { get; set; }
}
}
See here in the Dbset we are passing the blog class and comments class. The Dbset will create the table automatically with a relation into the database.
The Namespace "System.Data.Entity;" is very important for that.
Step 7:
Now we have to configure the "web.config" file for a connection string. The web.config file is under the main solution project, not the project web.config file.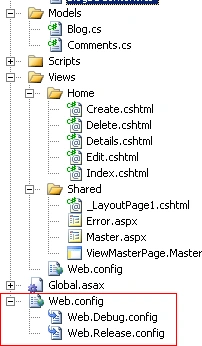
Now paste the following connection string into the web.config file.
<connectionStrings>
<add name="BlogDBContext" connectionString="data source=.;Database=Blogdb;Trusted_Connection=true;" providerName="System.Data.SqlClient" />
</connectionStrings>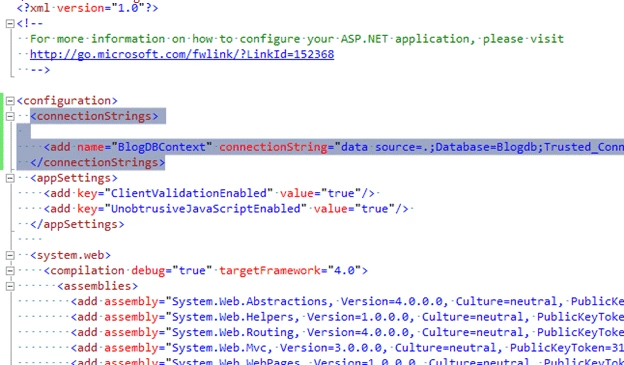
Step 8:
Now create a Controller Class named "HomeController" under the "ControllerFolder. After that check the
"Add action for create.update,delete.." so it will automatically create the action method in the Controller class.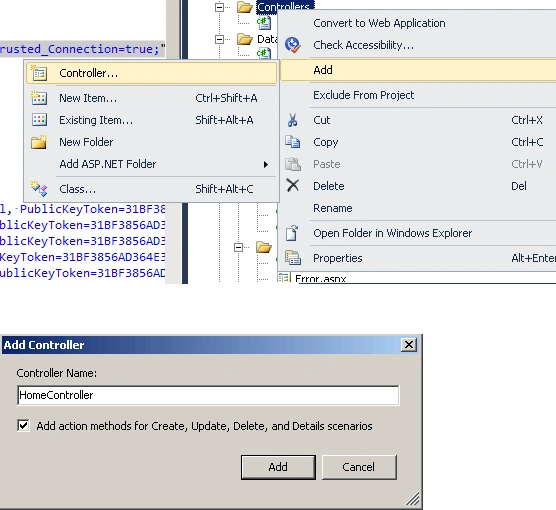
Step 9:
Now in the "HomeController" Class first create the object of Class "BlogDbContext".
BlogDbContext _db = new BlogDbContext();
After that in the Index Method write the following code:
public ActionResult Index()
{
return View(_db.Comments .ToList ());
}
Step 10:
Now create a master page in razor engine under the "shared" folder. Give it the name "_LayoutPage1.cshtml". 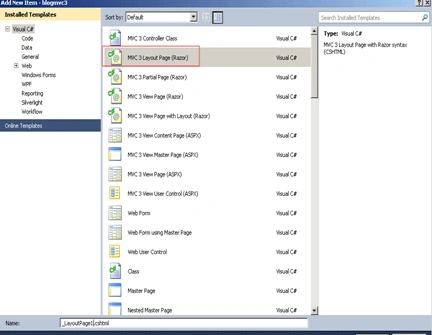
After that paste the following code there:
<!DOCTYPE html>
<html>
<head>
<title>@ViewBag.Title</title>
<link href="@Url.Content("~/Content/Site.css")" rel="stylesheet" type="text/css" />
<script src="@Url.Content("~/Scripts/jquery-1.4.4.min.js")" type="text/javascript"></script>
@* <script src="../../Scripts/jquery-ui-1.8.11.custom.min.js" type="text/javascript"></script>
<link href="../../Content/jquery-ui-1.8.11.custom.css" rel="stylesheet" type="text/css" />*@
</head>
<body>
<div class="page">
<div id="header">
<div id="title">
<h1>Blog Post</h1>
</div>
<div id="logindisplay">
@*@Html.Partial("_LogOnPartial")*@
</div>
<div id="menucontainer">
<ul id="menu">
@* <li>@html.actionlink("home", "index", "home")</li>*@
@*<li>@Html.ActionLink("About", "About", "Home")</li>*@
<li>@Html.ActionLink("home", "index", "home")</li>
<li>@Html.ActionLink("Article Post", "CreateLogin", "Article")</li>
@*<li>@Html.ActionLink("BookCab", "CreateLogin", "Cab")</li> *@
</ul>
</div>
<script type="text/javascript"><!-- mce: 0--></script>
</div>
<div id="main">
@RenderBody()
<div id="footer">
</div>
</div>
</div>
</body>
</html>
Step 11:
Now go the "Home controller". Right-click the Index Method and add view. It will look like:
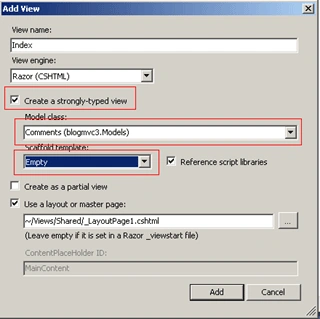
Please check "Create Strongly-typed Views".
Choose Model Class "Comments" Under DropDown List.
Select "Scaffold Template" List. After that press the "Add" Button. It will automatically create a view named "Index" under the "Home" folder.
Step 12:
See the Index View Engine will create code for the list view automatically.
Paste the following code there.
@model IEnumerable<blogmvc3.Models.Comments>
@{
ViewBag.Title = "Index";
Layout = "~/Views/Shared/_LayoutPage1.cshtml";
}
<h2>Index</h2>
<p>
@Html.ActionLink("Create New", "Create")
</p>
<table>
<tr>
<th></th>
<th>
Blog Name
</th>
<th>
Description
</th>
<th>
Body
</th>
<th>
Comment
</th>
</tr>
@foreach (var item in Model) {
<tr>
<td>
@Html.ActionLink("Edit", "Edit", new { id=item.CommentId }) |
@Html.ActionLink("Details", "Details", new { id=item.CommentId }) |
@Html.ActionLink("Delete", "Delete", new { id=item.CommentId })
</td>
<td></td>
<td> @item.Blog.BlogName</td>
<td> @item.Blog.Description</td>
<td> @item.Blog.Body</td>
<td>
@item.Comment
</td>
</tr>
}
</table>
Step 13:
Run the application now. It will look like: 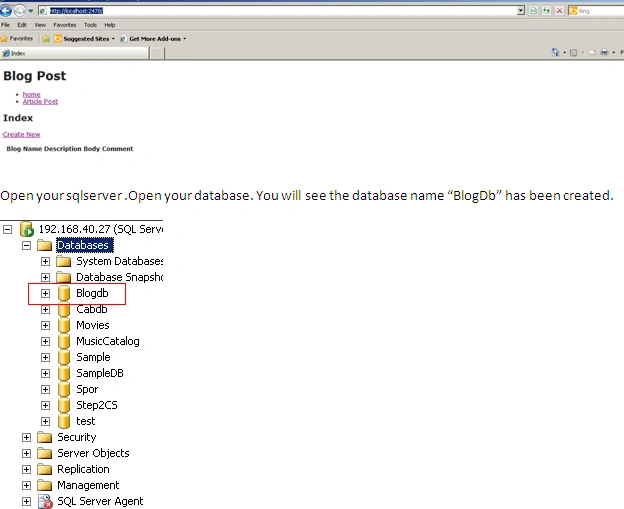
Open your SQL Server. Open your database. You will see the database named "BlogDb" has been created.
So here you cannot create, edit or delete. Because there is not a required Controller method with a view page.
I will discuss that in my next article.
Conclusion:
So in this article we have seen how to create a ASP.Net MVC3 application with the Entity Framework.
Manohar VemulaPosted Jul 11, 2012, 2:40 AM
Very good article on MVC. Just what I needed. Thanks!