
You've all seen the new One Drive Windows Phone app with the so-called "hamburger" menu. Users were not happy with Microsoft trying to copy the Android design, they even opened up a feature suggestion in the WP uservoice forum calling Microsoft to "stick to the modern UI". Still, maybe you want to build an app to provide a unified experience on all platforms.
Android has a built-in DrawerLayout that allows an interactive drawer to be pulled out from the edge of the windows. Here is how to add a Drawer Layout to your Windows Phone 8.1 app:
1. Open Visual Studio 2013.
2. Create a new Windows Phone 8.1 Universal App Project.
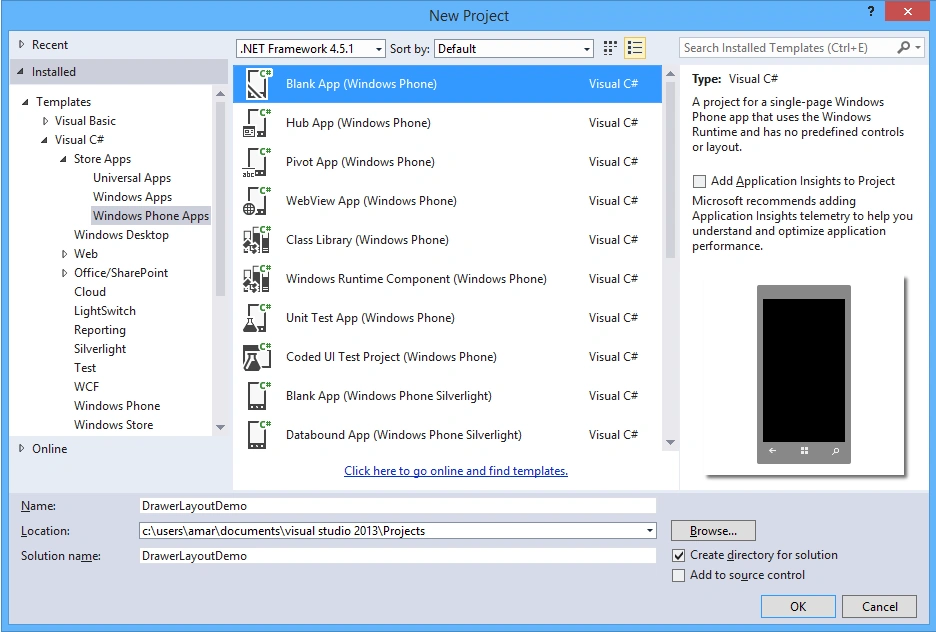
3. Go to the Project – Manage NuGet Packages, type "DrawerLayout" and add to your project.

4. Open MainPage.xaml and add the namespace:
- xmlns:drawerLayout="using:DrawerLayout"
5. Now, let's add some XAML code to our page. Create a Grid with two rows, the first one for the title bar (with drawer icon) and the second for the Drawer Layout.
- <Grid x:Name="RootLayout">
- <Grid.RowDefinitions>
- <RowDefinition Height="Auto" />
- <RowDefinition Height="*" />
- </Grid.RowDefinitions>
- <!-- Title Bar -->
- <Grid x:Name="TitleBar" Grid.Row ="0" Height="60">
- <!-- —Title Bar Code Goes Here -->
- </Grid>
- <!-- Drawer Layout -->
- <drawerLayout:DrawerLayout Grid.Row="1" x:Name="DrawerLayout">
- <!-- DrawerLayout code goes here -->
- </drawerLayout:DrawerLayout>
- </Grid>
6. We'll add a drawer icon and a title for our app in the title bar grid. Title bar XAML:
- <Grid x:Name="TitleBar" Background="#00ADEF" Grid.Row ="0" Height="60">
- <Grid.ColumnDefinitions>
- <ColumnDefinition Width="Auto" />
- <ColumnDefinition Width="*" />
- </Grid.ColumnDefinitions>
- <Image Margin="5" x:Name="DrawerIcon" Grid.Column="0" Source="/Assets/drawer_icon.png" HorizontalAlignment="Left" Tapped="DrawerIcon_Tapped" />
- <TextBlock Grid.Column="1" Text="DRAWER LAYOUT DEMO" Foreground="White" VerticalAlignment="Center" FontSize="18"/>
- </Grid>
Note: The image has a Tapped event that will be used to open/close the drawer. You can download the drawer icon here.
7. Inside DrawerLayout, create two child controls, one for the main content and one for the ListView:
- <drawerLayout:DrawerLayout Grid.Row="1" x:Name="DrawerLayout">
- <Grid x:Name="MainFragment" Background="White">
- <!-- Main Content goes here -->
- </Grid>
- <Grid x:Name="ListFragment" Background="#F4F4F4">
- <ListView x:Name="ListMenuItems">
- <ListView.ItemTemplate>
- <DataTemplate>
- <TextBlock Text="{Binding}" Margin="10" HorizontalAlignment="Left" VerticalAlignment="Center" FontSize="18" Foreground="Black" />
- </DataTemplate>
- </ListView.ItemTemplate>
- </ListView>
- </Grid>
- </drawerLayout:DrawerLayout>
Now let's do some coding. First we need to initialize the Drawer Layout then add some items to our list. Add the following code to the MainPage constructor:
- DrawerLayout.InitializeDrawerLayout();
- string[] menuItems = new string[5] { "Item1", "Item2", "Item3", "Item4", "Item5" };
- ListMenuItems.ItemsSource = menuItems.ToList();
Next, we want to open/close the drawer when the user taps on the drawer icon. To to this, DrawerLayout uses OpenDrawer() and CloseDrawer() and the IsDrawerOpen property:
- private void DrawerIcon_Tapped(object sender, TappedRoutedEventArgs e)
- {
- if (DrawerLayout.IsDrawerOpen)
- DrawerLayout.CloseDrawer();
- else
- DrawerLayout.OpenDrawer();
- }
You can also override the default HardwareButton Back Key Event so that the drawer closes on back key press:
- protected override void OnNavigatedTo(NavigationEventArgs e)
- {
- Windows.Phone.UI.Input.HardwareButtons.BackPressed += HardwareButtons_BackPressed;
- }
- void HardwareButtons_BackPressed(object sender, Windows.Phone.UI.Input.BackPressedEventArgs e)
- {
- if (DrawerLayout.IsDrawerOpen)
- {
- DrawerLayout.CloseDrawer();
- e.Handled = true;
- }
- else
- {
- Application.Current.Exit();
- }
- }
There you go. Run the app, try swiping the drawer from the left. You can close the drawer in one the following of 3 ways:
- Tap and hold on the right edge of the list view and then drag the list to the left.
- Tap on the shaded background.
- Tap on the drawer icon in the title bar.
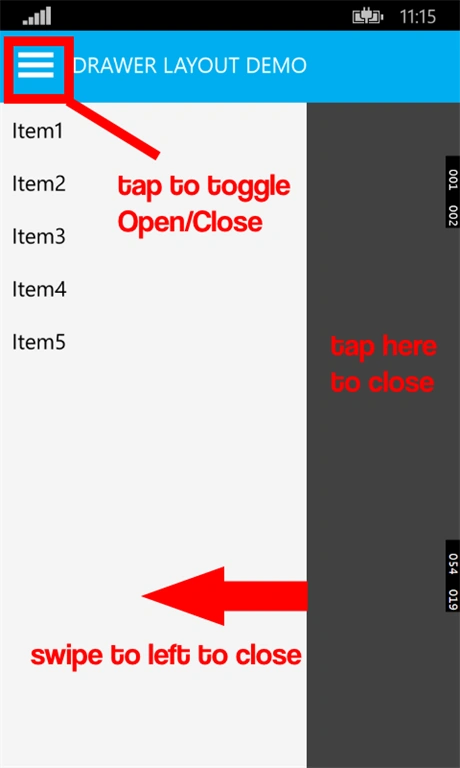
For more information, check out the DrawerLayout project on GitHub.
truong phucPosted Feb 24, 2016, 3:10 AM
How can I add a tap event for each item on this list?
Yukti SambharePosted Dec 19, 2015, 2:40 AM
<drawerLayout:DrawerLayout Grid.Row="1" x:Name="DrawerLayout" FlowDirection="RightToLeft">it shows error : the name <drawerLayout:DrawerLayout does not exist in using:DrawerLayout
Millan LeonardoPosted Nov 2, 2015, 5:23 PM
How I can navigate between pages?
fa taherPosted Oct 5, 2015, 9:05 AM
hello how can we change Width drawer???
NielsPosted Sep 25, 2015, 4:06 AM
How do I change the shaded background color or remove it?
Ander BlindPosted Aug 13, 2015, 1:20 AM
Hello , how can we open drawer from Right to Left ?
Vagelis DermosPosted Jul 15, 2015, 2:57 AM
hi to you, i add the "HardwareButtons_BackPressed" but when i press the back key, the page close also exept the drawer.What i am not doing well? void HardwareButtons_BackPressed(object sender, Windows.Phone.UI.Input.BackPressedEventArgs e) { Frame rootFrame = Window.Current.Content as Frame; if (DrawerLayout.IsDrawerOpen) { DrawerLayout.CloseDrawer(); e.Handled = true; } else { rootFrame.GoBack(); e.Handled = true; } }
JeanPhilippe MarchandPosted Apr 25, 2015, 9:55 AM
Hello, is it possible to factorize NavigationDrawer in a userControl instead of initializing in each pages ?
Altin SelimiPosted Apr 24, 2015, 8:43 AM
The drawer is crashing my app everytime I click on the article. It works fine if I remove the ListFragment grid from te code, it works fine. Here's the code : http://pastebin.com/HjY1Gx8T
Federico NavarretePosted Apr 18, 2015, 2:48 PM
I have a question and if I want go back instead of closing the App, what should I do? I tried this but it only goes back to the First Page and sometimes my previous one was other one. Thanks for your time. void HardwareButtons_BackPressed(object sender, Windows.Phone.UI.Input.BackPressedEventArgs e) { if (DrawerLayout.IsDrawerOpen) { DrawerLayout.CloseDrawer();//Close drawer on back press e.Handled = true; } else { Frame frame = Window.Current.Content as Frame; if (frame == null) return; if (frame.CanGoBack) { frame.GoBack(); e.Handled = true; } } }
Dinesh BeniwalPosted Nov 18, 2014, 1:19 AM
Good start Amar, Welcome to C# Corner.