

We know that animation is the technique for making a movie using a series of drawings, computer graphics, or photographs of objects (such as puppets or models) that are slightly different from one another and that, when viewed quickly one after another, creates the appearance of movement.
Today we make a simple animation as in the following:
In the preceding picture we are moving a series of photos frame-by-frame that create an illusion of moving an object.
Now we move toward the code section of this project.
In the design section we use an Imageview. In this ImageView we will show our image. We also use two buttons. One to start the animation and the other to stop the animation.
The following is the XML code of our project:
- <LinearLayout
- xmlns:android="http://schemas.android.com/apk/res/android"
- android:orientation="vertical"
- android:layout_width="fill_parent"
- android:layout_height="fill_parent"
- android:background="#E6E6E6">
- <ImageView android:layout_height="wrap_content"
- android:layout_width="wrap_content" android:id="@+id/imageAnimation"
- android:adjustViewBounds="true" />
- <Button
- android:id="@+id/btnStart"
- android:layout_width="wrap_content"
- android:layout_height="wrap_content"
- android:text="Start Animation" />
- <Button
- android:id="@+id/btnStop"
- android:layout_width="wrap_content"
- android:layout_height="wrap_content"
- android:text="Stop Animation" />
- </LinearLayout>

In drawable-mdpi folder we put a number of images. Each image contains a specific position of the ball with respect to the other image. We provide a serial number for each image according to their position in the animation.
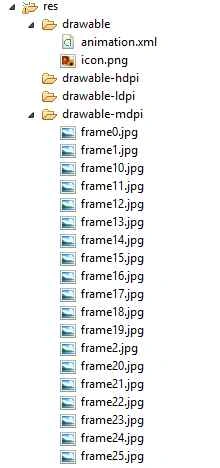
We use an animation.xml file. This file contains an animation-list. In this animation list we provide the path of each image in the form of a list item. We also provide the time duration for each image so that specific time image will be visible and then the next image will be visible. We can decrease the value of the time duration to increase the animation speed or increase the value of the time duration to decrease the animation speed.
The following is the animation.xml:
- <?xml version="1.0" encoding="utf-8"?>
- <animation-list
- xmlns:android="http://schemas.android.com/apk/res/android"
- android:oneshot="false">
- <item android:drawable="@drawable/frame0" android:duration="50" />
- <item android:drawable="@drawable/frame1" android:duration="50" />
- <item android:drawable="@drawable/frame2" android:duration="50" />
- <item android:drawable="@drawable/frame3" android:duration="50" />
- <item android:drawable="@drawable/frame4" android:duration="50" />
- <item android:drawable="@drawable/frame5" android:duration="50" />
- <item android:drawable="@drawable/frame6" android:duration="50" />
- <item android:drawable="@drawable/frame7" android:duration="50" />
- <item android:drawable="@drawable/frame8" android:duration="50" />
- <item android:drawable="@drawable/frame9" android:duration="50" />
- <item android:drawable="@drawable/frame10" android:duration="50" />
- <item android:drawable="@drawable/frame11" android:duration="50" />
- <item android:drawable="@drawable/frame12" android:duration="50" />
- <item android:drawable="@drawable/frame13" android:duration="50" />
- <item android:drawable="@drawable/frame14" android:duration="50" />
- <item android:drawable="@drawable/frame15" android:duration="50" />
- <item android:drawable="@drawable/frame16" android:duration="50" />
- <item android:drawable="@drawable/frame17" android:duration="50" />
- <item android:drawable="@drawable/frame18" android:duration="50" />
- <item android:drawable="@drawable/frame19" android:duration="50" />
- <item android:drawable="@drawable/frame20" android:duration="50" />
- <item android:drawable="@drawable/frame21" android:duration="50" />
- <item android:drawable="@drawable/frame22" android:duration="50" />
- <item android:drawable="@drawable/frame23" android:duration="50" />
- <item android:drawable="@drawable/frame24" android:duration="50" />
- <item android:drawable="@drawable/frame25" android:duration="50" />
- <item android:drawable="@drawable/frame26" android:duration="50" />
- <item android:drawable="@drawable/frame27" android:duration="50" />
- <item android:drawable="@drawable/frame28" android:duration="50" />
- <item android:drawable="@drawable/frame29" android:duration="50" />
- <item android:drawable="@drawable/frame30" android:duration="50" />
- <item android:drawable="@drawable/frame31" android:duration="50" />
- <item android:drawable="@drawable/frame32" android:duration="50" />
- <item android:drawable="@drawable/frame33" android:duration="50" />
- <item android:drawable="@drawable/frame34" android:duration="50" />
- <item android:drawable="@drawable/frame35" android:duration="50" />
- </animation-list>
The following is the source code of the project:
- package com.appsolut.example.animation;
- import android.app.Activity;
- import android.graphics.drawable.AnimationDrawable;
- import android.os.Bundle;
- import android.view.View;
- import android.widget.Button;
- import android.widget.ImageView;
- public class Animation extends Activity {
- /**
- * Reference to the ImageView which will display the animation.
- */
- ImageView animation;
- Button Start;
- Button Stop;
- @Override
- public void onCreate(Bundle savedInstanceState) {
- super.onCreate(savedInstanceState);
- setContentView(R.layout.main);
- Start = (Button) findViewById(R.id.btnStart);
- Stop = (Button) findViewById(R.id.btnStop);
- animation = (ImageView) findViewById(R.id.imageAnimation);
- animation.setBackgroundResource(R.drawable.animation); // the frame-by-frame animation defined as a xml file within the drawable folder
- final AnimationDrawable frameAnimation = (AnimationDrawable) animation.getBackground();
- /*
- * NOTE: It's not possible to start the animation during the onCreate.
- *
- */
- Start.setOnClickListener(new View.OnClickListener() {
- @Override
- public void onClick(View arg0) {
- // TODO Auto-generated method stub
- frameAnimation.start(); //Start the Animation
- }
- });
- Stop.setOnClickListener(new View.OnClickListener() {
- @Override
- public void onClick(View arg0) {
- // TODO Auto-generated method stub
- frameAnimation.stop(); // Stop the Animation
- }
- });
- }
- }
- ImageView animation;
- Button Start;
- Button Stop;
- Start=(Button)findViewById(R.id.btnStart);
- Stop=(Button)findViewById(R.id.btnStop);
- animation = (ImageView)findViewById(R.id.imageAnimation);
- Start.setOnClickListener(new View.OnClickListener() {
- @Override
- public void onClick(View arg0) {
- // TODO Auto-generated method stub
- frameAnimation.start(); //Start the Animation
- }
- });
- Stop.setOnClickListener(new View.OnClickListener() {
- @Override
- public void onClick(View arg0) {
- // TODO Auto-generated method stub
- frameAnimation.stop(); // Stop the Animation
- }
- });
Code Section 1
Code Section 2
animation.setBackgroundResource(R.drawable.animation);
final AnimationDrawable frameAnimation = (AnimationDrawable) animation.getBackground();;
In the preceding code first we provide the resource of the animation-list to the animation object (object of Imageview). This resource contains a number of images.
In the second line we create an object of the AnimationDrawable class. This object creates frame-by-frame animations, defined by a series of Drawable objects, that can be used as a View object's background. The simplest way to create a frame-by-frame animation is to define the animation in an XML file, placed in the res/drawable/ folder, and set it as the background to a View object.
Code Section 3
Code Section 4
Today we learned how make an animation in some simple steps.
Join the conversation! Your thoughts help the community grow.