

This article has been
excerpted from book "Graphics Programming with GDI+".
So far we have applied line caps and line styles only to lines, but these
effects can also be applied to other objects, including curves, rectangles, and
ellipses. However, some of these objects impose limitations. For example,
rectangles, ellipses, and closed curves do not have starting and ending caps, so
the StartCap and EndCap properties of a pen will not affect them.
Let's add one more menu item to MainMenu, called OtherObjects. The code for its
menu item click event handler is given in Listing 9.5. We create three pens with
different colors and widths; set their line cap, dash style, and dash cap
properties; and draw a rectangle, an ellipse, and a curve.
LISTING 9.5: Drawing other objects using line caps, dash styles, and dash
caps
using System;
using
System.Collections.Generic;
using
System.ComponentModel;
using System.Data;
using
System.Drawing;
using System.Linq;
using System.Text;
using
System.Drawing.Drawing2D;
using
System.Windows.Forms;
namespace
DrawingOtherObjectsLine
{
public partial
class Form1 :
Form
{
public Form1()
{
InitializeComponent();
}
private void
Form1_Paint(object sender,
PaintEventArgs e)
{
Graphics g =
this.CreateGraphics();
g.Clear(this.BackColor);
g.SmoothingMode = SmoothingMode.AntiAlias;
// Create pen objects
Pen blackPen =
new Pen(Color.Black,
5);
Pen bluePen =
new Pen(Color.Blue,
8);
Pen redPen =
new Pen(Color.Red,
4);
// Set DashCap styles
blackPen.StartCap = LineCap.DiamondAnchor;
blackPen.EndCap = LineCap.SquareAnchor;
blackPen.DashStyle = DashStyle.DashDotDot;
blackPen.DashPattern = new
float[] { 10 };
blackPen.DashCap = DashCap.Triangle;
// Set blue pen dash style and dash cap
bluePen.DashStyle = DashStyle.DashDotDot;
bluePen.DashCap = DashCap.Round;
// Set red pen line cap and line dash
styles
redPen.StartCap = LineCap.Round;
redPen.EndCap = LineCap.DiamondAnchor;
redPen.DashCap = DashCap.Triangle;
redPen.DashStyle = DashStyle.DashDot;
redPen.DashOffset = 3.4f;
// Draw a rectangle
g.DrawRectangle(blackPen, 20, 20, 200, 100);
// Draw an ellipse
g.DrawEllipse(bluePen, 20, 150, 200, 100);
// Draw a curve
PointF pt1 =
new PointF(90.0F,
40.0F);
PointF pt2 =
new PointF(130.0F,
80.0F);
PointF pt3 =
new PointF(200.0F,
100.0F);
PointF pt4 =
new PointF(220.0F,
120.0F);
PointF pt5 =
new PointF(250.0F,
250.0F);
PointF[] ptsArray =
{
pt1, pt2, pt3, pt4, pt5
};
g.DrawCurve(redPen, ptsArray);
// Dispose of objects
blackPen.Dispose();
}
}
}
Figure 9.7 shows the output from Listing 9.5. Each graphics object rectangle,
ellipse, and curve has a different style.
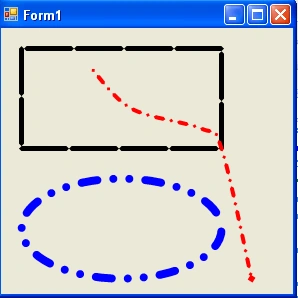
FIGURE 9.7: A rectangle, an ellipse, and a curve with different line styles
Conclusion
Hope the article would have helped you in understanding image class methods and
properties in GDI+. Read other articles on GDI+ on the website.
 |
This book teaches .NET developers how to work with GDI+ as they develop applications that include graphics, or that interact with monitors or printers. It begins by explaining the difference between GDI and GDI+, and covering the basic concepts of graphics programming in Windows. |
Join the conversation! Your thoughts help the community grow.