

This article demonstrates how to create and use a TextBox control in WPF using XAML and C#.
Creating a TextBox
The TextBox element represents a WPF TextBox control in XAML.
- <TextBox/>
The Width and Height attributes of the TextBox element represent the width and the height of a TextBox. The Text property of the TextBox element sets the content of a TextBox. The Name attribute represents the name of the control, which is a unique identifier of a control.
The code snippet in Listing 1 creates a TextBox control and sets the name, height, width, and content of a TextBox control.
- <TextBox Name="TextBox1" Height="30" Width="200" |
- Text="Hello! I am a TextBox.">
- </TextBox>
Listing 1
The output looks like Figure 1.
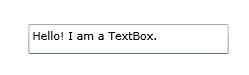
Figure 1
As you can see from Figure 1, by default the TextBox is placed in the center of the page. We can place a TextBox control where we want by using the Margin, VerticalAlignment and HorizontalAlignment attributes that sets the margin, vertical alignment, and horizontal alignment of a control.
The code snippet in Listing 2 sets the position of the TextBox control in the left top corner of the page.
- <TextBox Name="TextBox1" Height="30" Width="200"
- Text="Hello! I am a TextBox."
- Margin="10,10,0,0" VerticalAlignment="Top"
- HorizontalAlignment="Left">
- </TextBox>
Listing 2
Formatting a TextBox
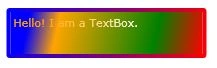
The BorderBrush property of the TextBox sets a brush to draw the border of a TextBox. You may use any brush to fill the border. The code snippet in Listing 3 uses a linear gradient brush to draw the border with a combination of red and blue color.
- <TextBox.BorderBrush>
- <LinearGradientBrush StartPoint="0,0" EndPoint="1,1">
- <GradientStop Color="Blue" Offset="0" />
- <GradientStop Color="Red" Offset="1.0" />
- </LinearGradientBrush>
- </TextBox.BorderBrush>
Listing 3
The Background and Foreground properties of the TextBox set the background and foreground colors of a TextBox. You may use any brush to fill the border. The following code snippet uses linear gradient brushes to draw the background and foreground of a TextBox.
- <TextBox.Background>
- <LinearGradientBrush StartPoint="0,0" EndPoint="1,1">
- <GradientStop Color="Blue" Offset="0.1" />
- <GradientStop Color="Orange" Offset="0.25" />
- <GradientStop Color="Green" Offset="0.75" />
- <GradientStop Color="Red" Offset="1.0" />
- </LinearGradientBrush>
- </TextBox.Background>
- <TextBox.Foreground>
- <LinearGradientBrush StartPoint="0,0" EndPoint="1,1">
- <GradientStop Color="Orange" Offset="0.25" />
- <GradientStop Color="White" Offset="1.0" />
- </LinearGradientBrush>
- </TextBox.Foreground>
The new TextBox looks like Figure 2.
Setting Image as Background of a TextBox
To set an image as background of a TextBox, we can set an image as the Background of the TextBox. The code snippet in Listing 4 sets the background of a TextBox to an image.
- <TextBox.Background>
- <ImageBrush ImageSource="dock.jpg" />
- </TextBox.Background>
Listing 4
The new output looks like Figure 3.

Creating a TextBox Dynamically
The code listed in Listing 5 creates a TextBox control programmatically. First, it creates a TextBox object and sets its width, height, contents, background and foreground and later the TextBox is added to the LayoutRoot.
- private void CreateATextBox() | {
- TextBox txtb = new TextBox();
- txtb.Height = 50;
- txtb.Width = 200;
- txtb.Text = "Text Box content";
- txtb.Background = new SolidColorBrush(Colors.Orange);
- txtb.Foreground = new SolidColorBrush(Colors.Black);
- LayoutRoot.Children.Add(txtb);
- }
Setting Fonts of TextBox Contents
The FontSize, FontFamily, FontWeight, FontStyle, and FontStretch properties are used to set the font size, family, weight, style and stretch to the text of a TextBox. The code snippet in Listing 6 sets the font properties of a TextBox.
- FontSize="14" FontFamily="Verdana" FontWeight="Bold"
Listing 6
The new output looks like Figure 4.

The FontSource property allows loading custom fonts dynamically. The following code snippet sets the FontSource property.
- Uri fontUri = new Uri("SomeFont.ttf", UriKind.Relative);
- StreamResourceInfo MySRI = Application.GetResourceStream(fontUri);
- TextBox1.FontSource = new FontSource(MySRI.Stream);
Non Editable TextBox
The IsReadOnly property of the TextBox sets the text box read only. By default, it is false.
- IsReadOnly="True"
Restricting Text Size of a TextBox
The MaxLength property of the TextBox sets the number of characters allowed to input in a text box.
- MaxLength="250"
Scrolling, Alignment, and Wrapping
The HorizontalScrollBarVisibility and VerticalScrollBarVisibility properties are used to set horizontal and vertical scroll bars of a TextBox, which is of type ScrollBarVisibility enumeration. The ScrollBarVisibility enumeration has four values – Disabled, Auto, Hidden, and Visible. The following code snippet sets the horizontal and vertical scroll bars visible in a TextBox.
- HorizontalScrollBarVisibility="Visible"
- VerticalScrollBarVisibility="Auto"
The TextWrapping property sets the wrap of no-wrap text. The following code snippet sets the wrapping text option.
- TextWrapping="Wrap"
The TextAlignment property sets the text alignment in a TextBox, which is of type TextAlignment enumeration. A text can be aligned left, center, or right.
- TextAlignment="Right"
The AcceptReturn property sets if the return is accepted in a TextBox or not.
- AcceptsReturn="True"
Listing 7 shows all these properties in a complete sample.
- <TextBox Name="TextBox2" Margin="10,10,50,0
- Width="300" Height="150"
- HorizontalScrollBarVisibility="Visible"
- VerticalScrollBarVisibility="Visible"
- TextWrapping="Wrap"
- TextAlignment="Right"
- MaxLength="500"
- IsReadOnly="False"
- AcceptsReturn="True" >
- </TextBox>
Listing 7
Summary
In this article, I discussed how we can create and format a TextBox control in WPF and C#. After that we saw how to create a TextBox control dynamically. Then we saw how to set various properties of a TextBox such as making it non editable, restricting the size of text, and setting the foreground and background of the selected text.
Smk MersalPosted Jul 8, 2020, 12:39 AM
How to hide the textbox element(content) not textbox if the listbox(list collections) selection is changed?
Teja KumarPosted Oct 28, 2015, 12:29 PM
Sir, actually my doubt is i need to pass text box data to button. When i click the button it wants to display the website, if the text box contain an URL.
Teja KumarPosted Oct 28, 2015, 8:01 AM
Thank you sir.
Teja KumarPosted Oct 25, 2015, 1:22 PM
Sir, how to get the text at runtime of the application.
swati ailPosted Apr 5, 2013, 4:28 AM
How to assign button fontstyle through coding in wpf?
Abhishek joshiPosted Jul 3, 2012, 10:15 AM
@Jeganathan Balachandar - As I mentioned in my previous comments, these properties are not supported by WPF textBox (but Silverlight TextBox support these). Refer - http://stackoverflow.com/questions/10850629/how-to-change-the-highlighted-texts-foreground-color-for-a-wpf-textbox
Jeganathan BalachandarPosted Jul 3, 2012, 8:49 AM
Hi I need to change the selected text foreground, but i couldn;t find the SelectionForeGround and SelectionBakground properties in TextBox control. TextBox2.SelectionBackground = new SolidColorBrush(Colors.Blue); TextBox2.SelectionForeground = new SolidColorBrush(Colors.White);
Abhishek joshiPosted Jun 4, 2012, 10:15 AM
BTW the Edit comment functionality is not working, shows this error - "We have recently made changes to the site and resource you are looking for may have moved. Please try our search by typing your keyword in search at top and click Go. Again, sorry for inconvenience."
Abhishek joshiPosted Jun 4, 2012, 10:11 AM
Wao, I was not expecting such reply from founder of C# corner! Can you provide some link to support your claim? I hope MS would not change the documentation of previous versions.
Mahesh ChandPosted Jun 4, 2012, 10:00 AM
This article was written couple of years ago and Microsoft keep changing its API in every new version :).
Abhishek joshiPosted Jun 4, 2012, 6:08 AM
Are you sure your article contains correct information? There is not property called SelectionForeground & SelectionBackground in WPF TextBox! Moreover your attached sample is incomplete, covering only one point of the article. http://msdn.microsoft.com/en-us/library/system.windows.controls.textbox(v=vs.100).aspx SelectionForeground & SelectionBackground are the properties of silverlight textbox - http://msdn.microsoft.com/en-us/library/system.windows.controls.textbox.selectionforeground(v=vs.95).aspx
Jared BarneckPosted Aug 25, 2011, 1:50 AM
This article is missing information on Mnemonics. <a href="http://www.rhyous.com/2011/02/15/wpf-label-textbox-and-mnemonics/">WPF Label, TextBox, and Mnemonics</a>