

Activity contains Views and ViewGroups. Examples of widgets are buttons, labels, text boxes, etc. One or more Views can be grouped together into a ViewGroup. A ViewGroup provides the layout in which you can order the appearance and sequence of views. Examples of View groups are LinearLayout, Relative Layout, etc. A
ViewGroup derives from the base class android.view.ViewGroup.
The
LinearLayout arranges views in a single column or a single row. It displays child View elements in a linear direction, either vertically or horizontally. Like a box, it contains controls inside. Controls are drawn one after another either horizontally or vertically according to the orientation of the layout.
When dealing with a linear layout there are five properties that we can deal with:
- Orientation
- Fill model
- Weight
- Gravity
- padding
The Common attributes supported by views and viewgroups are:
| Attribute | Description |
| layout_gravity | Declare child Views position |
| layout_weight | Declare the extra space in the layout which to be allocated to the View |
| layout_marginRight | Declare extra space on the right side of the View |
| layout_marginLeft | Declare extra space on the left side of the View |
| layout_marginBottom | Declare extra space on the bottom side of the View |
| layout_x | Declare the x-coordinate of the View |
| layout_y | Declare the y-coordinate of the View |
| layout_marginTop | Declare extra space on the top side of the View |
| layout_width | Declare the width of the View |
| layout_height | Declare the height of the View |
The LinearLayout is the simplest layout available in Android. Create a new Android project named LinearLayout in Visual Studio 2010 to start developing a LinearLayout application:
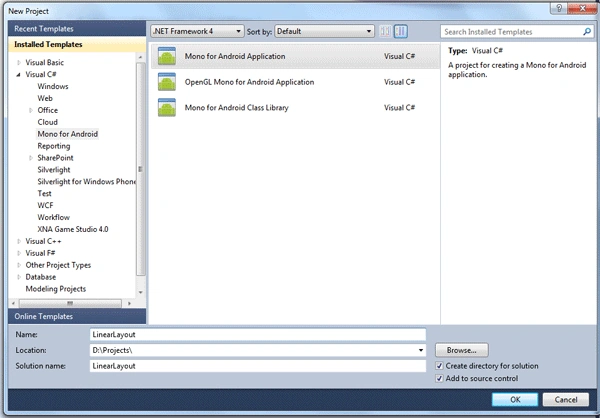
When you create an android application it will generate some default files like Activity1.cs, Main.axml, Resource.Designer.cs, Strings.xml.
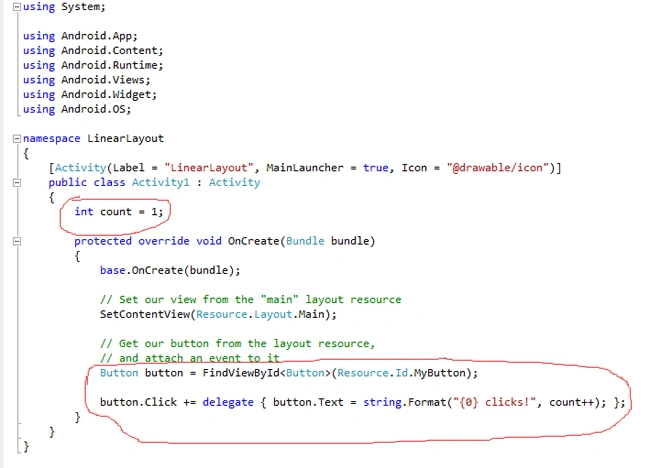
The Activity1.cs defines the code structure with the necessary Android Packages. Since we don't use a Button while working with a LinearLayout, remove all button related code from here.
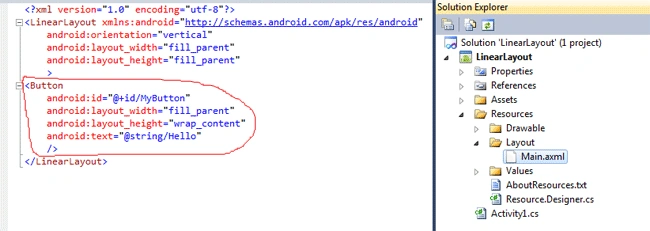
The Main.axml declares the user interface containing LinearLayout with TextView and Button, here you have to remove the Button view.
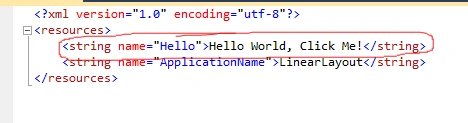
The Strings.xml declares the text to be displayed in application. In our case it contains:
Here you have to remove the first string property; it is for the button view.
Now come back to the Main.axml, here you will do all for working with LinearLayout:
- Orientation: Orientation is a property which is used by LinearLayout.VERTICAL, or LinearLayout.HORIZONTAL. If you select VERTICAL, then all your components added to this container will be stacked on top of each other. If you pick HORIZONTAL, they will all be stacked beside each other.
Vertical orientation:
<?xml version="1.0" encoding="utf-8"?>
<LinearLayout xmlns:android="http://schemas.android.com/apk/res/android"
android:orientation="vertical"
android:layout_width="fill_parent"
android:layout_height="fill_parent">
<TextView
android:text= "First Layout"
android:background= "#aa0000"
android:textColor="#ffffffff"
android:layout_width= "100px"
android:layout_height= "50px"/>
<TextView
android:text= "Second Layout"
android:background= "#00aa00"
android:textColor="#ffffffff"
android:layout_width= "100px"
android:layout_height= "50px"/>
<TextView
android:text= "Thired Layout"
android:background= "#0000aa"
android:textColor="#ffffffff"
android:layout_width= "100px"
android:layout_height= "50px" /></LinearLayout>
Output: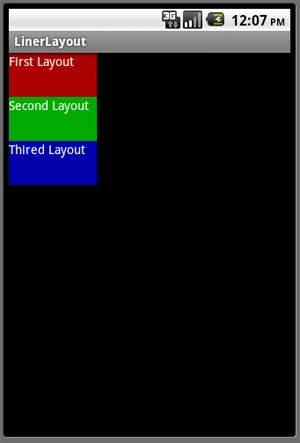
Horizontal Orientation:
<?xml version="1.0" encoding="utf-8"?>
<LinearLayout xmlns:android="http://schemas.android.com/apk/res/android"
android:orientation="horizontal"
android:layout_width="fill_parent"
android:layout_height="fill_parent">
<TextView
android:text= "First Layout"
android:background= "#aa0000"
android:textColor="#ffffffff"
android:layout_width= "70px"
android:layout_height= "50px"/>
<TextView
android:text= "Second Layout"
android:background= "#00aa00"
android:textColor="#ffffffff"
android:layout_width= "70px"
android:layout_height= "50px"/>
<TextView
android:text= "Thired Layout"
android:background= "#0000aa"
android:textColor="#ffffffff"
android:layout_width= "70px"
android:layout_height= "50px" />
</LinearLayout>
Output: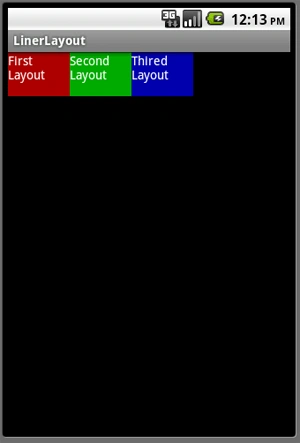
-
Fill model: Linear layout widgets have width and height properties. These properties also have some value which is user define, these values are:
-- A numeric value in pixels or inches.
-- A wrap_content value meaning the widget should occupy it's natural size unless there is no space.
-- A fill_parent meaning the widget should occupy all the available space of the closing container.
In this example you will see I use all the three values; the height of all three Textviews are fixed by numeric pixel value that is "50px", the width of first two Textviews are given fill_parent and the Textview have the property wrap_content as its width.<?xml version="1.0" encoding="utf-8"?>
<LinearLayout xmlns:android="http://schemas.android.com/apk/res/android"
android:orientation="vertical"
android:layout_width="fill_parent"
android:layout_height="fill_parent">
<TextView
android:text= "First Layout"
android:background= "#aa0000"
android:textColor="#ffffffff"
android:layout_width= "fill_parent"
android:layout_height= "50px"/>
<TextView
android:text= "Second Layout"
android:background= "#00aa00"
android:textColor="#ffffffff"
android:layout_width= "fill_parent"
android:layout_height= "50px"/>
<TextView
android:text= "Thired Layout"
android:background= "#0000aa"
android:textColor="#ffffffff"
android:layout_width= "wrap_content"
android:layout_height= "50px" />
</LinearLayout>
Output: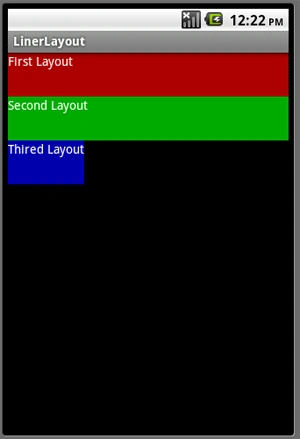
- Weight: This weight determines how much empty space the component should take up in the final layout. A good way to use this feature is if you want an expandable component in a mix of some other components.
Look at the following example; the first Textview has the Weight value "2" and the second Textview has the Weight value "1".
<?xml version="1.0" encoding="utf-8"?>
<LinearLayout xmlns:android="http://schemas.android.com/apk/res/android"
android:orientation="vertical"
android:layout_width="fill_parent"
android:layout_height="fill_parent">
<TextView
android:text= "First Layout"
android:background= "#aa0000"
android:textColor="#ffffffff"
android:layout_width= "fill_parent"
android:layout_height= "50px"
android:layout_weight= "2" />
<TextView
android:text= "Thired Layout"
android:background= "#0000aa"
android:textColor="#ffffffff"
android:layout_width= "wrap_content"
android:layout_height= "50px"
android:layout_weight="1" />
</LinearLayout>
Output: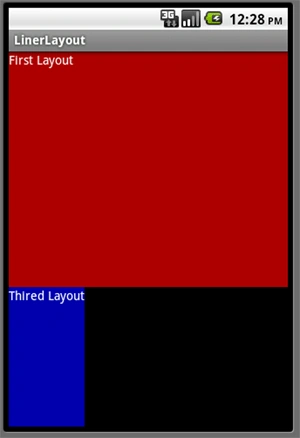
The remaining two categories I will explain in my next article.
Thank You. Have a nice Learning......
Join the conversation! Your thoughts help the community grow.