

Introduction
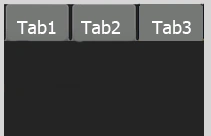
When you want to wrap multiple views in a
single window and navigate thought them with a Tab Container, you have to use
Tab Layouts. The container object for TabLayout is Android.Widget.TabHost. When
the user selects a tab, this object sends a message to the parent container,
TabHost, to tell it to switch the displayed page.
TabHost is used to navigate through multiple
views within the same activity.
syntex:
[Android.Runtime.Register("android/widget/TabWidget")]
public class TabWidget : LinearLayout, Android.Views.View.IOnFocusChangeListener
public class TabWidget : LinearLayout, Android.Views.View.IOnFocusChangeListener
The Activity of Tab Layout goes like:
Activity
-TabHost
-TabWidget
-FrameLayout
-TabsContent
- First, we create TabHost
- Than create TabWidget
- Than Create FrameLayout
- Last, create the Content for the Tabs
Let's look at an example in which you'll create a
tabbed UI that uses a separate an Activity for each tab:
Step 1: Start a new Mono for Android
Application in Visual Studio 2010 named AndroidTabLayout.
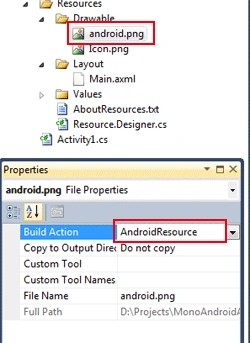
Step 2: Add the images to your project
Resources/Drawable/ like I add android.png and, and set the Build Action of
image to AndroidResource in the property window.
Step 3 : Open the Resources/Layout/Main.axml
file and edit the code like below code:
Main.axml file:
- <?xml version="1.0" encoding="utf-8"?>
- <TabHost xmlns:android="http://schemas.android.com/apk/res/android"
- android:id="@android:id/tabh"
- android:layout_width="fill_parent"
- android:layout_height="fill_parent">
- <LinearLayout
- android:orientation="vertical"
- android:layout_width="fill_parent"
- android:layout_height="fill_parent">
- <TabWidget
- android:id="@android:id/alltabs"
- android:layout_width="fill_parent"
- android:layout_height="wrap_content" />
- <FrameLayout
- android:id="@android:id/tabcontents"
- android:layout_width="fill_parent"
- android:layout_height="fill_parent">
- <ImageView
- android:id="@+id/imageview1"
- android:src="@drawable/android"
- android:layout_width="wrap_content"
- android:layout_height="wrap_content"/>
- <TextView
- android:id="@+id/textview1"
- android:layout_width="fill_parent"
- android:layout_height="fill_parent"
- android:textSize="15px"
- android:text="ANDROID" />
- <TextView
- android:id="@+id/textview2"
- android:layout_width="fill_parent"
- android:layout_height="fill_parent"
- android:textSize="15px"
- android:text="Android is a software stack for mobile devices that includes an operating system,
- middleware and key applications. The Android SDK provides the tools and APIs
- necessary to begin developing applications on the Android platform using the Java
- programming language." />
- </FrameLayout>
- </LinearLayout>
- </TabHost>
In the above code, we first create a TabHost than, as
it required, the TabWidget and a FrameLayout both live somewhere within it. To
position the TabWidget and FrameLayout vertically, a LinearLayout is used, and
inside the FrameLayout we create one ImageView and two TextViews to customize the
tabs.
Step 4: Now open the
Activity1.cs and use the following code:
Activity1.cs file
In the above code, you see the first we change the base class from Activity to
TabActivity, By default, the base class will be set to an Activity. After that
we use two methods, SetIndicator() to set the text for the tab button, and
SetContent() to define which View we want to associate with the tab and reveal
when pressed.
- using System;
- using Android.App;
- using Android.Content;
- using Android.Runtime;
- using Android.Views;
- using Android.Widget;
- using Android.OS;
- namespace AndroidTabLayout
- {
- [Activity(Label = "AndroidTabLayout", MainLauncher = true)]
- public class Activity1 : TabActivity
- {
- protected override void OnCreate(Bundle bundle)
- {
- base.OnCreate(bundle);
- // Set our view from the "main" layout resource
- SetContentView(Resource.Layout.Main);
- TabHost.TabSpec con;
- con = TabHost.NewTabSpec("tab_test1").SetIndicator("IMAGE").SetContent(Resource.Id.imageview1);
- TabHost.AddTab(con);
- con = TabHost.NewTabSpec("tab_test2").SetIndicator("NAME").SetContent(Resource.Id.textview1);
- TabHost.AddTab(con);
- con = TabHost.NewTabSpec("tab_test3").SetIndicator("DESCRIPTION").SetContent(Resource.Id.textview2);
- TabHost.AddTab(con);
- TabHost.CurrentTab = 0;
- }
- }
- }
Step 5: Run your application.
In this application, you see how all the tabs
are categorized for different types of information, when you click on a
particular tab the related information of the tab will be displayed in the content area.
Your
application looks like:
By default, the content of the first Tab will be displayed:
 Now click on the second Tab, the name will display:
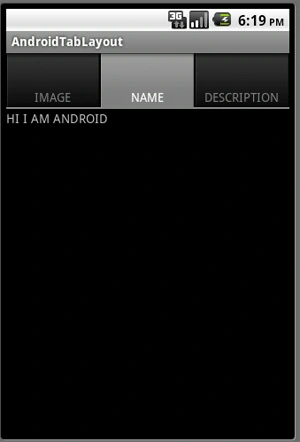 Now click on the third Tab, the description will display:
 Thank You............
jose fidalgoPosted Aug 9, 2013, 11:10 AM
to where this set the tabhost, give me also error AddTab (??sp1);
AndrewPosted Jan 22, 2013, 5:03 PM
I had to make the following changes for my proj to compile: android:id="@+id/tabh" android:id="@+id/alltabs" android:id="@+id/tabcontents"
SaqiPosted Jun 27, 2012, 8:49 AM
thanks . how to set image background tab button.