
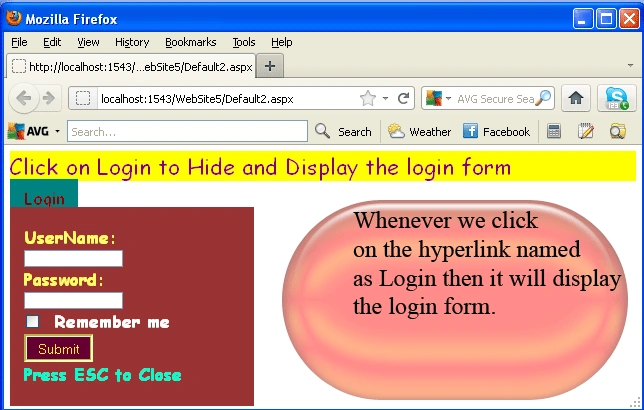
Introduction: In this article we will explore how to create a login form and hide/display it using jQuery. Further in details we will see that whenever we click on the login hyperlink then it will display a login form and whenever we press the Esc button from the keyboard then it will be hide the login form which is being displayed. In this article we are going to make a login form with an ASP.NET control in which we have to apply jQuery to hide and display that login form. Further we have to use CSS to display the awesome effects and later we will use these inside the ASP.NET elements. Let's see the steps to create this type of login control using jQuery:
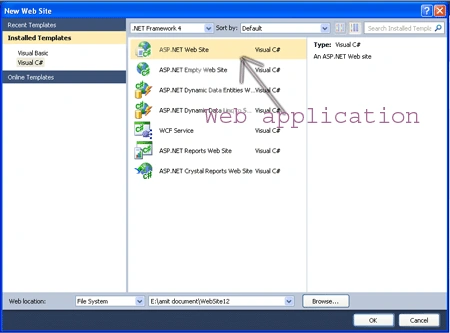
Step 1: Firstly we have to create a web Application
- Go to Visual Studio 2010
- Create the web Application
- Click OK
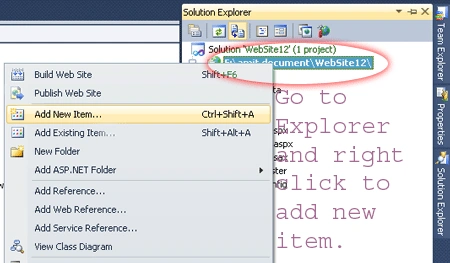
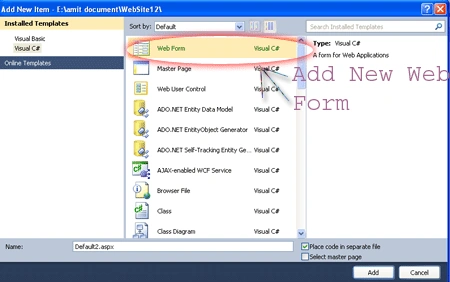
Step 2: Secondly you have to add a new page to the website
- Go to the Solution Explorer
- Right Click on Project name
- Select add new item
- Add a new web page and give it a name
- Click OK
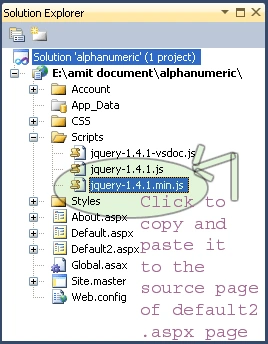
Step 3: In this step we are going to see that see from where the js reference will be added to the source page of the default2.aspx page.
Step 4: Now we are going to write the script code which will be inside either on the head section or in the body section it will depend upon you which way you like most to placed it.

Step 5: In this step we will write the CSS code which will be inside the <style></style> tags which is given below:
CSS Code:
<style
type="text/css">
#header{
width: 400px;
height:150px;
margin: 0
auto;
position: relative;
}
#HyperLink1{
position: absolute;
top: 6px;
font-family:Comic
Sans MS;
font-size:x-large;
rightright: 0px;
display: block;
background:teal;
padding: 10px
20px 10px
20px;
color:Maroon;
left: 0px;
margin-top:-8px;
cursor:pointer;
}
#lgn_panel{
position: absolute;
top: 38px;
rightright: 0px;
width: 300px;
padding: 25px
30px 10px
20px;
background:#993333;
font-size:x-large;
font-weight: bold;
color: #ffffff;
display: none;
font-family:Comic
Sans MS;
height:250px;
}
</style>
Step 6: In this step we are going to write the jQuery code which is given below:
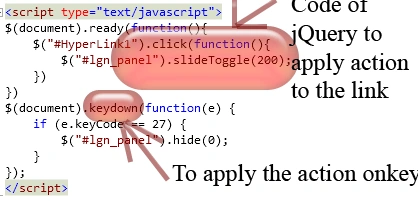
Step 7: In this step you will see the body code of the Default2.aspx page which is given below:
Body Code:
<body>
<form
id="form1"
runat="server">
<div
id="demo"
style="font-family:
'Comic Sans MS'; font-size:
xx-large; color:
#800080; background-color:
#FFFF00;">Click on Login to Hide and Display the login form</div>
<div
id="header"
style="width:
900px; height:
100px">
<asp:HyperLink
ID="HyperLink1"
runat="server">Login</asp:HyperLink>
<div
id="lgn_panel">
<asp:Label
ID="lbl1" runat="server"
ForeColor="#FFFF66">UserName:
<br
/>
<asp:TextBox
ID="TextBox1"
runat="server"></asp:TextBox>
</asp:Label>
<br
/>
<asp:Label
ID="lbl2" runat="server"
ForeColor="#FFFF66">Password:
<br
/>
<asp:TextBox
ID="TextBox2"
runat="server"></asp:TextBox>
</asp:Label>
<br
/>
<asp:CheckBox
ID="CheckBox1" runat="server"
/> <asp:Label
ID="Label1"
runat="server"
Text="Remember
me"></asp:Label>
<br
/>
<asp:Button
ID="Button1"
runat="server"
Text="Submit"
BackColor="#660033"
ForeColor="Yellow"
Height="40px"
Width="100px"
Font-Size="Large"
BorderColor="#FFFF66"
BorderStyle="Groove"
BorderWidth="5px"
/>
<br
/>
<asp:Label
ID="lbl3" runat="server"
Text="Press ESC to
Close"
ForeColor="#00FFCC"></asp:Label>
</div>
</div>
</form>
</body>
Step 8: In this step we will write the Complete code for the Default2.aspx page which is given below:
Code:
<%@
Page Language="C#"
AutoEventWireup="true"
CodeFile="Default2.aspx.cs"
Inherits="Default2"
%>
<!DOCTYPE
html PUBLIC
"-//W3C//DTD XHTML 1.0 Transitional//EN"
"http://www.w3.org/TR/xhtml1/DTD/xhtml1-transitional.dtd">
<html
xmlns="http://www.w3.org/1999/xhtml">
<head
runat="server">
<title></title>
<script
type="text/javascript"
src="Scripts/jquery-1.4.1.min.js"></script>
<script
type="text/javascript">
$(document).ready(function(){
$("#HyperLink1").click(function(){
$("#lgn_panel").slideToggle(200);
})
})
$(document).keydown(function(e) {
if (e.keyCode == 27) {
$("#lgn_panel").hide(0);
}
});
</script>
<style
type="text/css">
#header{
width: 400px;
height:150px;
margin: 0
auto;
position: relative;
}
#HyperLink1{
position: absolute;
top: 6px;
font-family:Comic
Sans MS;
font-size:x-large;
rightright: 0px;
display: block;
background:teal;
padding: 10px
20px 10px
20px;
color:Maroon;
left: 0px;
margin-top:-8px;
cursor:pointer;
}
#lgn_panel{
position: absolute;
top: 38px;
rightright: 0px;
width: 300px;
padding: 25px
30px 10px
20px;
background:#993333;
font-size:x-large;
font-weight: bold;
color: #ffffff;
display: none;
font-family:Comic
Sans MS;
height:250px;
}
</style>
</head>
<body>
<form
id="form1"
runat="server">
<div
id="demo"
style="font-family:
'Comic Sans MS'; font-size:
xx-large; color:
#800080; background-color:
#FFFF00;">Click on Login to Hide and Display the login form</div>
<div
id="header"
style="width:
900px; height:
100px">
<asp:HyperLink
ID="HyperLink1"
runat="server">Login</asp:HyperLink>
<div
id="lgn_panel">
<asp:Label
ID="lbl1" runat="server"
ForeColor="#FFFF66">UserName:
<br
/>
<asp:TextBox
ID="TextBox1"
runat="server"></asp:TextBox>
</asp:Label>
<br
/>
<asp:Label
ID="lbl2" runat="server"
ForeColor="#FFFF66">Password:
<br
/>
<asp:TextBox
ID="TextBox2"
runat="server"></asp:TextBox>
</asp:Label>
<br
/>
<asp:CheckBox
ID="CheckBox1" runat="server"
/> <asp:Label
ID="Label1"
runat="server"
Text="Remember
me"></asp:Label>
<br
/>
<asp:Button
ID="Button1"
runat="server"
Text="Submit"
BackColor="#660033"
ForeColor="Yellow"
Height="40px"
Width="100px"
Font-Size="Large"
BorderColor="#FFFF66"
BorderStyle="Groove"
BorderWidth="5px"
/>
<br
/>
<asp:Label
ID="lbl3" runat="server"
Text="Press ESC to
Close"
ForeColor="#00FFCC"></asp:Label>
</div>
</div>
</form>
</body>
</html>
Step 9: In this step we will see the design file of the Default2.aspx page which is given below:

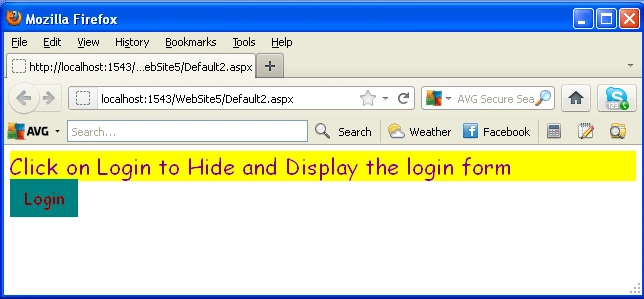
Step 10: Now we are going to run the application by pressing F5 and the related output is given below:
Output1:
Output2:
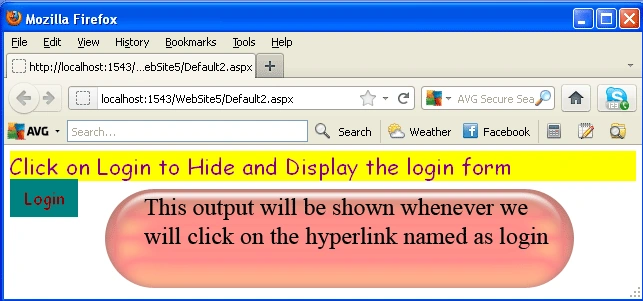
Output3:
Akash BhimaniPosted Nov 12, 2014, 9:01 PM
good effort