Introduction
Silverlight is a new and powerful browser plug-in that works with Mac OS, Windows and Linux. It helps you create rich web application that is safe, secure and scalable cross-platform. This article will use Visual Studio 2008 to create Silverlight pop search form control.
System Requirement
The article assumes a familiarity with C#, as well as with using Visual Studio 2008 to create Silverlight applications. Elementary knowledge of WCF, Web Service, LINQ would be beneficial but not absolutely necessary to fully understand the content of this article.
Design Requirement
The main control is combining with two textboxes and one button as Fig 1. The first textbox has ability to display data and enter data. The button will show up pop search form. The second textbox has ability to display data only.

Fig 1. Main Control with function descriptions
The pop search form control has datagrid to display data and it has searching function as Fig 2.

Fig 2. Pop Search Form control with function descriptions
There are two ways to bring data from datagrid to the main control.
- By double click datagrid
- By click OK button

Fig 3. Bring selected data back to Main control
There is one way to extract data without pop search form.
- Types correct ID (key) in first textbox to display Name (Value) data.

Fig 4. Types correct ID to display Name
Create Silverlight and WCF Project
Once we know control's functionalities, now we can start to create our project in Visual Studio 2008. Let's create all the projects we need, then we will tackle each project to achieve goal.
**Please download the code and walkthrough it with each step
Step 1. Create Silverlight Application
In Visual Studio 2008, go File->New->Project then select Sivlerlight Application. You can name whatever name you would like to call. I will name it popFormDemo in this sample as Fig 5.

Fig 5. Create Silverlight project
You should see the wizard window after you click OK in step 1. We will leave it in default setting as Fig 6.

Fig 6. Add Silverlight Application wizard
Add New Folder under PopFormDemo Project with name CusControl as Fig 7.

Fig 7. Create new folder in PopFormDemo project
Under CusControl Folder, add New Silverlight user control with name PopForm as Fig 8.

Fig 8. Add new Silverlight User Control in CusControl folder
Step 2. Create WCF service project
There are few ways to pass data from database to Silverlight control. The common technologies are either web service or WCF. I am going to use WCF in this sample.
Under solution, add new ASP.NET Web Application and rename to DaoWcf as Fig 9.

Fig 9. Add ASP.NET Web Application in Solution
Under DaoWcf web project, add new WCF Service and rename to PopDataService as Fig 10. (You can delete Default.aspx or you can leave it)

Fig 10. Add WCF Service
Now you should have IPopDataService.cs and PopDataService.svc in the DaoWcf project as Fig 11.

Fig 11. IPopDataService.cs and PopDataService.svc
Step 3. Configuration in WCF service project
In the DaoWcf project, right click Properties. You need to use Local IIS Web server in the Web tab as Fig 12.
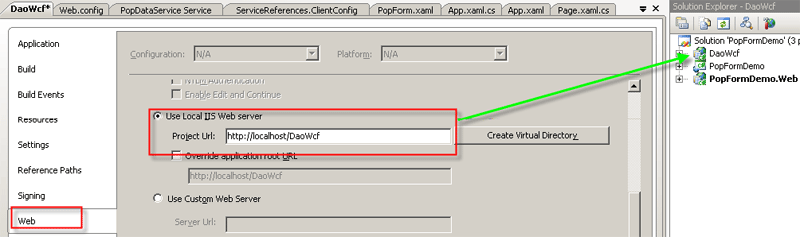
Fig 12. Set Local IIS Web server in DaoWcf Project
In the web.config, add NorthWindDb connection string in connectionStrings tag as Fig 13.

Fig 13. NorthWindDb connection string in web.config
In the web.config, modify service binding from wsHttpBinding (default) to basicHttpBinding as Fig 14.

Fig 14. Use basicHttpBinding for Silverlight-enabled WCF service
Notes:
A Silverlight-enabled WCF Service is very similar to a "normal" WCF Service. The only difference is that Silverlight only supports calls to WCF services configured with BasicHttpBinding. More advanced profiles are not supported at the moment. It is also possible to take a "normal" WCF Service, to reconfigure it to work with BasicHttpBinding, and to call it from Silverlight.
Step 4. Implement Code in WCF service project
In the PopDataSerivce.svc.cs, PopFormClass has ID and NAME properties with DataContract attribute. DataContract attribute describe data structures that are used by the service to communicate with client.
[DataContract()] public class PopFormClass { [DataMember] public string ID { get; set; } [DataMember] public string NAME { get; set; } }
|
In the IPopDataService.cs, the IPopDataService interface has 3 abstract methods with ServiceContract attribute. ServiceContract describe the functional operations implemented by the service.
[ServiceContract] public interface IPopDataService { [OperationContract] List<PopFormClass> GetSqlCustomersData(); [OperationContract] List<PopFormClass> GetSqlEmployeesData(); [OperationContract] List<PopFormClass> GetSqlProductsData(); }
|
Implement interface IPopDataService to the PopDataService.svc.cs
public class PopDataService : IPopDataService { public PopDataService() { SqlConString = ConfigurationManager.ConnectionStrings["NorthWindDb"].ConnectionString; } public List<PopFormClass> GetSqlCustomersData() { List<PopFormClass> list = new List<PopFormClass>(); try { list = GetPopData("select CustomerID, CompanyName from Customers order by 1"); } catch (Exception ex) { throw ex; } return list; } public List<PopFormClass> GetSqlProductsData() { List<PopFormClass> list = new List<PopFormClass>(); try { list = GetPopData("select ProductID, ProductName from Products order by 1"); } catch (Exception ex) { throw ex; } return list; } public List<PopFormClass> GetSqlEmployeesData() { List<PopFormClass> list = new List<PopFormClass>(); try { list = GetPopData("select EmployeeID, LastName, FirstName from Employees order by 1"); } catch (Exception ex) { throw ex; } return list; } }
|
The GetPopData(string strSql) method will get data from database then insert data into List<PopFormClass>
private List<PopFormClass> GetPopData(string strSql) { List<PopFormClass> list = new List<PopFormClass>(); using (SqlConnection con = new SqlConnection(SqlConString)) { con.Open(); SqlCommand com = new SqlCommand(strSql, con); IDataReader dr = com.ExecuteReader(); while (dr.Read()) { PopFormClass pf = new PopFormClass(); pf.ID = Convert.ToString(dr[0]); pf.NAME = Convert.ToString(dr[1]); list.Add(pf); } } return list; }
|
Step 5. Check WCF service is working properly
Now, you can use IE to check whether the WCF is working correctly. Right click DaoWcf project, then select "Set as StartUp Project". Run Start Without Debugging (Ctrl-F5). You should see service web as Fig 15.

Fig 15. PopDataService Web
Clicking on the url next to svcutil.exe text. You should see the xml similar as Fig 16.

Fig 16. WSDL for PopDataService
Step 6. Add Service Reference in Silverlight Project
To invoke WCF service, firstly you need to generate a configuration file and proxy class, and second, write code that uses the proxy class to invoke the service. In PopFormDemo project, right click the Reference and then select Add Service Reference from the context menu as Fig 17. This will launch as dialog box show in Fig 18.

Fig 17. Add Service Reference in Silverlight
In the Address, give service Url as you created before then click go. This dialog calls the svcutil utility to create a source file that implements the proxy class.

Fig 18. Get available service by giving service URL
It also creates an app.config file with a <system.serviceMode> node that stores the address, binding, and contract information necessary to call the endpoints as Fig 19.

Fig 19. App.config and service reference
Step 7. Create Pop Search Form Control UI
In the main control, create 2 Textboxes and 1 Button as Fig 20.

Fig 20. Main control layout and XAML
The pop search form is inside of Border control as Fig 21. So it can use Visibility to hide or show the pop search form.

Fig 21. Pop Search Form layout and XAML
Initially, the pop search form control is set to Visibility = "Collapsed" as Fig 22.

Fig 22. Set Border to Visibility = "Collapsed"
I am using resources to define styles for top right close button as Fig 23. (Its kind like CSS for web application.)

Fig 23. btnPopClose button is using StaticResource for style
I define resources in App.xaml as Fig 24. That's because very element has access to the resources. You can also define resources in page level, and then all the elements on that page can use it.
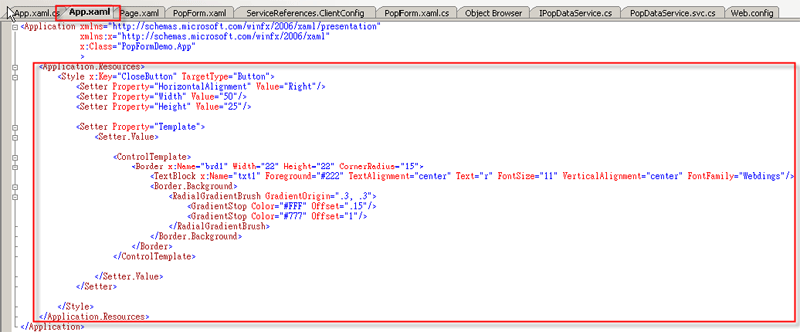
Fig 24. Define resource in App.xaml
Step 8. Implement Code in Silverlight project
There 5 main properties in PopForm.xaml.cs as below:
public string DataProvider { get; set; } public string TitleName { get; set; } public string PopId { get; set; } public string PopName { get; set; } public string OpacityValue { get; set; }
|
DataProvider : It tells which data you would like to show on pop search form
TitleName : Title name on the top of pop search form
PopId : Label ID text on the pop search form
PopName: Label NAME text on the pop search form
OpacityValue : Opacity level for the pop search form
As mentioned before, there are two ways to get data
1. From pop search form
a. By click OK button
private void btnPopEnter_Click(object sender, RoutedEventArgs e) { if (popBoder.Visibility == Visibility.Visible) { PopFormClass pf = dgPop.SelectedItem as PopFormClass; txtId.Text = pf.ID; txtName.Text = pf.NAME; popBoder.Visibility = Visibility.Collapsed; }}
|
b. By Double click on Datagrid
The double click idea from MouseClickManager.
Assign double click event with ResultSelected in the construct as below:
public PopForm() { InitializeComponent(); this.Loaded += new RoutedEventHandler(PopForm_Loaded); _gridClickManager = new MouseClickManager(200); _gridClickManager.DoubleClick += new MouseButtonEventHandler(ResultSelected);
} private void ResultSelected(object sender, MouseButtonEventArgs e) { if (popBoder.Visibility == Visibility.Visible) { PopFormClass pf = dgPop.SelectedItem as PopFormClass; txtId.Text = pf.ID; txtName.Text = pf.NAME; popBoder.Visibility = Visibility.Collapsed; } }
|
Assign double click event on each row in datagrid as below:
private void dgPop_LoadingRow(object sender, DataGridRowEventArgs e) { e.Row.MouseLeftButtonUp -= _gridClickManager.HandleCl
e.Row.MouseLeftButtonUp += _gridClickManager.HandleClick; }
|
2. From Textbox
private void txtId_MouseLeave(object sender, MouseEventArgs e) {
if (!string.IsNullOrEmpty(txtId.Text))
{
var eData = from eFilter in popData
where eFilter.ID == txtId.Text
select eFilter; if (eData.Count() > 0)
{
txtName.Text = eData.First().NAME;
}
else
{
txtName.Text = string.Empty
}
} }
|
code that uses the proxy class to invoke the service
private void dgPop_Loaded(object sender, RoutedEventArgs e)
{   lblPopTitle.Text = string.IsNullOrEmpty(TitleName) ? "" : TitleName;   lblPopId.Text = string.IsNullOrEmpty(PopId) ? "ID: " : PopId;   lblPopName.Text = string.IsNullOrEmpty(PopName) ? "NAME: " : PopName;   if (!string.IsNullOrEmpty(DataProvider))   {      switch (DataProvider)      {         case "GetSqlCustomersData":            daoWcf = new PopDataServiceClient();            daoWcf.GetSqlCustomersDataCompleted += new EventHandler<GetSqlCustomersDataCompletedEventArgs>(daoWcf_GetSqlCustomersDataCompleted);            daoWcf.GetSqlCustomersDataAsync();         brbeak;         case "GetSqlProductsData":            daoWcf = new PopDataServiceClient();            daoWcf.GetSqlProductsDataCompleted += new EventHandler<GetSqlProductsDataCompletedEventArgs>(daoWcf_GetSqlProductsDataCompleted);            daoWcf.GetSqlProductsDataAsync();         break;         case "GetSqlEmployeesData":            daoWcf = new PopDataServiceClient();            daoWcf.GetSqlEmployeesDataCompleted += new EventHandler<GetSqlEmployeesDataCompletedEventArgs>(daoWcf_GetSqlEmployeesDataCompleted);            daoWcf.GetSqlEmployeesDataAsync();         break;         dedfault:         break;
      }   }
}
|
Step 9. Apply pop search form control to page
Firstly, we need to map pop search form control namespace to Page.xaml as below:
<UserControl x:Class="PopFormDemo.Page" xmlns="http://schemas.microsoft.com/winfx/2006/xaml/presentation" xmlns:x="http://schemas.microsoft.com/winfx/2006/xaml" xmlns:local="clr-namespace:PopFormDemo.CusControl">
|
I apply 3 pop search form control on the Page.xaml as below:
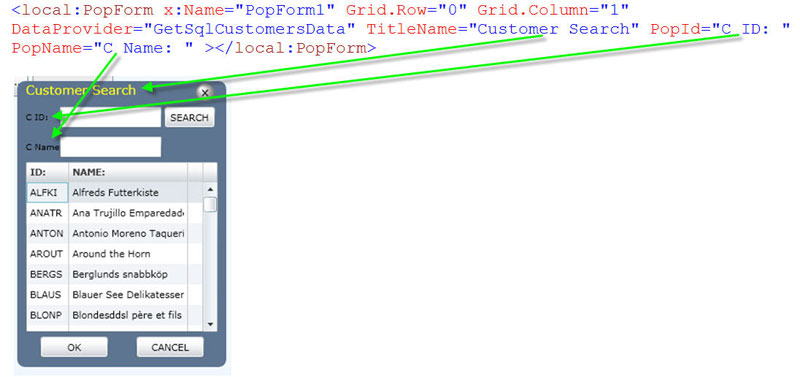
Fig 25. Customer Search
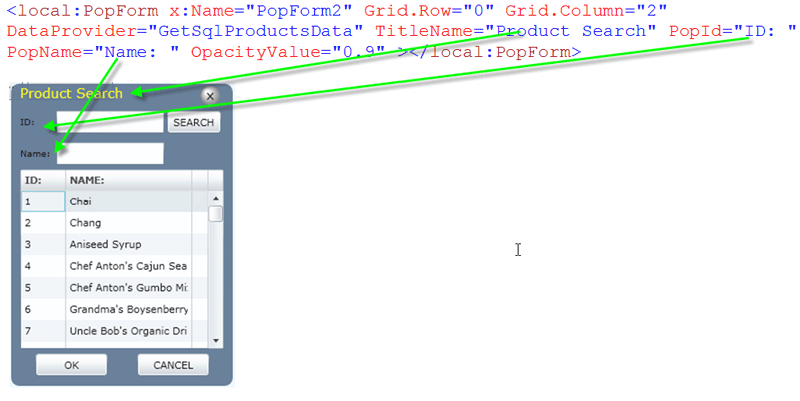
Fig 26. Product Search

Fig 27. Employee Search
Moving Forward
I am placing this code into the public domain without restriction. It doesn't have the best pattern design or coding style. Anyone can use it for any purpose, including in commercial products. If you can improve the code or even make it more clear, please let me know. I will update the code to make it more useful. Thank you all.