Objective: The article demonstrates how to use the MediaElement control in Silverlight 2.
A MediaElement is a rectangular region on a Silverlight user interface and can contain audio or video on its surface.
The MediaElement control allows you to specify event handlers for mouse and keyboard events. You can either specify a URL for the media element or you can have it added as an item to the project.
Some of the media types supported by Silverlight 2 are:
Silverlight currently supports the following types of media:
- Advanced Stream Redirector (ASX) playlist file format
- Windows Media Audio 7 (WMA 7)
- Windows Media Audio 8 (WMA 8)
- Windows Media Audio 9 (WMA 9)
- ISO/MPEG Layer-3 compliant data stream input (MP3)
- Windows Media Video 7 (WMV 1)
- Windows Media Video 8 (WMV 2)
- Windows Media Video 9 (WMV 3)
- Windows Media Video Advanced Profile, non-VC1 (WMVA)
- Windows Media Video Advanced Profile, VC1 (WMVC1)
Let us walkthrough a simple Silverlight 2 application that displays a video using the MediaElement control.
Create a Silverlight 2 application. Let us assume that it is named MediaApp. Add a .wmv file to the project. In our case, we will assume that a file bud.wmv has been added to the application folder.
Modify the default XAML code of Page.xaml so that it looks like below:
<UserControl x:Class="MediaApp.Page"
xmlns="http://schemas.microsoft.com/winfx/2006/xaml/presentation"
xmlns:x="http://schemas.microsoft.com/winfx/2006/xaml"
Width="800" Height="800">
<Grid x:Name="LayoutRoot" Background="Bisque" Height="600" Width="600">
<Grid.ColumnDefinitions>
<ColumnDefinition Width="400" />
</Grid.ColumnDefinitions>
<Grid.RowDefinitions>
<RowDefinition Height="Auto" />
<RowDefinition Height="Auto" />
<RowDefinition Height="Auto" />
</Grid.RowDefinitions>
</Grid>
</UserControl>
This will create the Grid having a background of Bisque and 1 column and 2 rows.
Drag and drop a MediaElement in between the <Grid> tags after the </GridRowDefinitions> tags.
Drag and drop a Button after the MediaElement tags.
Modify the properties of MediaElement and Button as shown below:
<UserControl x:Class="MediaApp.Page"xmlns="http://schemas.microsoft.com/winfx/2006/xaml/presentation" xmlns:x="http://schemas.microsoft.com/winfx/2006/xaml"
Width="800" Height="800"><Grid x:Name="LayoutRoot" Background="Bisque" Height="600" Width="600">
<Grid.ColumnDefinitions>
<ColumnDefinition Width="400" />
</Grid.ColumnDefinitions>
<Grid.RowDefinitions>
<RowDefinition Height="Auto" />
<RowDefinition Height="Auto" />
<RowDefinition Height="Auto" />
</Grid.RowDefinitions>
<MediaElement Grid.Row="0" Grid.Column="0" Height="300" Width="300" AutoPlay="false" Grid.Row="1" Grid.Column="0" Name="mdaVideo" Source="bud.wmv" ></MediaElement>
<Button Content="Click" Name="bntClick" Height="20" Width="40" Click="Button_Click" ></Button>
</Grid>
</UserControl>
In Page.xaml.cs, add the bolded code inside the event handler:
private void Button_Click(object sender, RoutedEventArgs e)
{
this.mdaVideo.Play();
}
This will ensure that the video will play only when the button is clicked.
When you build and execute the application, and then click the button, you will see the video playing. Figure 1 shows the grab of the page running the video.
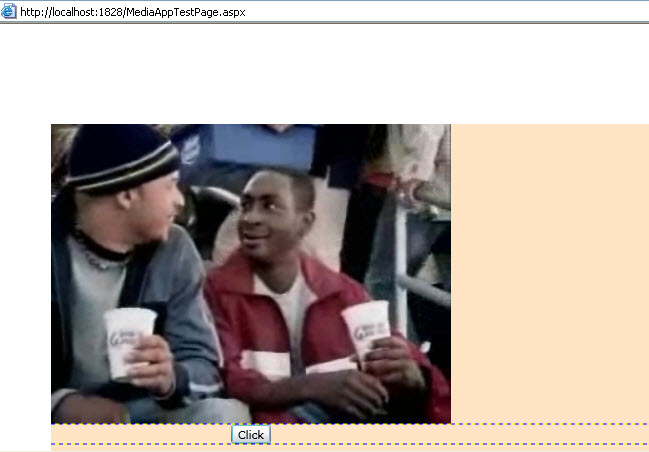
Figure 1 : MediaElement in Action
Conclusion: Thus, you learnt how to display a video using the MediaElement control in Silverlight 2.