This chapter is taken from book "Pro WPF in C# 2008" by Matthew MacDonald published by Apress.
Introducing
The Windows Presentation Foundation (WPF) is an entirely new graphical display system for Windows. WPF is designed for .NET, influenced by modern display technologies such as HTML and Flash, and hardware-accelerated. It's also the most radical change to hit Windows user interfaces since Windows 95.
In this chapter you'll peer into the architecture of WPF. You'll get your first look at how it works, and you'll see what it promises for the next generation of Windows applications.
Understanding Windows Graphics
It's hard to appreciate how dramatic WPF is without realizing that Windows developers have been using essentially the same display technology for more than 15 years. A standard Windows application relies on two well-worn parts of the Windows operating system to create its user interface:
- User32 provides the familiar Windows look and feel for elements such as windows,buttons, text boxes, and so on.
- GDI/GDI+ provides drawing support for rendering shapes, text, and images at the costof additional complexity (and often lackluster performance).
Over the years, both technologies have been refined, and the APIs that developers use to interact with them have changed dramatically. But whether you're crafting an application with .NET and Windows Forms, or lingering in the past with Visual Basic 6 or MFC-based C++ code, behind the scenes the same parts of the Windows operating system are at work. Newer frameworks simply deliver better wrappers for interacting with User32 and GDI/GDI+. They can provide improvements in efficiency, reduce complexity, and add prebaked features so you don't have to code them yourself; but they can't remove the fundamental limitations of a system component that was designed more than a decade ago.
Note: The basic division of labor between User32 and GDI/GDI+ was introduced more than 15 years agoand was well established in Windows 3.0. Of course, User32 was simply User at that point, because software hadn't yet entered the 32-bit world.
DirectX: The New Graphics Engine
Microsoft created one way around the limitations of the User32 and GDI/GDI+ libraries:
DirectX. DirectX began as a cobbled-together, error-prone toolkit for creating games on the Windows platform. Its design mandate was speed, and so Microsoft worked closely with video card vendors to give DirectX the hardware acceleration needed for complex textures, special effects such as partial transparency, and three-dimensional graphics.
Over the years since it was first introduced (shortly after Windows 95), DirectX has matured. It's now an integral part of Windows, with support for all modern video cards. However, the programming API for DirectX still reflects its roots as a game developer's toolkit. Because of its raw complexity, DirectX is almost never used in traditional types of Windows applications (such as business software).
WPF changes all this. In WPF, the underlying graphics technology isn't GDI/GDI+. Instead, it's DirectX. Remarkably, WPF applications use DirectX no matter what type of user interface you create. That means that whether you're designing complex three-dimensional graphics (DirectX) or just drawing buttons and plain text, all the drawing work travels through the DirectX pipeline. As a result, even the most mundane business applications can use rich effects such as transparency and anti-aliasing. You also benefit from hardware acceleration, which simply means DirectX hands off as much work as possible to the GPU (graphics processing unit), which is the dedicated processor on the video card.
Note: DirectX is more efficient because it understands higher-level ingredients such as textures and gradients,which can be rendered directly by the video card. GDI/GDI+ doesn't, so it needs to convert them to pixel-by-pixel instructions, which are rendered much more slowly by modern video cards.
One component that's still in the picture (to a limited extent) is User32. That's because WPF still relies on User32 for certain services, such as handling and routing input and sorting out which application owns which portion of screen real estate. However, all the drawing is funneled through DirectX.
Note: This is the most significant change in WPF. WPF is not a wrapper for GDI/GDI+. Instead, it's a replacement-a separate layer that works through DirectX.
Hardware Acceleration and WPF
You're probably aware that video cards differ in their support for specialized rendering features and optimizations. When programming with DirectX, that's a significant headache. With WPF, it's a much smaller concern, because WPF has the ability to perform everything it does using software calculations rather than relying on built-in support from the video card.
Note: There's one exception to WPF's software support. Due to poor driver support, WPF only performsanti-aliasing for 3-D drawings if you're running your application on Windows Vista (and you have a native Windows Vista driver for your video card). That means that if you draw three-dimensional shapes on a WindowsXP computer, you'll end up with slightly jagged edges rather than nicely smoothed lines. Anti-aliasing is always provided for 2-D drawings, regardless of the operating system and driver support.
Having a high-powered video card is not an absolute guarantee that you'll get fast, hardware-accelerated performance in WPF. Software also plays a significant role. For example, WPF can't provide hardware acceleration to video cards that are using out-of-date drivers. (If you're using an older video card, these out-of-date drivers are quite possibly the only ones that were provided in the retail package.) WPF also provides better performance under the Windows Vista operating system, where it can take advantage of the new Windows Vista Display Driver Model (WDDM). WDDM offers several important enhancements beyond the Windows XP Display Driver Model (XPDM). Most importantly, WDDM allows several GPU operations to be scheduled at once, and it allows video card memory to be paged to normal system memory if you exceed what's available on the video card.
As a general rule of thumb, WPF offers some sort of hardware acceleration to all WDDM (Windows Vista) drivers and to XPDM (Windows XP) drivers that were created after November 2004, which is when Microsoft released new driver development guidelines. Of course, the level of support differs. When the WPF infrastructure first starts up, it evaluates your video card and assigns it a rating from 0 to 2, as described in the sidebar "WPF Tiers."Part of the promise of WPF is that you don't need to worry about the details and idiosyncrasiesof specific hardware. WPF is intelligent enough to use hardware optimizations where possible, but it has a software fallback for everything. So if you run a WPF application on a computer with a legacy video card, the interface will still appear the way you designed it. Of course, the software alternative may be much slower, so you'll find that computers with older video cards won't run rich WPF applications very well, especially ones that incorporate complex animations or other intense graphical effects. In practice, you might choose to scale down complex effects in the user interface, depending on the level of hardware acceleration that's available in the client (as indicated by the RenderCapability.Tier property).
Note: The goal of WPF is to offload as much of the work as possible on the video card so that complexgraphics routines are render-bound (limited by the GPU) rather than processor-bound (limited by your computer's CPU). That way, you keep the CPU free for other work, you make the best use of your video card, and you are able to take advantage of performance increases in newer video cards as they become available.
Video cards differ significantly. When WPF assesses a video card, it considers a number of factors, including the amount of RAM on the video card, support for pixel shaders (built-in routines that calculate per-pixel effects such as transparency), and support for vertex shaders (built-in routines that calculate values at the vertexes of a triangle, such as the shading of a 3-D object). Based on these details, it assigns a renderingtier value.
WPF recognizes three rendering tiers. They are as follows:
- Rendering Tier 0. The video card will not provide any hardware acceleration. This corresponds to aDirectX version level of less than 7.0.
- Rendering Tier 1. The video card can provide partial hardware acceleration. This corresponds to aDirectX version level greater than 7.0 but less than 9.0.
- Rendering Tier 2. All features that can be hardware accelerated will be. This corresponds to a DirectXversion level greater than or equal to 9.0.
In some situations, you might want to examine the current rendering tier programmatically, so you can selectively disable graphics-intensive features on lesser-powered cards. To do so, you need to use the static Tier property of the System.Windows.Media.RenderCapability class. But there's one trick. To extract the tier value from the Tier property, you need to shift it 16 bits, as shown here:
int renderingTier = (RenderCapability.Tier >> 16);
if (renderingTier == 0)
{ ... }
else if (renderingTier == 1)
{ ... }
This design allows extensibility. In future versions of WPF, the other bits in the Tier property might be used to store information about support for other features, thereby creating subtiers.
For more information about what WPF features are hardware-accelerated for tier 1 and tier 2, and for a list of common tier 1 and tier 2 video cards, refer to http://msdn2.microsoft.com/en-gb/library/ ms742196.aspx.
WPF: A Higher-Level API
If the only thing WPF offered was hardware acceleration through DirectX, it would be a compelling improvement, but not a revolutionary one. But WPF actually includes a basket of high-level services designed for application programmers.
Here's a list with some of the most dramatic changes that WPF ushers into the Windows programming world:
- A web-like layout model. Rather than fix controls in place with specific coordinates,WPF emphasizes flexible flow layout that arranges controls based on their content.
The result is a user interface that can adapt to show highly dynamic content or different languages.
- A rich drawing model. Rather than painting pixels, in WPF you deal with primitives-basic shapes, blocks of text, and other graphical ingredients. You also have new features,such as true transparent controls, the ability to stack multiple layers with different opacities, and native 3-D support.
Note: The 3-D support in WPF is not as mature as Direct3D or OpenGL. If you are planning to design anapplication that makes heavy use of three-dimensional drawing (such as a real-time game), WPF probably won't provide the features and performance you need.
- A rich text model. After years of substandard text handling with feeble controls such asthe classic Label, WPF finally gives Windows applications the ability to display rich, styled text anywhere in a user interface. You can even combine text with lists, floating figures, and other user interface elements. And if you need to display large amounts of text, you can use advanced document display features such as wrapping, columns, and justification to improve readability.
- Animation as a first-class programming concept. Yes, you could use a timer to force aform to repaint itself. But in WPF, animation is an intrinsic part of the framework. You define animations with declarative tags, and WPF puts them into action automatically.
- Support for audio and video media. Previous user interface toolkits, such as WindowsForms, were surprisingly limited when dealing with multimedia. But WPF includes support for playing any audio or video file supported by Windows Media Player, and it allows you to play more than one media file at once. Even more impressively, it gives you the tools to integrate video content into the rest of your user interface, allowing you to pull off exotic tricks such as placing a video window on a spinning 3-D cube.
- Styles and templates. Styles allow you to standardize formatting and reuse it throughoutyour application. Templates allow you to change the way any element is rendered, even a core control such as the button. It's never been easier to build modern skinned interfaces.
- Commands.Most users realize that it doesn't matter whether they trigger the Opencommand through a menu or a toolbar; the end result is the same. Now that abstraction is available to your code, you can define an application command in one place and link it to multiple controls.
- Declarative user interface. Although you can construct a WPF window with code,Visual Studio takes a different approach. It serializes each window's content to a set of XML tags in a XAML document. The advantage is that your user interface is completely separated from your code, and graphic designers can use professional tools to edit your XAML files and refine your application's front end. (XAML is short for Extensible ApplicationMarkup Language, and it's described in detail in Chapter 2.)
- Page-based applications. Using WPF, you can build a browser-like application that letsyou move through a collection of pages, complete with forward and back navigation buttons. WPF handles the messy details, such as the page history. You can even deploy your project as a browser-based application that runs right inside Internet Explorer.
Resolution Independence
Traditional Windows applications are bound by certain assumptions about resolution. Developers usually assume a standard monitor resolution (such as 1024 by 768 pixels), design their windows with that in mind, and try to ensure reasonable resizing behavior for smaller and larger dimensions.
The problem is that the user interface in traditional Windows applications isn't scalable. As a result, if you use a high monitor resolution that crams pixels in more densely, your application windows become smaller and more difficult to read. This is particularly a problem with newer monitors that have high pixel densities and run at correspondingly high resolutions. For example, it's common to find consumer monitors (particularly on laptops) that have pixel densities of 120 dpi or 144 dpi (dots per inch), rather than the more traditional 96 dpi. At their native resolution, these displays pack the pixels in much more tightly, creating eye-squintingly small controls and text.
Ideally, applications would use higher pixel densities to show more detail. For example, a high-resolution monitor could display similarly sized toolbar icons but use the extra pixels to render sharper graphics. That way you could keep the same basic layout but offer increased clarity and detail. For a variety of reasons, this solution hasn't been possible in the past. Although you can resize graphical content that's drawn with GDI/GDI+, User32 (which generates the visuals for common controls) doesn't support true scaling.
WPF doesn't suffer from this problem because it renders all user interface elements itself, from simple shapes to common controls such as buttons. As a result, if you create a button that's 1 inch wide on your computer monitor, it can remain 1 inch wide on a high-resolution monitor-WPF will simply render it in greater detail and with more pixels.
Note: Resolution independence also has advantages when printing the contents of a window, as you'llsee in Chapter 20.
This is the big picture, but it glosses over a few details. Most importantly, you need to realize that WPF bases its scaling on the system DPI setting, not the DPI of your physical display device. This makes perfect sense-after all, if you're displaying your application on a 100-inchprojector, you're probably standing several feet back and expecting to see a jumbo-size version of your windows. You don't want WPF to suddenly scale down your application to "normal" size. Similarly, if you're using a laptop with a high-resolution display, you probably expect to have slightly smaller windows-it's the price you pay to fit all your information ontoa smaller screen. Furthermore, different users have different preferences. Some want richer detail, while others prefer to cram in more content.
So how does WPF determine how big an application window should be? The short answer is that WPF uses the system DPI setting when it calculates sizes. But to understand how this really works, it helps to take a closer look at the WPF measurement system.
WPF Units
A WPF window and all the elements inside it are measured using device-independent units. A single device-independent unit is defined as 1/96 of an inch. To understand what this means in practice, you'll need to consider an example.
Imagine that you create a small button in WPF that's 96 by 96 units in size. If you're using the standard Windows DPI setting (96 dpi), each device-independent unit corresponds to one real, physical pixel. That's because WPF uses this calculation:
[Physical Unit Size] = [Device-Independent Unit Size] * [System DPI]= 1/96 inch * 96 dpi= 1 pixel
Essentially, WPF assumes it takes 96 pixels to make an inch because Windows tells it that through the system DPI setting. However, the reality depends on your display device.
For example, consider a 20-inch LCD monitor with a maximum resolution of 1600 by 1200 pixels. Using a dash of Pythagoras, you can calculate the pixel density for this monitor, as shown here:
In this case, the pixel density works out to 100 dpi, which is slightly higher than what Windows assumes. As a result, on this monitor a 96-by-96-pixel button will be slightly smaller than 1 inch.
On the other hand, consider a 15-inch LCD monitor with a resolution of 1024 by 768. Here, the pixel density drops to about 85 dpi, so the 96-by-96 pixel button appears slightly larger than 1 inch.
In both these cases, if you reduce the screen size (say, by switching to 800 by 600 resolution), the button (and every other screen element) will appear proportionately larger. That's because the system DPI setting remains at 96 dpi. In other words, Windows continues to assume it takes 96 pixels to make an inch, even though at a lower resolution it takes far fewer pixels.
Tip: As you no doubt know, LCD monitors are designed with a single resolution, which is called the nativeresolution. If you lower the resolution, the monitor must use interpolation to fill in the extra pixels, which can cause blurriness. To get the best display, it's always best to use the native resolution. If you want larger windows, buttons, and text, consider modifying the system DPI setting instead (as described next).
System DPI
So far, the WPF button example works exactly the same as any other user interface element in any other type of Windows application. The difference is the result if you change the system DPI setting. In the previous generation of Windows, this feature was sometimes called largefonts. That's because the system DPI affects the system font size, but often leaves other details unchanged.
Note: Many Windows applications don't fully support higher DPI settings. At worst, increasing the systemDPI can result in windows that have some content that's scaled up, and other content that isn't, which can lead to obscured content and even unusable windows.
This is where WPF is different. WPF respects the system DPI setting natively and effortlessly.For example, if you change the system DPI setting to 120 dpi (a common choice for users of large high-resolution screens), WPF assumes that it needs 120 pixels to fill an inch of space. WPF uses the following calculation to figure out how it should translate its logical units to physical device pixels:
[Physical Unit Size] = [Device-Independent Unit Size] * [System DPI]= 1/96 inch * 120 dpi= 1.25 pixels
In other words, when you set the system DPI to 120 dpi, the WPF rendering engine assumes one device-independent unit equals 1.25 pixels. If you show a 96-by-96 button, the physical size will actually be 120 by 120 pixels (because 96 * 1.25 = 120). This is the result youexpect-a button that's 1 inch on a standard monitor remains 1 inch in size on a monitor witha higher pixel density.
This automatic scaling wouldn't help much if it only applied to buttons. But WPF uses device-independent units for everything it displays, including shapes, controls, text, and any other ingredient you put in a window. As a result, you can change the system DPI to whatever you want, and WPF will adjust the size of your application seamlessly.
Note: Depending on the system DPI, the calculated pixel size may be a fractional value. You might assumethat WPF simply rounds off your measurements to the nearest pixel. (In fact, WPF supports a pixel-snapping feature that does exactly this, and you'll learn how to enable it for specific bits of content in Chapter 13.)
However, by default, WPF does something different. If an edge of an element falls between pixels, it uses anti-aliasing to blend that edge into the adjacent pixels. This might seem like an odd choice, but it actually makes a fair bit of sense. Your controls won't necessarily have straight, clearly defined edges if you use custom-drawn graphics to skin them; so some level of anti-aliasing is already necessary.
The steps for adjusting the system DPI depend on the operating system. In Windows XP, you follow these steps:
- Right-click your desktop and choose Display.
- Choose the Settings tab and click Advanced.
- On the General tab, choose Normal Size (96 dpi), or Large Size (120 dpi). These are the two recommended options for Windows XP, because custom DPI settings are less likely to be supported by older programs. To try out a custom DPI setting, choose Custom Setting. You can then specify a specific percentage value. (For example, 175% scales the standard 96 dpi to 168 dpi.)
Here's what to do to change system DPI in Windows Vista:
- Right-click your desktop and choose Personalize.
- In the list of links on the left, choose Adjust Font Size (DPI).
- Choose between 96 or 120 dpi. Or click Custom DPI to use a custom DPI setting. You can then specify a percentage value, as shown in Figure 1-1. (For example, 175% scales the standard 96 dpi to 168 dpi.) In addition, when using a custom DPI setting, you have an option named Use Windows XP Style DPI Scaling, which is described in the sidebar "DPI Scaling with Windows Vista.
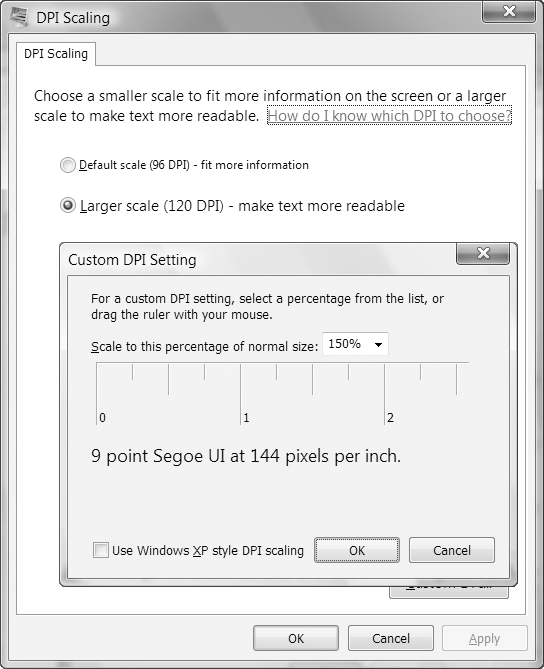
"Figure 1-1. Changing the system DPI
DPI SCALING WITH WINDOWS VISTA
Because older applications are notoriously lacking in their support for high DPI settings, Windows Vista uses a new technique: bitmap scaling.
If you run an application that doesn't appear to support high DPI settings, Windows Vista resizes the contents of the window to the desired DPI, just as if it were an image. The advantage is that the application still believes it's running at the standard 96 dpi. Windows seamlessly translates input (such as mouse clicks) and routes them to the right place in the application's "real" coordinate system.
The scaling algorithm that Windows Vista uses is a fairly good one-it respects pixel boundariesto avoid blurry edges and uses the video card hardware where possible to increase speed-but itinevitably leads to a fuzzier display. It also has a serious limitation in that Windows can't recognize older applications that do support high DPI settings. That's because applications need to include a manifest or call SetProcessDPIAware (in User32) to advertise their high DPI support. Although WPF applications handle this step correctly, applications prior to Windows Vista won't use either approach and will be stuck with the less
than ideal bitmap scaling.
There are two possible solutions. If you have a few specific applications that support high DPI settings, but don't indicate it, you can configure that detail manually. To do so, right-click the shortcut that starts the application (in the Start menu) and choose Properties. In the Compatibility tab, switch on the option named Disable Display Scaling on High DPI Settings. If you have a lot of applications to configure, this gets tiring fast.
The other possible solution is to disable bitmap scaling altogether. To do so, choose the Use Windows XP Style DPI Scaling option in the Custom DPI Setting dialog box shown in Figure 1-1. The only limitation of this approach is that there may be some applications that won't display properly (and possibly won't be usable) at high DPI settings. By default, Use Windows XP Style DPI Scaling is checked for DPI sizes of 120 or less but unchecked for DPI sizes that are greater.
Bitmap and Vector Graphics
When you work with ordinary controls, you can take WPF's resolution independence for granted. WPF takes care of making sure that everything has the right size automatically. However, if you plan to incorporate images into your application you can't be quite as casual. For example, in traditional Windows applications, developers use tiny bitmaps for toolbar commands.
In a WPF application, this approach is not ideal because the bitmap may display artifacts (becoming blurry) as it's scaled up or down according to the system DPI. Instead, when designing a WPF user interface even the smallest icon is generally implemented as a vector graphic. Vector graphics are defined as a set of shapes, and as such they can be easily
scaled to any size.
Note: Of course, drawing a vector graphic takes more time than painting a basic bitmap, but WPF includesoptimizations that are designed to lessen the overhead to ensure that drawing performance is reasonable for any business application and most consumer-oriented ones as well.
It's difficult to overestimate the importance of resolution independence. At first glance, it seems like a straightforward, elegant solution to a time-honored problem (which it is). However, in order to design interfaces that are fully scalable, developers need to embrace a new way of thinking.
Although WPF is a relatively new technology, it already exists in two versions:
- WPF 3.0. The first version of WPF was released with two other new technologies:Windows Communication Foundation (WCF) and Windows Workflow Foundation (WF). Together, these three technologies were called the .NET Framework 3.0 (even though the core bits of .NET weren't changed).
- WPF 3.5. A year later, a new version of WPF was released as part of the .NET Framework3.5. The new features in WPF are mostly minor refinements. Some of these bug fixes and performance improvements are available to .NET Framework 3.0 applications through the .NET Framework 3.0 Service Pack 1.
From a developer standpoint, the most significant difference between WPF 3.0 and 3.5 is design-time support. The .NET Framework 3.0 was released without a corresponding version of Visual Studio. Developers could get basic support for Visual Studio 2005 by installing a free Community Technology Preview (CTP). Although these extensions made it possible to create and develop WPF applications in Visual Studio 2005, they didn't provide a drag-and-drop designer for WPF windows.
The .NET Framework 3.5 was released in conjunction with Visual Studio 2008, and as a result, it offers much better design-time support for building WPF applications. This book assumes you are using WPF 3.5 and Visual Studio 2008. However, if you're using WPF 3.0, virtually all of the same concepts apply.
New Features in WPF 3.5
If you've programmed with the first version of WPF, you might be interested in tracking down the changes. Aside from bug fixes, performance tune-ups, and better design support, WPF 3.5 introduces the following enhancements (listed in order of their appearance in this book):
- Firefox support for XBAPs. It's now possible to run WPF browser-hosted applications(known as XBAPs) in Firefox as well as in Internet Explorer. Chapter 9 has more.
- Data binding support for LINQ. LINQ is a set of language extensions that allow developersto write queries. These queries can pull data out of various data sources, including in-memory collections, XML files, and databases, all without requiring a line of low-level code. (To learn more about LINQ, you can refer to http://msdn.microsoft.com/data/ ref/linq or a dedicated book on the subject.) WPF now fully supports using LINQ in data binding scenarios, such as the ones you'll explore in Chapter 16.
- Data binding support for IDataErrorInfo. The IDataErrorInfo interface is a key linchpinfor business developers who want to build rich data objects with built-in validation.
Now, the data binding infrastructure can catch these validation errors and display them in the user interface.
- Support for placing interactive controls (such as buttons) inside a RichTextBox control.This feature previously required an obscure workaround. It now works through a simple property that's described in Chapter 19.
- Support for placing 2-D elements on 3-D surfaces. This feature previously required aseparate download. Now, it's incorporated into the framework, along with better support for 3-D objects that can raise mouse and keyboard events. You'll learn to use these features in Chapter 23.
- An add-in model. The add-in model allows an application to host third-party componentsin a limited security context. Technically, this feature isn't WPF-specific, because it can be used in any .NET 3.5 application. You'll learn how it works with WPF in Chapter 26.
Multitargeting
Previous versions of Visual Studio were tightly coupled to specific versions of .NET. You used Visual Studio .NET to create .NET 1.0 applications, Visual Studio .NET 2003 to create .NET 1.1 applications, and Visual Studio 2005 to create .NET 2.0 applications. Visual Studio 2008 partially removes this restriction. It allows you to create applications that are specifically designed to work with .NET 2.0, .NET 3.0, or .NET 3.5.
Although it's obviously not possible to create a WPF application with .NET 2.0, both .NET 3.0 and .NET 3.5 have WPF support. You may choose to target .NET 3.0 for slightly broader compatibility (because .NET 3.0 applications can run on both the .NET 3.0 and .NET 3.5 runtimes). Or, you may choose to target .NET 3.5 to get access to newer features in WPF or in the .NET platform itself. (One common reason for targeting .NET 3.5 is to support LINQ, the set of technologies that allow .NET languages to access different data sources using a tightly integrated query syntax.)
When you create a new project in Visual Studio (by choosing File --> New --> Project), youcan choose the version of the .NET Framework that you're targeting from a drop-down list in the top-right corner of the New Project dialog box (see Figure 1-2). You can also change the version you're targeting at any point afterward by double-clicking the Properties node in the Solution Explorer and changing the selection in the Target Framework list.
To really understand how the Visual Studio multitargeting system works, you need to know a bit more about how .NET 3.5 is structured. Essentially, .NET 3.5 is built out of three separate pieces-a copy of the original .NET 2.0 assemblies, a copy of the assemblies thatwere added in .NET 3.0 (for WPF, WCF, and WF), and the new assemblies that were added in .NET 3.5 (for LINQ and a number of miscellaneous features). However, when you create and test an application in Visual Studio, you are always using the .NET 3.5 assemblies. When you choose to target an earlier version of .NET, Visual Studio simply uses a subset of the .NET 3.5 assemblies.
For example, when you choose to target .NET 3.0, you effectively configure Visual Studio to use a portion of .NET 3.5-just those assemblies that were available in .NET 2.0 and.NET 3.0. There's a potential stumbling block in this system. Although these assemblies are treated as though they haven't changed in .NET 3.5, they aren't completely identical to the .NET 2.0 versions. For example, they may include performance tweaks, bug fixes, and (very rarely) a new public member in a class. For that reason, if you build an assembly that targets an earlier version of .NET, you should still test it with that version of .NET to make absolutely sure there are no backward compatibility quirks.
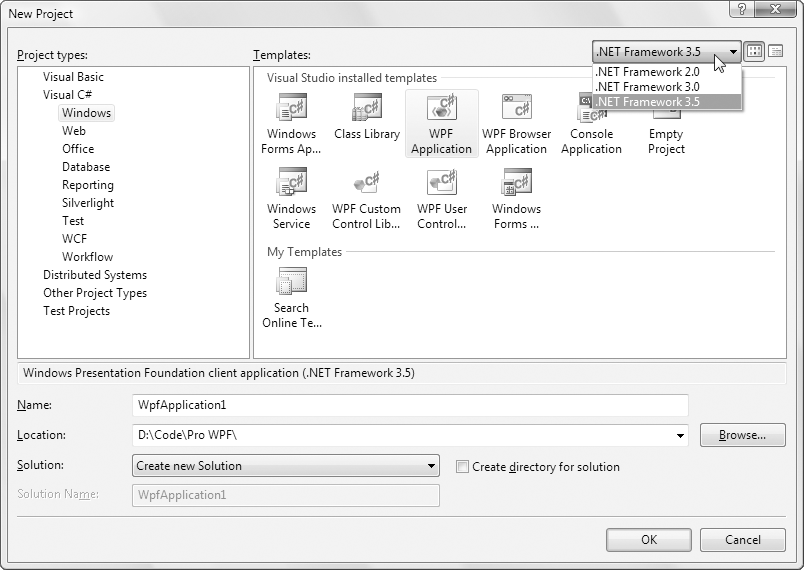
Figure 1-2. Choosing the target version of the .NET Framework
Note: Visual Studio 2008 doesn't provide a way to build applications that specifically target .NET 3.0 withSP1. Thus, if there's an added feature in the .NET Framework 3.0 Service Pack 1, you won't be able to use it (unless you compile your project by hand at the command line). The only solution is to step up all the way to .NET 3.5.
Windows Forms Lives On
WPF is the platform for the future of Windows user interface development. However, it won't displace Windows Forms overnight. Windows Forms is in many ways the culmination of the display technology built on GDI/GDI+ and User32. It's more mature than WPF and still includes features that haven't made their way into the WPF toolkit (such as the WebBrowser control, the DataGridView control, and the HelpProvider component).
So which platform should you choose when you begin designing a new Windows application? If you're starting from the ground up, WPF is an ideal choice and it offers the best prospects for future enhancements and longevity. Similarly, if you need one of the features that WPF provides and Windows Forms does not-such as 3-D drawing or page-based applications-it makessense to make the shift. On the other hand, if you have a considerable investment in a Windows Forms–based business application, there's no need to recode your application for WPF. The WindowsForms platform will continue to be supported for years to come.
Perhaps the best part of the story is the fact that Microsoft has invested considerable effort in building an interoperability layer between WPF and Windows Forms (which plays a similar role to the interoperability layer that allows .NET applications to continue to use legacy COM components). In Chapter 25, you'll learn how to use this support to host Windows Forms controls inside a WPF application, and vice versa. WPF offers similarly robust support for integrating with older Win32-style applications.
DirectX Also Lives On
There's one area where WPF isn't a good fit: when creating applications with demanding realtime graphics, such as complex physics-based simulators or cutting-edge action games. If you want the best possible video performance for these types of applications, you'll need to program at a much lower level and use raw DirectX. You can download the managed .NET libraries for DirectX programming at http://msdn.microsoft.com/directx.
Silverlight
Like the .NET Framework itself, WPF is a Windows-centric technology. That means that WPF applications can only be used on computers running the Windows operating system (specifically, Windows XP or Windows Vista). Browser-based WPF applications are similarly limited-they can run only on Windows computers, although they support both the InternetExplorer and Firefox browsers.
These restrictions won't change-after all, part of Microsoft's goal with WPF is to takeadvantage of the rich capabilities of Windows computers and its investment in technologies such as DirectX. However, there is a separate technology named Silverlight that's designed to take a subset of the WPF platform, host it in any modern browser using a plug-in (including Firefox, Opera, and Safari), and open it up to other operating systems (such as Linux and Mac OS). This is an ambitious project that's attracted considerable developer interest.
To make matters more interesting, Silverlight currently exists in two versions:
- Silverlight 1.0. This first release includes 2-D drawing features, animation, and mediaplayback features that are similar to those in WPF. However, Silverlight 1.0 has no support for the .NET Framework or the C# and Visual Basic languages-instead, you mustuse JavaScript code.
- Silverlight 2.0. This second release adds a pared-down version of the .NET Framework,complete with a miniature CLR that's hosted by the browser plug-in and a small subset of essential .NET Framework classes. Because Silverlight 2.0 allows you to write code in a .NET language such as C# and Visual Basic, it's a far more compelling technology than Silverlight 1.0. However, at the time of this writing it's still in beta.
Although both Silverlight 1.0 and Silverlight 2.0 are based on WPF and incorporate many of its conventions (such as the XAML markup you'll learn about in the next chapter), they leave out certain feature areas. For example, neither version supports true three-dimensional drawing or rich document display. New features may appear in future Silverlight releases, but the more complex ones might never make the leap.
The ultimate goal of Silverlight is to provide a powerful developer-oriented competitor for Adobe Flash. However, Flash has a key advantage-it's used throughout the Web, and the Flashplug-in is installed just about everywhere. In order to entice developers to switch to a new,Microsoft will need to make sure Silverlight has next-generation features, rock-solid compatibility, and unrivaled design support.
Note: Although the Silverlight programming model is best understood as a dramatically scaled-down versionof WPF, it's probably more useful to web developers than rich client developers. That's because web developers can use Silverlight content to enhance ordinary websites or web applications built with ASP.NET. In other words, Silverlight has two potential audiences: web developers who are seeking to create more interactive applications and Windows developers who are seeking to get a broader reach for their applications. To learn more about Silverlight, refer to a dedicated book such as Pro Silverlight 2.0, or surf to http://silverlight.net.
The Architecture of WPF
WPF uses a multilayered architecture. At the top, your application interacts with a high-level set of services that are completely written in managed C# code. The actual work of translating .NET objects into Direct3D textures and triangles happens behind the scenes, using a lowerlevel unmanaged component called milcore.dll.
Note: milcore.dll is implemented in unmanaged code because it needs tight integration with Direct3D andbecause it's extremely performance-sensitive.
Figure 1-3 shows the layers at work in a WPF application.
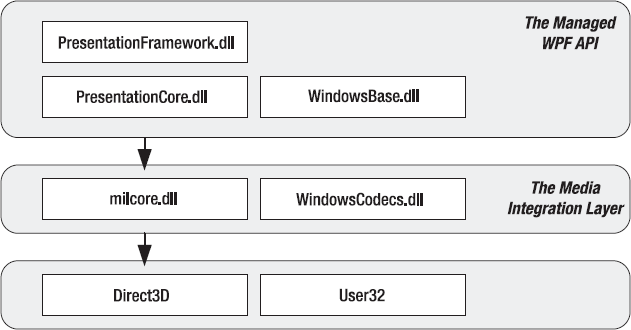
Figure 1-3. The architecture of WPF
Figure 1-3 includes these key components:
- PresentationFramework.dll holds the top-level WPF types, including those that representwindows, panels, and other types of controls. It also implements higher-level programming abstractions such as styles. Most of the classes you'll use directly come from this assembly.
- PresentationCore.dll holds base types, such as UIElement and Visual, from which allshapes and controls derive. If you don't need the full window and control abstraction layer, you can drop down to this level and still take advantage of WPF's rendering engine.
- WindowsBase.dll holds even more basic ingredients that have the potential to bereused outside of WPF, such as DispatcherObject and DependencyObject, which introduces the plumbing for dependency properties (a topic you'll explore in detail in Chapter 6).
- milcore.dll is the core of the WPF rendering system and the foundation of the MediaIntegration Layer (MIL). Its composition engine translates visual elements into the triangle and textures that Direct3D expects. Although milcore.dll is considered a part of WPF, it's also an essential system component for Windows Vista. In fact, the Desktop Window Manager (DWM) in Windows Vista uses milcore.dll to render the desktop.
Note: milcore.dll is sometimes referred to as the engine for "managed graphics." Much as the commonlanguage runtime (CLR) manages the lifetime of a .NET application, milcore.dll manages the display state. And just as the CLR saves you from worrying about releasing objects and reclaiming memory, milcore.dll saves you from thinking about invalidating and repainting a window. You simply create the objects with the content you want to show, and milcore.dll paints the appropriate portions of the window as it is dragged around, covered and uncovered, minimized and restored, and so on.
- WindowsCodecs.dll is a low-level API that provides imaging support (for example, processing,displaying, and scaling bitmaps and JPEGs).
- Direct3D is the low-level API through which all the graphics in a WPF are rendered.
- User32 is used to determine what program gets what real estate. As a result, it's stillinvolved in WPF, but it plays no part in rendering common controls.
The most important fact that you should realize is the Direct3D renders all the drawing in WPF. It doesn't matter whether you have a modest video card or a much more powerful one, whether you're using basic controls or drawing more complex content, or whether you're running your application on Windows XP or Windows Vista. Even two-dimensional shapes and ordinary text are transformed into triangles and passed through the 3-D pipeline. There is no fallback to GDI+ or User32.
The Class Hierarchy
Throughout this book, you'll spend most of your time exploring the WPF namespaces and classes. But before you begin, it's helpful to take a first look at the hierarchy of classes that leads to the basic set of WPF controls.
Figure 1-4 shows a basic overview with some of the key branches of the class hierarchy. As you continue through this book, you'll dig into these classes (and their relatives) in more detail.
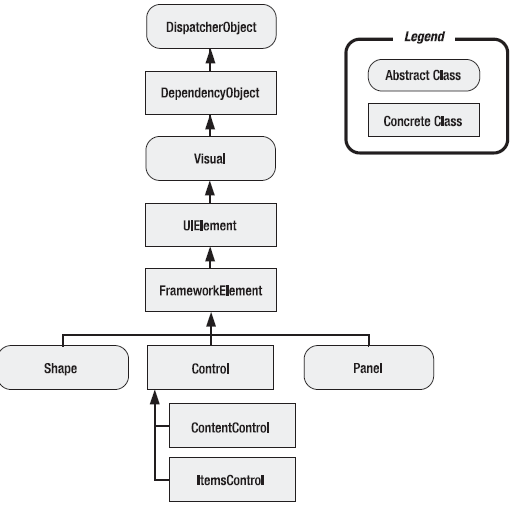
Figure 1-4. The fundamental classes of WPF
The following sections describe the core classes in this diagram. Many of these classes lead to whole branches of elements (such as shapes, panels, and controls).
Note: The core WPF namespaces begin with System.Windows (for example, System.Windows,System.Windows.Controls, and System.Windows.Media). The sole exception is namespaces that begin with System.Windows.Forms, which are part of the Windows Forms toolkit.
System.Threading.DispatcherObject
WPF applications use the familiar single-thread affinity (STA) model, which means the entire user interface is owned by a single thread. It's not safe to interact with user interface elements from another thread. To facilitate this model, each WPF application is governed by a dispatcherthat coordinates messages (which result from keyboard input, mouse movements, and framework processes such as layout). By deriving from DispatcherObject, every element in your user interface can verify whether code is running on the correct thread and access the dispatcher to marshal code to the user interface thread. You'll learn more about the WPF threading model in Chapter 3.
System.Windows.DependencyObject
In WPF, the central way of interacting with onscreen elements is through properties. Early on in the design cycle, the WPF architects decided to create a more powerful property model that baked in features such as change notification, inherited default values, and more economical property storage. The ultimate result is the dependency property feature, which you'll explore in Chapter 6. By deriving from DependencyObject, WPF classes get support for dependency properties.
System.Windows.Media.Visual
Every element that appears in a WPF is, at heart, a Visual. You can think of the Visual class as a single drawing object, which encapsulates drawing instructions, additional details about how the drawing should be performed (such as clipping, opacity, and transformation settings), and basic functionality (such as hit testing). The Visual class also provides the link between the managed WPF libraries and the milcore.dll that renders your display. Any class that derives from Visual has the ability to be displayed on a window. If you prefer to create your user interface using a lightweight API that doesn't have the higher-level framework features of WPF, you can program directly with Visual objects, as described in Chapter 14.
System.Windows.UIElement
UIElement adds support for WPF essentials such as layout, input, focus, and events (which the WPF team refers to by the acronym LIFE). For example, it's here that the two-step measure and arrange layout process is defined, which you'll learn about in Chapter 4. It's also here that raw mouse clicks and key presses are transformed to more useful events such as MouseEnter.
As with properties, WPF implements an enhanced event-passing system called routed events. You'll learn how it works in Chapter 6. Finally, UIElement adds supports for commands (Chapter 10).
System.Windows.FrameworkElement
FrameworkElement is the final stop in the core WPF inheritance tree. It implements some of the members that are merely defined by UIElement. For example, UIElement sets the foundation for the WPF layout system, but FrameworkElement includes the key properties (such as HorizontalAlignment and Margin) that support it. UIElement also adds support for data binding, animation, and styles, all of which are core features.
System.Windows.Shapes.Shape
Basic shapes classes, such as Rectangle, Polygon, Ellipse, Line, and Path, derive from this class. These shapes can be used alongside more traditional Windows widgets, such as buttons and text boxes. You'll start building shapes in Chapter 13.
System.Windows.Controls.Control
A control is an element that can interact with the user. It obviously includes classes such as TextBox, Button, and ListBox. The Control class adds additional properties for setting the font and the foreground and background colors. But the most interesting detail it provides is template support, which allows you to replace the standard appearance of a control with your own stylish drawing. You'll learn about control templates in Chapter 15.
Note: In Windows Forms programming, every visual item in a form is referred to as a control. In WPF,this isn't the case. Visual items are called elements, and only some elements are actually controls (those that can receive focus and interact with the user). To make this system even more confusing, many elements are defined in the System.Windows.Controls namespace, even though they don't derive from System.Windows.Controls.Control and aren't considered controls. One example is the Panel class.
System.Windows.Controls.ContentControl
This is the base class for all controls that have a single piece of content. This includes everything from the humble Label to the Window. The most impressive part of this model (which is described in more detail in Chapter 5) is the fact that this single piece of content can be anything from an ordinary string to a layout panel with a combination of other shapes and controls.
System.Windows.Controls.ItemsControl
This is the base class for all controls that show a collection of items, such as the ListBox and TreeView. List controls are remarkably flexible-for example, using the features that are builtinto the ItemsControl class you can transform the lowly ListBox into a list of radio buttons, a list of check boxes, a tiled display of images, or a combination of completely different elements that you've chosen. In fact, in WPF menus, toolbars, and status bars are actually specialized lists, and the classes that implement them all derive from ItemsControl. You'll start using lists in Chapter 16 when you consider data binding. You'll learn to enhance them in Chapter 17, and you'll consider the most specialized list controls in Chapter 18.
System.Windows.Controls.Panel
This is the base class for all layout containers-elements that can contain one or more childrenand arrange them according to specific layout rules. These containers are the foundation of the WPF layout system, and using them is the key to arranging your content in the most attractive, flexible way possible. Chapter 4 explores the WPF layout system in more detail.
The Last Word
In this chapter, you took your first look at WPF and the promise it holds. You considered the underlying architecture and briefly considered the core classes.
WPF is the beginning of the future of Windows development. In time, it will become a system like User32 and GDI/GDI+, on top of which more enhancements and higher-level features are added. Eventually, WPF will allow you to design applications that would be impossible (or at least thoroughly impractical) using Windows Forms.
Clearly, WPF introduces many dramatic changes. However, there are five key principles that immediately stand out because they are so different from previous Windows user interface toolkits such as Windows Forms. These principles are the following:
- Hardware acceleration. All WPF drawing is performed through DirectX, which allows itto take advantage of the latest in modern video cards.
- Resolution independence. WPF is flexible enough to scale up or down to suit yourmonitor and display preferences, depending on the system DPI setting.
- No fixed control appearance. In traditional Windows development, there's a wide chasmbetween controls that can be tailored to suit your needs (which are known as ownerdrawncontrols) and those that are rendered by the operating system and essentially fixed in appearance. In WPF, everything from a basic Rectangle to a standard Button or more complex Toolbar is drawn using the same rendering engine and completely customizable. For this reason, WPF controls are often called lookless controls-they define the functionalityof a control, but they don't have a hard-wired "look."
- Declarative user interfaces. In the next chapter, you'll consider XAML, the markupstandard you use to define WPF user interfaces. XAML allows you to build a window without using code. Impressively, XAML doesn't limit you to fixed, unchanging user interfaces. You can use tools such as data binding and triggers to automate basic user interface behavior (such as text boxes that update themselves when you page through a record source, or labels that glow when you hover overtop with the mouse), all without writing a single line of C#.
- Object-based drawing. Even if you plan to work at the lower-level visual layer (ratherthan the higher-level element layer), you won't work in terms of painting and pixels. Instead, you'll create shape objects and let WPF maintain the display in the most optimized manner possible.
You'll see these principles at work throughout this book. But before you go any further, it's time to learn about a complementary standard. The next chapter introduces XAML, the markup language used to define WPF user interfaces.
Book Details
 |
Pro WPF in C# 2008 |
| By Matthew MacDonald |
| ISBN10: 1-59059-955-1 |
| Published Feb 2008 |
| eBook Price: $38.49 |
| Price: $54.99 |