Introduction:
When you install Share point then you will be getting 11 predefined templates like
- Windows SharePoint Services Site
- SharePoint Portal Server Site
- SharePoint Portal Server Personal Space
- SharePoint Portal Server My Site
- Contents area Template
- Topic area template
- News area template
- News Home area template
- Site Directory area template
- SharePoint Portal Server BucketWeb Template
- Community area template
These templates can be located at C:\Program Files\Common Files\Microsoft Shared\web server extensions\60\TEMPLATE\1033.
Advantages of having custom templates.
- You can control the Look and feel of the web site page.
- You can have your predefined custom web parts.
- Not required to drag and drop web parts.
- Same look and feel across the web site page.
Steps for Creating Custom Templates in Share Point.
- Copy SPS folder from C:\Program Files\Common Files\Microsoft Shared\web server extensions\60\TEMPLATE\1033 and Rename it as SPSCustom folder.
- Open default.aspx from C:\Program Files\Common Files\Microsoft Shared\web server extensions\60\TEMPLATE\1033\SPSCustom. Create you own structure here like
<
table border=0 cellpadding=0 cellspacing=0>
<tr>
<td width=170 valign=top>
<WebPartPages:WebPartZone runat="server" AllowPersonalization="false" ID="TopZone"
Title="TopZone" Orientation="Vertical"></WebPartPages:WebPartZone>
</td>
</tr>
</table>
-
Open onet.xml from C:\Program Files\Common Files\Microsoft Shared\web server extensions\60\TEMPLATE\1033\SPSCustom\XML. Add the following section under
<Components>
<Modules>
<Module>
<File>
<
AllUsersWebPart WebPartZoneID="TopZone" WebPartOrder="0">
<![CDATA[<WebPart xmlns="http://schemas.microsoft.com/WebPart/v2">
<Assembly>AssemblyName, Version=1.0.0.0,Culture=Neutral,
PublicKeyToken=1111111111111111</Assembly>
<TypeName> NameSpaceName.AssemblyName</TypeName>
<Title>Web Part Title</Title>
<Description>My Own Custom Web Part</Description>
<PartOrder>0</PartOrder>
<FrameType>None</FrameType>
<AllowMinimize>true</AllowMinimize>
<AllowRemove>true</AllowRemove>
<IsVisible>true</IsVisible>
<AllowOverrideGlobalXML xmlns="NameSpaceName">false</AllowOverrideGlobalXML>
</WebPart>]]>
</AllUsersWebPart>
Replace NameSpaceName with your NameSpace name
Replace AssemblyName with your Assembly Name
Open WEBTEMPSPS.XML from C:\Program Files\Common Files\Microsoft Shared\web server extensions\60\TEMPLATE\1033\XML. Add the below section under
<Templates>
<Template Name="SPSCustom" ID="1036">
<Configuration ID="0" Title="My Custom Template" Type="0" Hidden="TRUE"
ImageUrl="../images/spshome.gif" Description="Area Template</Configuration>
</Template>
Name = should be your custom folder name
ID = should be any four digit number which should be unique
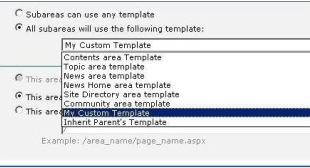
Title= can be your own title which will be displayed in your web site list box.
Do iisreset.
Navigation steps to see the below screen
- You need to be Administrator on the Portal Server
- Open Home page of your portal
- Click on Change Settings Sub Area link available in the left side of the screen.
- Click on Page tab.
