

Overview
If you are new in the development of the Android application, the below articles are useful to start with.
- Android Programming - Day One
- Android Programming - Day Two
- How To Display A Dialog Windows In Android
- How To Display A Progress Dialog Window In Android
- Intent In Android
- Return Data Using Intent Object In Android Applications
- Passing Data Using An Intent Object In Android Applications
- Fragments In Android Applications
- Adding Fragments Dynamically In Android Application
- Fragment Life Cycle In Android Application
Introduction
In this article, I will explain how to make the interaction between the two fragments.
Most of the time, an activity can contain one or more fragments working together to present a logical UI to the user. It is very important for fragments to communicate with one another and exchange data. For example, there is one fragment that might contain a list of items ( product name list). When the user taps on an item in that fragment, details about the selected item may be displayed in another fragment.
Coding
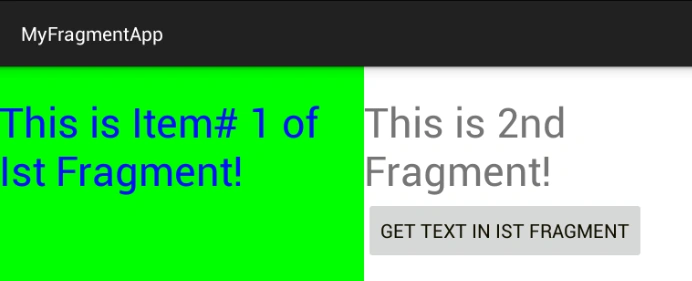
Fragment1.xml file has only TextView control.
- <LinearLayout
- xmlns:android="http://schemas.android.com/apk/res/android"
- xmlns:tools="http://schemas.android.com/tools"
- android:layout_width="fill_parent"
- android:layout_height="fill_parent"
- android:orientation="vertical"
- android:background="#00FF00"
- tools:context="com.example.administrator.myfragmentapp.Fragment1Activity">
- <TextView android:text="@string/Fragment1"
- android:layout_width="fill_parent"
- android:layout_height="wrap_content"
- android:textColor="#000FFF"
- android:layout_marginTop="20dp"
- android:textSize="30dp"
- android:id="@+id/labelFragment1"
- />
- </LinearLayout>
Fragment2.xml file has a TextView and Button control.
- <LinearLayout xmlns:android="http://schemas.android.com/apk/res/android"
- xmlns:tools="http://schemas.android.com/tools"
- android:layout_width="fill_parent"
- android:layout_height="fill_parent"
- android:orientation="vertical"
- tools:context="com.example.administrator.myfragmentapp.Fragment2Activity">
- <TextView android:text="This is 2nd Fragment!"
- android:layout_width="fill_parent"
- android:layout_height="wrap_content"
- android:layout_marginTop="20dp"
- android:textSize="30dp"/>
- <Button
- android:id="@+id/buttonGet"
- android:layout_width="wrap_content"
- android:layout_height="wrap_content"
- android:text="Get text in Ist fragment"
- android:textColor="#111000"
- android:onClick="onClick" />
- </LinearLayout>
I have implemented one method called onStart() in Fragment2Activity.java class.
- package com.example.administrator.myfragmentapp;
- import android.app.Fragment;
- import android.support.v7.app.ActionBarActivity;
- import android.os.Bundle;
- import android.view.LayoutInflater;
- import android.view.Menu;
- import android.view.MenuItem;
- import android.view.View;
- import android.view.ViewGroup;
- import android.widget.Button;
- import android.widget.TextView;
- import android.widget.Toast;
- public class Fragment2Activity extends Fragment {
- @Override
- public View onCreateView(LayoutInflater inflater, ViewGroup container, Bundle savedInstanceState)
- {
- return inflater.inflate(R.layout.activity_fragment2,container,false);
- }
- @Override
- public void onStart(){
- super.onStart();
- Button buttonGet = (Button)getActivity().findViewById(R.id.buttonGet);
- buttonGet.setOnClickListener(new View.OnClickListener() {
- @Override
- public void onClick(View view) {
- TextView label=(TextView)getActivity().findViewById(R.id.labelFragment1);
- Toast.makeText(getActivity(),label.getText(),Toast.LENGTH_SHORT).show();
- }
- });
- }
- }
In MainActivity.java class, I added code to put fragmentTransaction as per the calculation of width and height at run time, in the back stack.
- package com.example.administrator.myfragmentapp;
- import android.app.FragmentManager;
- import android.app.FragmentTransaction;
- import android.support.v7.app.ActionBarActivity;
- import android.os.Bundle;
- import android.view.Display;
- import android.view.Menu;
- import android.view.MenuItem;
- import android.view.WindowManager;
- public class MainActivity extends ActionBarActivity {
- @Override
- protected void onCreate(Bundle savedInstanceState) {
- super.onCreate(savedInstanceState);
- setContentView(R.layout.activity_main);
- }
- @Override
- public boolean onCreateOptionsMenu(Menu menu) {
- // Inflate the menu; this adds items to the action bar if it is present.
- getMenuInflater().inflate(R.menu.menu_main, menu);
- return true;
- }
- @Override
- public boolean onOptionsItemSelected(MenuItem item) {
- // Handle action bar item clicks here. The action bar will
- // automatically handle clicks on the Home/Up button, so long
- // as you specify a parent activity in AndroidManifest.xml.
- int id = item.getItemId();
- //noinspection SimplifiableIfStatement
- if (id == R.id.action_settings) {
- return true;
- }
- return super.onOptionsItemSelected(item);
- }
- }
Explanation
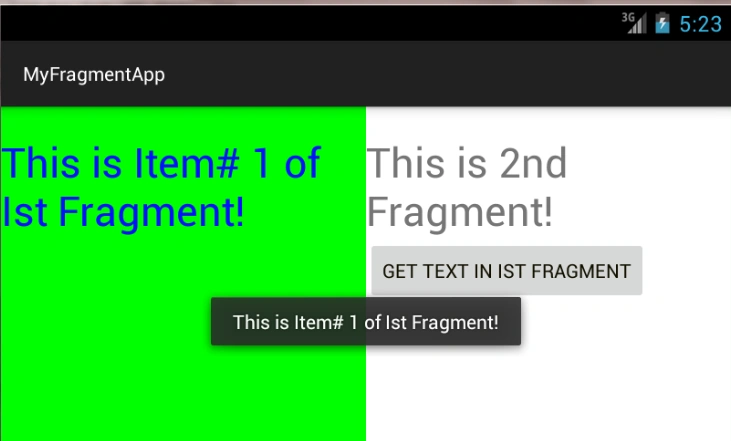
The two fragments are embedded within activities. We can obtain the activity, in which a fragment is currently embedded, by first using the getActivity() method and then using the findViewById() method to locate the Views contained within the fragment.
- buttonGet.setOnClickListener(new View.OnClickListener() {
- @Override
- public void onClick(View view) {
- TextView label=(TextView)getActivity().findViewById(R.id.labelFragment1);
- Toast.makeText(getActivity(),label.getText(),Toast.LENGTH_SHORT).show();
- }
- });
The getActivity() method returns the activity with which the current fragment is currently associated.
Conclusion
In this article, I have explained about the interaction between two fragments. In the next article, I will explain about calling built-in applications using Intents. If you have any questions or comments, post me a message in the C# Corner comments section.
kalu singh raoPosted Aug 10, 2016, 1:52 AM
Helpful !!!
Ramesh PalaniappanPosted Aug 9, 2016, 9:25 AM
Good Article :)
Vignesh ManiPosted Aug 9, 2016, 8:37 AM
Nice one