We can create a custom menu control in Silverlight using the following steps.
Step 1: Create a Custom Menu control in Silverlight.
With the help of ToggleButton and Popup controls in Silverlight, we can create a custom menu control as follows.
<ToggleButton x:Name="toggleButton" Style="{StaticResource ColorToggleButtonStyle}" BorderBrush="{x:Null}" Height="20" Width="90" Click="toggleButton_Click">
<Grid>
<Grid.ColumnDefinitions>
<ColumnDefinition Width="20" />
<ColumnDefinition Width="58" />
</Grid.ColumnDefinitions>
<TextBlock Height="14" Name="txtview" Text="First View" Width="58" Foreground="#FF3B62A0" FontSize="10" VerticalAlignment="Center" Grid.Column="1" />
<Image Height="18" Width="20" HorizontalAlignment="Left" x:Name="Stackimage" Source="images/icon1.jpg" Margin="2,0,0,2" Grid.Column="0"/>
</Grid>
</ToggleButton>
<Popup x:Name="MyPopup" Closed="MyPopup_Closed" Opened="Popup_Opened" IsOpen="{Binding IsChecked, ElementName=toggleButton, Mode=TwoWay}"
Style="{StaticResource popup}">
<Border x:Name="PopupChild" LostFocus="PopupChild_LostFocus" MaxHeight="300" Effect="{StaticResource effect1}" MouseLeave="PopupChild_MouseLeave">
<Grid>
<Border BorderBrush="#84aded" BorderThickness="1" Margin="0" >
<StackPanel>
<!--first stackpanel-->
<StackPanel x:Name="FirstRowColors" Style="{StaticResource panel}" Background="#f8fbff">
<HyperlinkButton Style="{StaticResource HyperlinkButtonStyle1}" Tag="First View" Click="HyperlinkButton_Click">
<StackPanel Style="{StaticResource insidepanel}">
<Image Source="images/icon1.jpg" Style="{StaticResource image}"/>
<TextBlock Text="First View" Style="{StaticResource text}"/>
</StackPanel>
</HyperlinkButton>
<HyperlinkButton Style="{StaticResource HyperlinkButtonStyle1}" Tag="Second View" Click="HyperlinkButton_Click" >
<StackPanel Style="{StaticResource insidepanel}" >
<Image Source="images/icon2.jpg" Style="{StaticResource image}"/>
<TextBlock Text="Second View" Style="{StaticResource text}"/>
</StackPanel>
</HyperlinkButton>
<HyperlinkButton Style="{StaticResource HyperlinkButtonStyle1}" Tag="Third View" Click="HyperlinkButton_Click" >
<StackPanel Style="{StaticResource insidepanel}" >
<Image Source="images/icon3.jpg" Style="{StaticResource image}"/>
<TextBlock Text="Third View" Style="{StaticResource text}"/>
</StackPanel>
</HyperlinkButton>
</StackPanel>
</StackPanel>
</Border>
</Grid>
</Border>
</Popup>
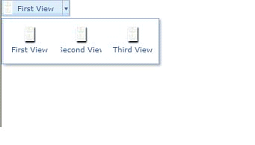
This XAML design looks like as follows:

We can also display the images on menus as below.
switch (btn.Tag.ToString())
{
case "First View":
Stackimage.Source = new BitmapImage(new Uri("images/icon1.jpg", UriKind.Relative));
txtview.Text = btn.Tag.ToString();
break;
case "Second View":
Stackimage.Source = new BitmapImage(new Uri("images/icon2.jpg", UriKind.Relative));
txtview.Text = btn.Tag.ToString();
break;
case "Third View":
Stackimage.Source = new BitmapImage(new Uri("images/icon3.jpg", UriKind.Relative));
txtview.Text = btn.Tag.ToString();
break;
}
Output looks like as following.
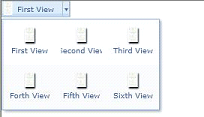
We can also add more menus one by one, which looks like as following.
Summary: We can Create Custom Menu control in Silverlight with the help of other controls in Silverlight.