

Foreword:
In this article we shall discuss about what my colleague has discussed with me
for help on his LightSwitch project.
I.e. he needed to save a record into another table when he deleted a record.
So I showed a way to save the records programmatically in a LightSwitch 2011
application. Let us create a demo LightSwitch 2011 application to demonstrate
the situation above.
Preparing the Solution:
Startup VS LightSwitch 2011; create a LightSwitch 2011 application as shown
below.
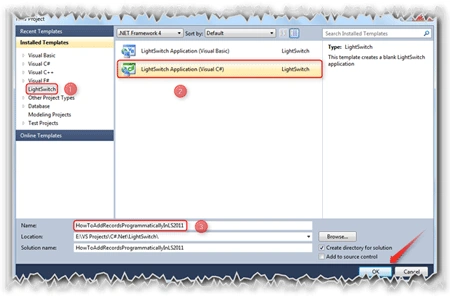
Follow the steps shown in the figure.
Designing the Entity:
We are going to save the record into a table which has been deleted from another
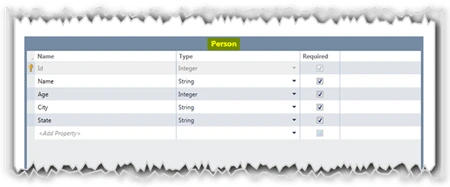
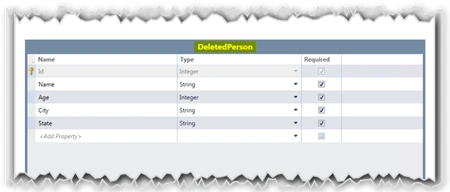
table. So we need to create two tables namely "Person" and "DeletedPerson" as
shown in the below figures.
Person Entity:
DeletedPerson Entity:
Designing the Screen:
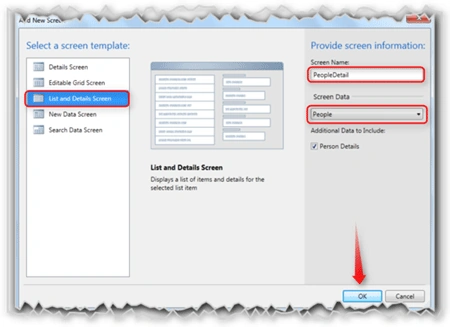
We are going to create two screens in which one is a List and Details Screen; another
one is a Search Data Screen.
Here,
- Select the "List and Details Screen" template from the Screen template panel.
- Name the Screen "PeopleDetails".
- Select the Entity for the Screen as Person and Click OK to create the screen.
Now create another screen for showing the deleted record.
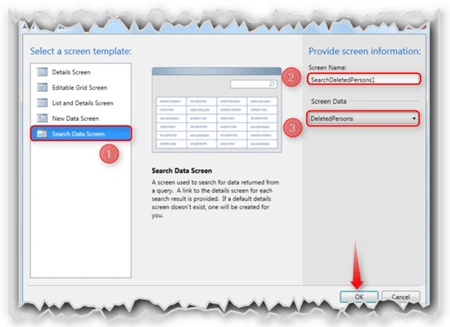
Here,
- Select the "Search Data Screen" template from the Screen template panel.
- Name the Screen "SearchDeletedPerson".
- Select the Entity for the Screen as DeletedPerson and Click OK to create the screen.
To add the records which are deleted, we need to override the delete method of the LightSwitch application.
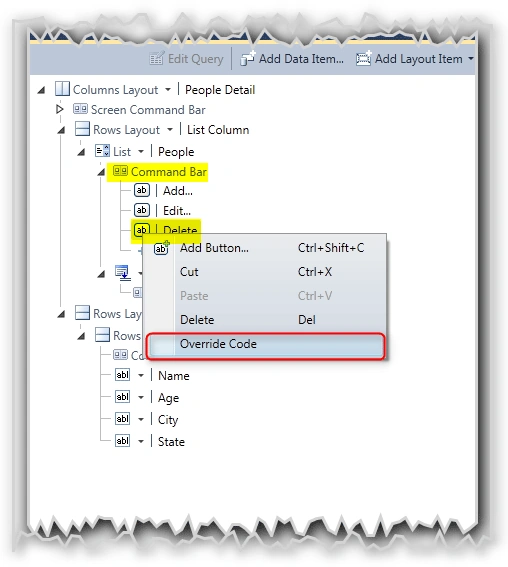
Here,
- Select the Command Bar of the People Detail screen.
- Select and right click the Delete button. A popup menu will be displayed.
- Select the Override Code to add the code for saving the data programmatically into the LightSwitch entity.
The Code-Behind:
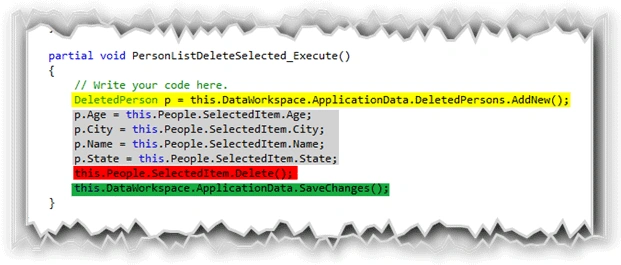
When we click on Override code option, we will have a method called "PersonListDeleteSeleted_Execute".
Add the above highlighted code snippet into that method.
In the highlighted parts,
- The highlighted part in Yellow creates a new record in the DeletedPerson entity.
- The highlighted part in Gray assigns the deleted Person record to the DeletedPerson's properties.
- The highlighted part in Red deletes the Person record which has to be deleted.
- The highlighted part in Green saves the changes made to the DeletedPerson.
Now we are done. Just Hit F5 to see the
application in Action.
Application in Action:
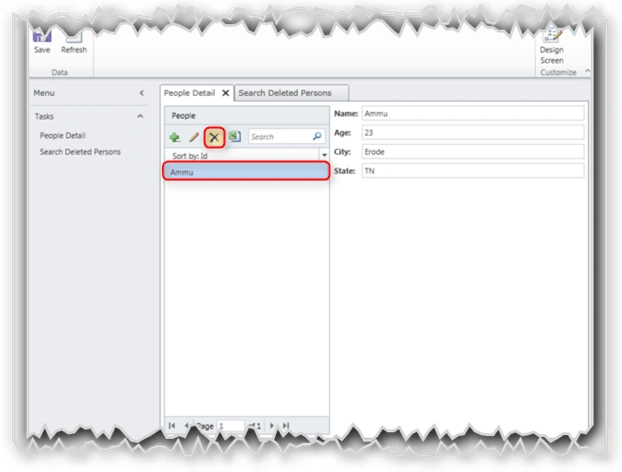
Here,
We have added a record with name Ammu. Select that record and delete that.
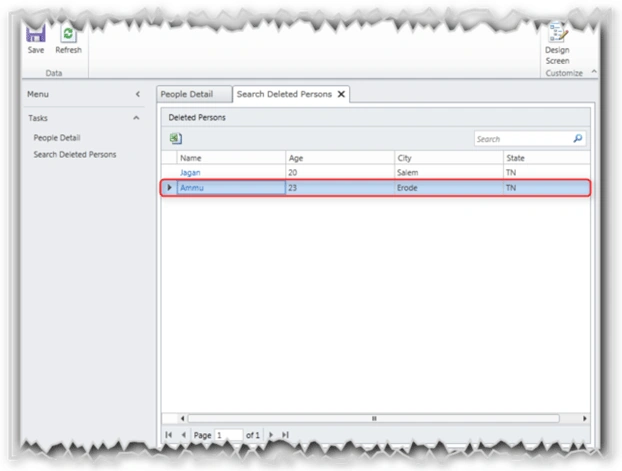
When we delete the record it will be saved in the Search Deleted Persons screen
as shown in the above figure.
Summary:
In this article, we have seen about how to add records programmatically into a LightSwitch entity using Visual Studio LightSwitch 2011.
Thanks for spending your precious time here. Please provide your valuable
feedbacks and comments, which make me to give a better article next time.
AliPosted Sep 2, 2013, 6:11 AM
Great thanks. How can i apply the same using a loop statement. I tried adding for each but it still only copies the selected record
majacik zajacikPosted Jan 26, 2013, 3:59 PM
can you show us how to do this in VB code please?
Donald BeatyPosted Sep 20, 2011, 4:59 PM
Thanks great article. I have master and details tables that I am importing to with code. The foreign key to the master in the details file is named and given a type of master table name by LS. It is Details_Master in the SQL server. How can I set this value programatically? I get the newly inserted value from the Master with this code: newMasterId = newMstEntity.Details.Properties("Id").Value But I get an error that the types don't match when I try to set the value of the details file. The PropertyType returned from the details entity is "LightSwitchApplication.Master". Code to add details: Dim newEntity As IEntityObject = entitySetToCreateIn.AddNew() currentProperty = newEntity.Details.Properties("Master") currentProperty.Value = newMasterId Thanks in advance for pointing out what I am missing!
Diptimaya PatraPosted Sep 6, 2011, 1:23 AM
Nice Article.