This chapter is taken from book "Foundations of WF: An Introduction to Windows Workflow Foundation" By Brian Myers published by Apress.
Introduction to Workflow and Windows Workflow Foundation
In this chapter, you'll learn what workflow is and get introduced to a new .NET technology known as Windows Workflow Foundation (WF). I'll explain the different types of workflow and provide reasons for using each type of workflow. I'll define workflow activities and provide a list of workflow activities within WF.
What Is Workflow?
In the business world, workflow is how an item is moved from one person to another through a process. That process is the business process, and it defines the steps necessary to complete apiece of work. Steps in the process can be required or optional. For example, a business process for a vacation request might be that the employee must provide some information, such as the dates requested, to his or her supervisor. Then, the employee's supervisor must determine if the employee has vacation time to use, and if the date or dates requested are available for vacation. The supervisor must provide the date information to the human resources department. Finally, the human resources department verifies that all policies have been followed, and provides the information to accounting at the appropriate time so payroll adjustments can be made.
Notice that I didn't mention technology in my explanation of the business process. Business processes should be defined absent of technology. However, you can see there's a flow to the work. Also, notice that at several points in the flow, decisions need to be made. For example, the supervisor must make sure the employee has vacation time to use, and the company might have specific requirements about the number of employees that can be on vacation at the same time within a department. Because the flow can't move from one step to the next without some criteria being met, this is a state-based workflow. A state-based workflow means that each step of the flow has criteria that must be met before the flow can continue to the next step. A state-based workflow waits on external entities to perform some action before moving to the next step.
This example of workflow has a large amount of potential branching. Within a workflow, branching is when a decision needs to be made, such as when the supervisor must determine if the employee has enough vacation time to use, and if company policies related to staff size within a department will be met. In this case, two decisions need to be made: first, if the employee has vacation time to use, and second, if policies have been met. For each branch in a workflow, there must be at least two alternatives. You can't have a workflow just stop at a decision point. For example, the supervisor can't determine that the employee doesn't have enough vacation time and simply stop the workflow. Some step must still be taken to let the employee know the vacation request has been denied. So in the supervisor step, the branching involved would be as follows: if the employee has vacation time then approve, and if the employee doesn't have vacation time, don't approve the request and send it back to the employee.
Another type of workflow is sequential. Sequential workflow is a workflow whose steps are performed one right after the other, but might include branching. In this case, sequential refers more to continuous operation, instead of the order in which actions are performed. The traditional concept of sequential in programming is without branching, but when related to workflow, sequential means continuous, instead of without branching. Steps in a Sequential workflow don't wait for an external entity to perform the next step. You can think of the Sequential workflow as close to continuous. There might be some external entity's action required to begin the flow, but once the flow is started, little if any external action is needed. Technology must be applied to a business process. For example, you might have a process that automatically updates a sales order as complete, and sends an e-mail notice to the customer and the sales person when a sales order is shipped. An external entity must start the process by saying that the sales order has shipped, but then some system would mark the sales order as complete, determine the customer's e-mail address, determine the sales person's e-mail address, and then send the e-mail. Once an external entity initiates the flow, the flow continues until an exception is encountered or the flow is completed.
When to Use Which Workflow Type
Sequential workflow within WF follows the traditional thinking of workflow. That is, the workflow is in control. As long as the process is simple and rarely goes outside the bounds, then a Sequential workflow will work. For example, an employee performance review workflow might have an employee's supervisor create a review and send the review to the employee. The employee sends the review back to the supervisor, and the supervisor sends the review to the employee. The supervisor is involved twice, but there's little room for deviation from the flow. This is a good example of a Sequential workflow. Again, remember that just because the flow is sequential doesn't mean it can't have branching and looping.
On the other hand, State Machine workflow deals with different states. A process that can have many different iterations is a candidate for a State Machine workflow. A help desk system would be a good candidate for a State Machine workflow. For example, a user creates a ticket and that ticket goes into a queue. The state of the ticket is pending. The help desk manager reviews the queue and sets a priority. Also, the help desk manager then assigns the ticket to a technician. The state of the ticket is now assigned. The technician says to begin work on the ticket. The state is now Working. However, the technician must wait for information from another vendor. The state goes to pending vendor. After some time, the vendor returns information. However, the technician doesn't have time to work on the ticket, so he assigns it to another technician. The state is back to assigned. The technician begins and completes the work and the ticket is closed. The state is now closed. Performing this type of process with a Sequential workflow would require a lot of while loops and if branching, because there are so many possible statuses and not every ticket would use each state. Most tickets wouldn't use the pending vendor status, but some tickets might.
Why Use Workflows?
Why might you even want to use workflows? I can, and have, created a help desk application with the same complexities mentioned earlier as an ASP.NET application with Visual Basic. The biggest reason to create workflow, especially with WF, is that you're creating a model. Most projects that facilitate a business process have some type of model associated with them. This model might be use cases and UML diagrams, or it might be as simple as a flow chart. These are models-ways to look at the process. With WF, the model and the workflow are the same thing. You use pieces of the business process to make a workflow, and you piece together the business process, which makes a model. Before WF, you'd create UML diagrams that showed how classes were to interact, and with some tools you could get the diagrams to create class definitions automatically, along with method and property definitions. With WF, when you're laying out the business process-that is, modeling the business process-you're also building the application. WF also has other facilities that help take care of a great deal of the plumbing related to workflow. For example, you can persist workflow data, so that even during a reboot, running processes can be started from the point they stopped. Finally, WF allows processes to change on the fly. You can change the process while instances of the process are running, and the instances will adhere to the new process.
Introducing Windows Workflow Foundation
Windows Workflow Foundation (WF) is a technology that Microsoft has packaged with the .NET Framework for Microsoft Vista. WF is part of the programming model for Microsoft Vista, the next release of the Windows operating system. The new name for that programming model is WinFX, and it's a significant expansion of the Microsoft .NET Framework that was first released several years ago. Although WF is part of the WinFX programming model for Windows Vista, it can be run on clients that have Windows Server 2003 SP1, Windows XP SP2, Windows XP Home Edition, or Windows XP Media Center Edition. To develop workflow applications, you must be using Visual Studio 2005-any version except Express. You can build workflow applications using VS2005 by adding the Visual Studio 2005 Extensions for Windows Workflow Foundation.
Architecture of Windows Workflow Foundation
WF itself is a programming model, along with an engine and a set of tools for building workflowenabled applications. The programming model is made up of exposed APIs that other programming languages can use to interact with the workflow engine. These APIs are encapsulated within a namespace called System.Workflow. That namespace will be part of the WinFX programming model, but can also be installed as an add-on to the existing .NET Framework 2.0.
The easiest way to interact with the new APIs and namespace is through the Workflow Designers, which you can add onto VS2005. You must download and install WF (more on this in the next section) unless you're using Windows Vista as your operating system. When you download and install the foundation, WF gets bolted onto the .NET Framework 2.0 and VS2005. Within VS2005, you'll have new project types and will be able to import and use the System.Workflow namespace. The new Workflow Designer projects allow you to design workflow visually using the same drag-and-drop methods you use for creating Windows or Web-based applications. Within the designers, you build workflow much like you'd create a flowchart with a tool such as Microsoft Visio. WF also allows you to package the designers for reuse. For example, you could build a Windows application that allows business people to create their own workflow libraries.
The design tools that become part of VS2005 make up the first component of the overall WF. The next component is the actual workflow. Workflow is made up of a group of activities. These activities facilitate a business process or part of a business process. Activities are a central idea within the concept of workflow and the WF. A single workflow within WF is made up of one or more activities. In the context of the WF, activities are the actual work units necessary to perform a workflow. A number of out-of-the-box activities are provided as part of the WF. These out-of-the-box activities are part of the WF base activity library. You aren't restricted only to these activities; you can create custom activities and create your own library (as will be done in Chapter 8). You create the custom activities using the VS2005 Workflow Designers.
The next component of the WF is the WF runtime engine. The WF runtime engine executes workflow, made up of activities, and created with the VS2005 Workflow Designers. The runtime engine also includes services such as scheduling, state management, and rules. The scheduling service schedules the execution of activities within a given workflow. The state management service allows the state of a workflow to be persisted, instead of storing that state in another mechanism, such as a database. The rules service executes Policy activities. I'll further explain Policy activities in the section entitled "Out-of-the-Box Activities" and in more depth in Chapter 5. For now, realize that you can create workflows that are based on business rules and that perform some action when those rules are satisfied. The rules service handles all this.
The last component of WF is a host process. WF itself doesn't have an executable environment. Instead, another process must host the runtime engine and workflows. This host process may be a Windows application or an ASP.NET application. During development, this host process is VS2005. The soon-to-be-released Microsoft Office 12 can also be a host for a workflow created with WF.
Getting Started with WF and VS2005
Before you can create or use workflows, you must first install the Windows Workflow Foundation or be running Windows Vista. Even if you're running Windows Vista as an operating system, you must install the Workflow Designers for VS2005. If you're running an operating system other than Windows Vista, you need to install the Visual Studio 2005 Extensions for Windows Workflow Foundation. This installation package includes the VS Workflow Designers, the WF SDK, and the WF runtime components. The installation is self-explanatory, so I won't walk through it here. When the package is installed, two new programs will appear in the Add/Remove Programs within the Control Panel. The first is the Visual Studio 2005 Extensions for Windows Workflow Foundation. These are the Workflow Designers that are part of VS2005. The other program is the Windows Workflow Foundation, which is an add-on to the .NET Framework 2.0 and contains the components mentioned earlier.
As soon as the Visual Studio 2005 Extensions for Windows Workflow Foundation is installed, you can open VS2005 and find new projects.
When you open VS2005, click File --> New --> Project. When the New Project window appears, click the plus sign next to your favorite programming language, such as VB. Notice when the project types list is expanded, there's a new project type called Workflow. When you click the Workflow project type, you'll see the new project templates (see Figure 1-1).
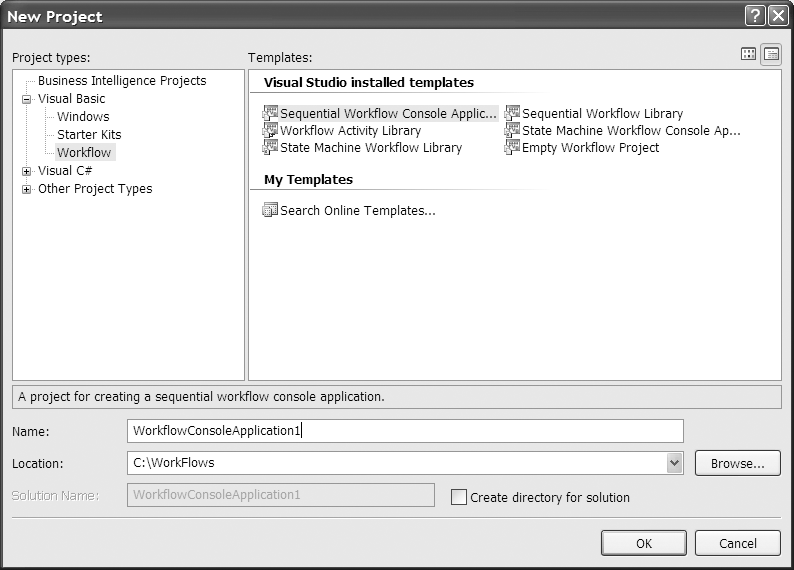
Figure 1-1. New workflow project templates
The Sequential Workflow Console Application and State Machine Workflow Console Application provide the workflow model for the two types of workflow that can be created within WF: sequential and state machine. In the first section of this chapter, I explained what workflow was, and discussed Sequential workflow and State Machine workflow. WF implements these workflows using these models. First you need to select a workflow model, then you need to add activities to that model. In the section entitled "Out-of-the-Box Activities" you'll find a list of all the out-of-the-box activities and a brief explanation of each. Most of this book will expand that brief explanation and provide examples for each of the base activities.
There isn't much difference between each of the project templates. In this section, I'll explain the differences between the templates, and then show you how to create one project using each template (except for the empty workflow project template). The projects created in this section will be used in Chapter 2 to demonstrate how to create and execute a simple workflow project of each type.
The first project will be the Sequential Workflow Console Application. Create a new Sequential Workflow Console Application by creating a new workflow project within VS2005 and selecting the Sequential Workflow Console Application project template from the Workflow project type under VB (in Chapter 2 you'll create the C# projects). Create a new folder on your computer called WorkFlows, which is simply for organization. However, the WF beta doesn't allow saving into the default directory, so you need to create a folder into which to put the workflow. Create the project as VBFirstSequentialWFConsoleApplication within that WorkFlows folder. Your New Project window should look like Figure 1-2.
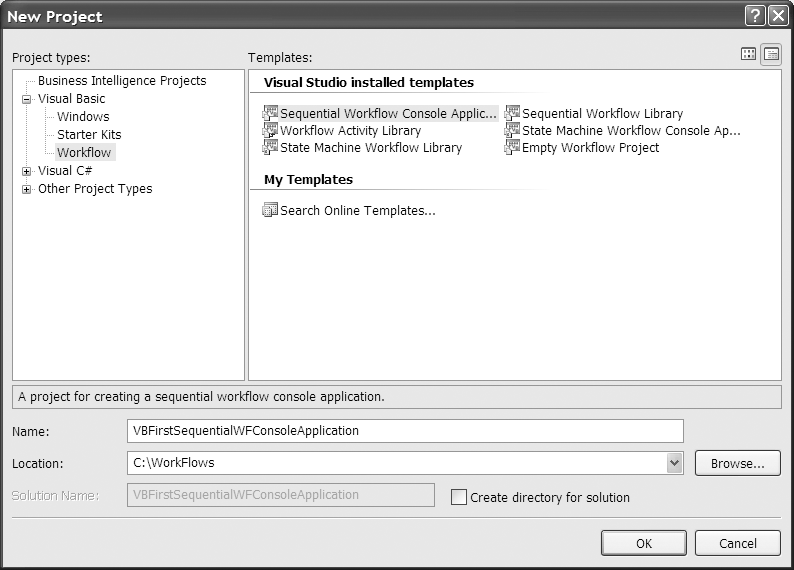
Figure 1-2. Create VBFirstSequentialWFConsoleApplication
With that VS2005 instance still open, open a new instance of VS2005. Create a new project, but this time create a Sequential Workflow Library project called VBFirstSequentialWFLibrary, as shown in Figure 1-3.
Make the VS2005 instance with the first application (VBFirstSequentialWFConsoleApplication) active. Click the Solution Explorer. You'll notice there's a file called Workflow1.vb and a file called Module1.vb, as shown in Figure 1-4.
The reason the workflow file has a .VB extension just like classes do is because both workflows and activities are classes. Chapter 2 will further cover the fact that workflows and activities are classes and behave like classes (have events, for instance). If you make the other instance of VS2005 active, you'll notice there's only a Workflow1.vb file. The reason for this is that the first application is the console application. The Module1.vb file contains a Sub Main procedure that's used to start the workflow. Again, Chapter 2 will further cover Module1.vb and Sub Main.
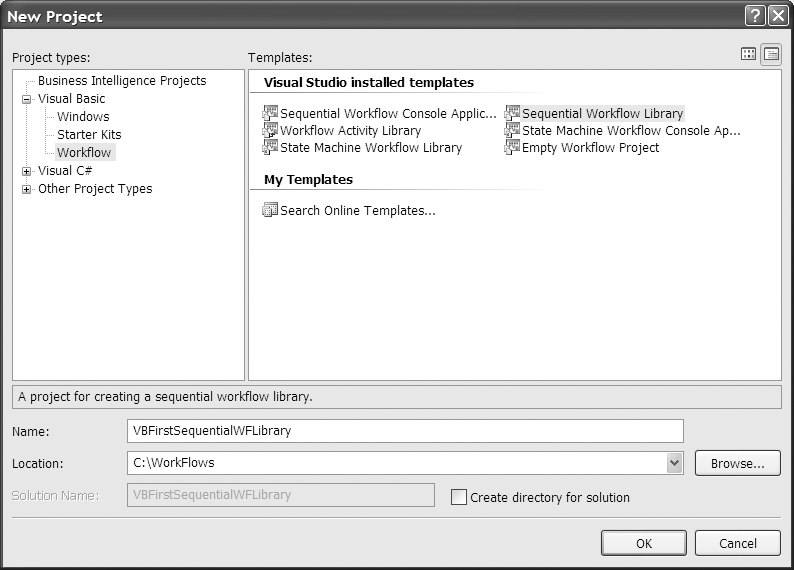
Figure 1-3. Create VBFirstSequentialWFLibrary
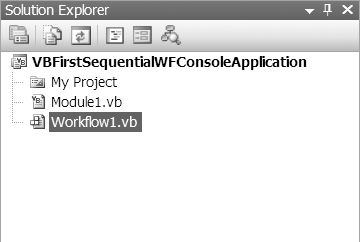
Figure 1-4. Sequential Workflow Console Application in the Solution Explorer
The Toolbox within VS2005 for a workflow project is different from a typical project using the selected language. Instead of controls such as text boxes or grid views , the Toolbox contains a control for each of the activities from the WF Basic Activity Library (the out-of-the-box activities). The formal design area is where the controls from the Toolbox will be placed. The design area is the area with the Sequential workflow starting point already defined, waiting for the next activity to be placed next in the flow, as shown in Figure 1-5.
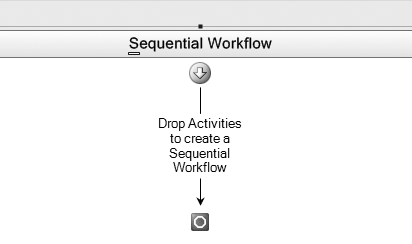
Figure 1-5. Sequential Workflow design area
To further prepare for Chapter 2 and creating your first workflow projects, create a new State Machine workflow console application called VBFirstStateMachineWFConsoleApplication, and a State Machine Library called VBFirstStateMachineWFLibrary. When you open the projects, you'll notice the same differences in the Solution Explorer between the console application and the library. Also compare the Toolbox of a State Machine workflow to that of a Sequential workflow project. A few differences will be discussed and shown in Chapter 2. Finally, notice that the design area is different for the State Machine workflow, as shown in Figure 1-6. There's no starting point, just a container for the first state.
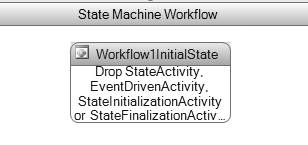
Figure 1-6. State Machine workflow design area
Close all the projects that are open. The final project to create is the Workflow Activity Library project. Call this project VBFirstWorkflowActivityLibrary. When you open this project, again you'll notice a different design area, as shown in Figure 1-7. This design area allows you to create new activities from the existing out-of-the-box activities. These are called composite activities. The Workflow Activity Library project is similar to creating a class library. This allows you to customize existing activities and create your own, to be reused within other projects.
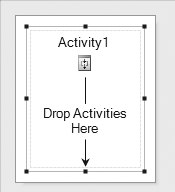
Figure 1-7. Activity Library design area
Out-of-the-Box Activities
The preceding section showed how to create each of the new types of workflow projects. However, without an understanding of the out-of-the-box activities, you won't be able to create effective workflow projects. This section will describe all the out-of-the-box activities and indicate which chapter within this book to find out more information about this activity.
- Code activity: The Code activity allows you to add your own VB or C# code to the workflow. This is a simple form of the custom activity. The actual code resides in a "code beside" file and gets compiled with the workflow. Any code entered here executes synchronously, so the workflow must wait for it to complete. More information about this activity will follow in Chapter 2.
- Compensate activity: This is an error activity, and can only be added to an exception handler activity. You use this activity to undo actions already performed by the workflow after an error has occurred. This is the equivalent of rolling back a transaction. For more information about the Compensate activity, read Chapter 7.
- Conditional Activity Group: This is a conditional activity that executes other activities based on a condition that applies to the Conditional Activity Group (CAG) or to the activity that's linked to the CAG. Use this grouping of activities to execute a set of activities based on criteria specified for each activity in the group, until some condition is met for the group as a whole. This would allow a group of activities to be executed in parallel, because they each have their own criteria for defining when the activity is complete. You can use a WhenCondition on an activity within the group and an UntilCondition on the group as a whole. All activities continue to execute, if a WhenCondition is provided for the activities, unless the UntilCondition on the group is met. When the UntilCondition on the group is satisfied, the entire group will stop executing. For more information about the CAG, refer to Chapter 3.
- Delay activity: This is a flow activity that allows you to build interval-based pauses into your workflow. With this activity, you can set a duration so that the workflow will pause before continuing to execute. For more information about the Delay activity, refer to Chapter 4.
- EventDriven activity: This is a flow activity that contains other activities that are to be executed when an event occurs. The event is subscribed to by child activities, such as the Delay activity, which wait for external events to happen. For more information about the EventDriven activity, refer to Chapter 4.
- Fault Handler activity: This is an error handling activity. The Fault Handler activity performs much like the Catch block in code. A workflow can have many of these activities to handle the various types of exceptions that could occur within the workflow. The Fault Handler activity can contain other activities that are fired when an exception is encountered, including a Compensate activity. For more information about the Fault Handler activity, refer to Chapter 7.
- IfElse activity: This is a conditional activity. Use the IfElse activity to execute a branch of activities based on a condition. The first branch must have a condition, but the last branch doesn't require a condition (this is the else part of the activity). The execution is the same as an If Else statement: the first successful branch execution ends the execution of the activity. For more information about the IfElse activity, refer to Chapter 3.
- Invoke Web Service activity: This activity invokes a Web service using a proxy class, and can pass and receive parameters. When invoking a Web service with this activity, you specify a method of the Web service to invoke. For more information about the Invoke Web Service activity, refer to Chapter 6.
- Listen activity: This activity is a composite activity (made up of a minimum of two activities). Each activity that makes up the Listen activity must be an EventDriven activity. The first event raised by an EventDriven activity is executed, and the other EventDriven activity or activities within the Listen activity isn't executed. You can't use a Listen activity in a State Machine workflow. For more information about the Listen activity, refer to Chapter 7.
- Parallel activity: This activity is a composite activity, made up of two or more Sequence activities. The Parallel activity allows the execution of more than one activity at the same time. The activity isn't complete until all Sequence activities that make up the Parallel activity have completed. You need to be careful with the Parallel activity, as more than one Sequence activity within the Parallel activity might attempt to access the same data and could cause conflicts. For more information about the Parallel activity, refer to Chapter 4.
- Policy activity: You can use the Policy activity to represent a collection of rules. A rule has a condition and action or actions that should be taken when that condition is met. The Policy activity allows you to set up a rules-based workflow that can have many conditions, instead of using a series of IfElse activities. For more information about the Policy activity, refer to Chapter 5.
- Replicator activity: The Replicator activity is a conditional activity that's similar to the For Each statement. The Replicator activity creates a number of instances of a single activity while running. All instances must complete before the Replicator activity can complete. For more information about the Replicator activity, refer to Chapter 5.
- Sequence activity: This is a flow activity and a composite activity. This activity provides an easy way to link activities together that are to be executed in sequence. All activities in the sequence are executed before the sequence is complete. For more information about the Sequence activity, refer to Chapter 4.
- SetState activity: This activity is a flow activity that's used to specify a transition to a new state within a State Machine workflow. For more information about the SetState activity, refer to Chapter 4.
- State activity: This is a flow activity. This activity represents a state (the main component of a State Machine workflow) within a State Machine workflow. The State activity makes up the building block of the State Machine workflow. When an event is handled within a State Machine workflow, a different state activity is entered to handle that state. For more information about the State activity, refer to Chapter 4.
- StateInitialization activity: This activity is a flow activity and a composite activity. This activity is part of a State activity, and is made up of other activities that are to be executed when the State activity is first entered. This activity doesn't need to respond to events. For more information about the StateInitialization activity, refer to Chapter 4.
- Suspend activity: This is a flow activity. The Suspend activity pauses the operation of a workflow to allow intervention to occur if an error condition requiring special attention is encountered. When this activity is executed, an error is logged. A workflow that has been paused can still receive messages, but those messages are queued. For more information about the Suspend activity, refer to Chapter 4.
- Terminate activity: This is a flow activity. This activity immediately ends a workflow's operation if an error condition is met. Unlike the Suspend activity, which only pauses the workflow when a serious error occurs, this activity stops the workflow. This activity also logs an error. For more information about the Terminate activity, refer to Chapter 4.
- Throw activity: This is an error handling activity. Use this activity to throw an exception from within a workflow or another activity. The action of this activity is the same as the Throw statement within a Catch block in code. For more information about the Throw activity, refer to Chapter 7.
- Transaction Scope activity: This is a flow activity. This activity provides transaction support, and exception and event handling. All activities that make up a transaction are placed within this activity. For more information about the Transaction Scope activity, refer to Chapter 7.
- While activity: This is a conditional activity. This activity executes another activity until a condition is met. The condition that needs to be met can be a rule condition (see the "Policy activity" bullet point) or a code condition. For more information about the While activity, refer to Chapter 3.
Conclusion
This chapter introduced you to workflow, and showed you how you can use the new WF to develop workflow-based applications. This chapter also discussed the new project type within VS2005 for workflow, and defined each of the out-of-the-box-activities that are part of the Windows Workflow Activity Library. The next chapter will expand on the workflow projects that were created in this chapter. You'll learn how to use the VS2005 Workflow Designers and how to create a simple workflow project.
Book Detail: