

Transclusion simply means inclusion of one document or a part of it into another document. It will allow us to include some content (could be textual or graphical) or part of html inside our custom AngularJs directive.
If we place some content inside our custom AngularJS directive by default it won’t work (i.e. the content or html won’t be displayed when the custom directive is rendered on the browser) because transclude property of custom AngularJS directive is by default set to “false”. To make it work we need to set the Transclude property to “True” inside our custom directive. Transclusion can also be useful when we want to nest the custom directives (i.e. using custom directive inside another custom directive). Transclusion property in AngularJS custom directive can hold value either of “true”, “false” or “element”.
Let’s define our application architecture. For demonstrating this I am using ASP.NET MVC4 application. Inside my application I’ve added a new folder with the name “Angular” which will hold all my AngularJS components like directives, page scripts & html pages. I’ve added bootstrap and AngularJS reference through Nuget. The following is the snapshot of my application architecture.
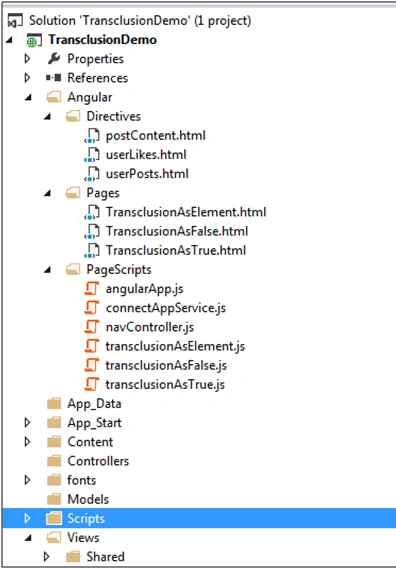
Let’s create the base of the application. I’ve created a base JavaScript file which will hold the reference of my AngularJS module. The following is the code snippet of the file.
- //angularJs Module
- var myApp = angular.module("myApp", ["ngRoute"]);
Index.html
- <!DOCTYPE html>
- <html xmlns="http://www.w3.org/1999/xhtml" ng-app="myApp">
- <head>
- <title>Transclusion Demo</title>
- <!--bootstrap reference-->
- <link href="Content/bootstrap.min.css" rel="stylesheet" />
- <!--jQuery reference-->-->
- <script src="Scripts/jquery-1.9.1.min.js"></script>
- <!--AngularJs reference-->
- <script src="Scripts/angular.min.js"></script>
- <script src="Scripts/angular-route.min.js"></script>
- <!--PageScripts Reference-->
- <script src="Angular/PageScripts/angularApp.js"></script>
- <script src="Angular/PageScripts/connectAppService.js"></script>
- <script src="Angular/PageScripts/navController.js"></script>
- <script src="Angular/PageScripts/transclusionAsFalse.js"></script>
- <!--Just keep on adding the new reference file for every new page-->
- </head>
- <body class="container">
- <header>
- <h1>Transclusion in AngularJs</h1>
- <!--Creating Menus-->
- <div ng-controller="navController" style="margin-top:50px;">
- <ul class="nav nav-pills">
- <li role="presentation" ng-class="{'active': isActive('/TransclusionAsFalse')}">
- <a href="#/TransclusionAsFalse">Transclude As False</a>
- </li>
- <li role="presentation" ng-class="{'active': isActive('/TransclusionAsTrue')}">
- <a href="#/TransclusionAsTrue">Transclude As True</a>
- </li>
- <li role="presentation" ng-class="{'active': isActive('/TransclusionAsElement')}">
- <a href="#/TransclusionAsElement">Transclude As Element</a>
- </li>
- </ul>
- </div>
- </header>
- <section>
- <div ng-view>
- </div>
- </section>
- </body>
- </html>
- //Application Routing Configuration
- myApp.config(function ($routeProvider) {
- $routeProvider
- .when("/", {
- templateUrl: "Angular/Pages/TransclusionAsFalse.html",
- controller: "transcludeFalseController"
- })
- .when("/TransclusionAsFalse", {
- templateUrl: "Angular/Pages/TransclusionAsFalse.html",
- controller: "transcludeFalseController"
- })
- .when("/TransclusionAsTrue", {
- templateUrl: "Angular/Pages/TransclusionAsTrue.html",
- controller: "transcludeTrueController"
- })
- .when("/TransclusionAsElement", {
- templateUrl: "Angular/Pages/TransclusionAsElement.html",
- controller: "transcludeElementController"
- })
- .otherwise({
- redirectTo: "../../Index.html"
- })
- });
- myApp.controller("navController", ["$scope", "$location", function ($scope, $location) {
- //This function is used for highlighting the clicked menu.
- $scope.isActive = function (locationUrl) {
- return locationUrl === $location.path();
- };
- }]);
- “False”: This is the default value for the transclude property. With transclude value as “false” if we add some content or part of html inside our custom AngularJS directive declaration, then in that case AngularJS will only render the directive and the added content or html will be ignored.
To demonstrate this I’ve added a new JavaScript file with the name “TransclusionAsFalse.js”. The following are its contents:
Here is the page where I’ve used this directive.- myApp.controller("transcludeFalseController", ["$scope", function ($scope) {
- }]);
- //Tranclusion is by default false
- myApp.directive("myDirective", function () {
- return {
- restrict: "E",
- template: "<div class='panel panel-default'><div class='panel-heading'>Vishal Gilbile</div><div class='panel-body'>Address: Andheri (E)</div></div>"
- }
- });
TransclusionAsFalse.html
Now let’s run the application and you’ll see the following output.- <h2>Transclusion As False</h2>
- <div ng-controller="transcludeFalseController" class="table-responsive">
- <!--using the directive-->
- <my-directive>
- </my-directive>
- </div>
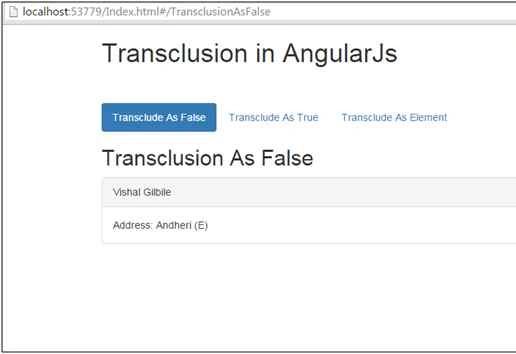
Now let’s add some content inside our custom directive declaration. Here is the updated TransclusionAsFalse.html file.
Now let’s run the application and you’ll see the following output.- <h2>Transclusion As False</h2>
- <div ng-controller="transcludeFalseController" class="table-responsive">
- <!--using the directive-->
- <my-directive>
- <strong>Hello playing with transclude property of custom angularJs directive.</strong>
- </my-directive>
- </div>
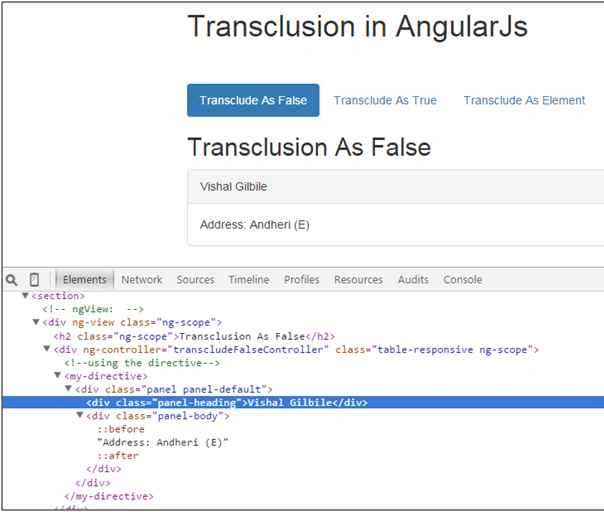
As mentioned earlier whenever the transclude property value is false and if we add some content inside our custom directive declaration then at the time of rendering the custom directive AngularJS simply ignore the added content and only render the custom directive.
- “True”: With transclude property value setting to true will notify the AngularJS to render the contents defined inside the custom directive declaration. Inside the custom directive we need to tell AngularJS where the added contents should be displayed, to do this we need to use ng-transclude attribute inside our custom AngularJS directive which will act as a placeholder for the added contents.
To demonstate this I’ve added a new JavaScript file with the name “transclusionAsTrue.js”. The following are the contents for the same.
I’ve defined the directives and the following are the code snippet for each of them.- //angularController
- myApp.controller("transcludeTrueController", ["$scope", "ConnectAppDataService", function ($scope, ConnectAppDataService) {
- $scope.users = ConnectAppDataService.GetConnectAppUserDetails();
- }]);
- //PostContent Directive
- myApp.directive("postContent", function () {
- return {
- restrict: "E",
- templateUrl: "Angular/Directives/postContent.html",
- scope: {
- userDetailsArray: "=",
- }
- }
- })
- //UserPost Directive
- myApp.directive("userPost", function () {
- return {
- restrict: "E",
- templateUrl: "Angular/Directives/userPosts.html",
- transclude: true,
- scope: {
- userName: '@',
- postDetails: "="
- }
- }
- });
- //UserLikes Directive
- myApp.directive("userLikes", function () {
- return {
- restrict: "E",
- templateUrl: "Angular/Directives/userLikes.html",
- scope: {
- postLikesCount: "@"
- }
- }
- });
postContent.html
userPosts.html- <div ng-repeat="user in userDetailsArray">
- <user-post user-name="{{user.Name}}" post-details=" post" ng-repeat="post in user.Posts">
- <user-likes post-likes-count="{{post.Likes.length}}"></user-likes>
- </user-post>
- </div>
userLikes.html- <div class="panel panel-default panel-primary">
- <div class="panel-heading">
- <h5><strong>{{userName}}</strong></h5>
- </div>
- <div class="panel-body">
- <img ng-src="{{postDetails.Content}}" alt="Image" class="img-responsive" />
- </div>
- <div class="panel-footer" ng-transclude>
- </div>
- </div>
Here is the code snippet for the page where we have included this directive.- <div>
- <button class="btn btn-primary" type="button">
- Likes <span class="glyphicon glyphicon-thumbs-up"></span>
- </button>
- <!--Binding the likesCount model-->
- <span class="badge">{{postLikesCount}}</span>
- </div>
TransclusionAsTrue.html
Let’s run the application and here is the output.- <h2>Transclusion As True</h2>
- <div ng-controller="transcludeTrueController" class="table-responsive">
- <post-content user-details-array="users">
- </post-content>
- </div>
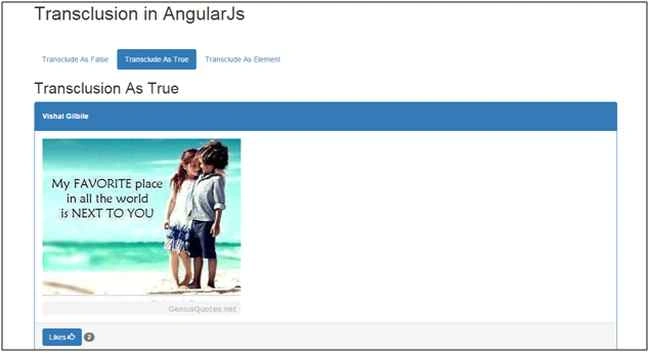
- “Element”: When the transclude property value is set to “element” it will transclude the full directive i.e. it will render the directive as comment. This value should be used only when we want to transclude the whole element on which the directive is applied including any directive defined with low priority. Whenever we set the value of the transclude property to “element” it provides us with the link function on which can have access to the scope, element, attributes, controller & transclude function. This transclude function enables you to clone the element and also to bound data to the scope within it.
To demonstrate this I’ve created a new javascript file with the name “transclusionAsElement.js”. The following is the code snippet for the same.
Here is the html code snippet on which the directive is used.- //angularJs Controller
- myApp.controller("transcludeElementController", ["$scope", function ($scope) {
- $scope.userList = ["Vishal Gilbile", "Rahul Bandekar", "Lincy Pullan", "Muthu Konar"];
- $scope.addUser = function () {
- var userName = $("#txtUserName").val();
- if ($scope.userList.indexOf(userName) == -1) {
- $scope.userList.push(userName);
- }
- $("#txtUserName").val("");
- }
- $scope.removeUser = function () {
- var userName = $("#txtUserName").val();
- var index = $scope.userList.indexOf(userName);
- if (index > -1) {
- $scope.userList.splice(index, 1);
- }
- $("#txtUserName").val("");
- }
- }]);
- //UserListOperation Directive
- myApp.directive("userListOperation", function () {
- return {
- restrict: "E",
- transclude: "element"
- }
- });
TransclusionAsElement.html
Now let’s run the application and you’ll see the following output.- <h2>Transclusion As Element</h2>
- <div ng-controller="transcludeElementController">
- <user-list-operation>
- <ul class="list-group">
- <li class="list-group-item" ng-repeat="user in userList"> {{user}}</li>
- </ul>
- </user-list-operation>
- <div class="row">
- <div class="col-xs-2">
- Enter User Name:
- </div>
- <div class="col-xs-4">
- <input id="txtUserName" type="text" required class="form-control" />
- </div>
- </div>
- <div class="row" style="margin-top:10px; text-align:center;">
- <div class="col-xs-4">
- <button class="btn btn-default btn-primary" ng-click="addUser()">Add User</button>
- <button class="btn btn-default btn-primary" ng-click="removeUser()">Remove User</button>
- </div>
- </div>
- </div>
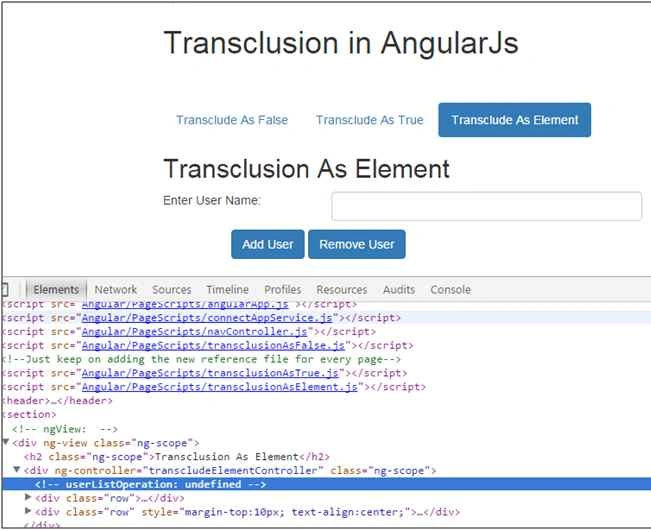
As you can see that after setting the value of the transclude property to element it just replaces the directive content with the html comment “<!-- userListOperation: undefined -->”. Now let’s try to introduce the link function inside our directive. Here is the updated code snippet for the “transclusionAsElement.js” userListOperation directive.
Now let’s run the application and here is the output.- //UserListOperation Directive
- myApp.directive("userListOperation", function () {
- return {
- restrict: "E",
- transclude: "element",
- link: function (scope, el, attrs, cntrl, transclude) {
- console.log(scope);
- transclude(scope, function (clone) {
- el.before(clone);
- })
- }
- }
- });
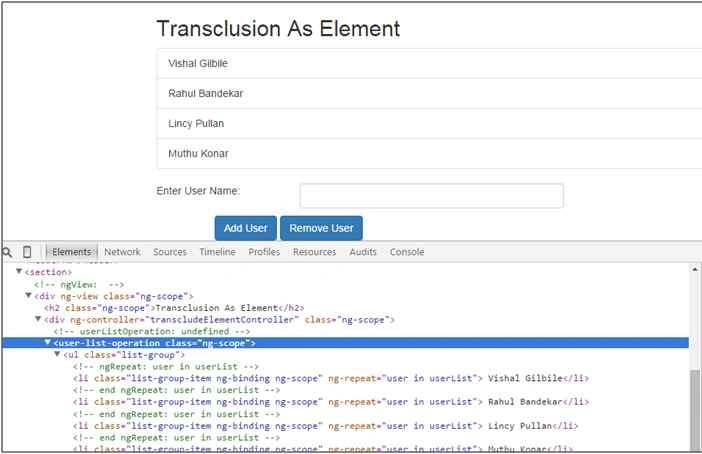
You can add or remove a user by entering the details and by clicking the “Add User” or “Remove User” button respectively and accordingly the newly added elements would be displayed in the list and existing user entry would be removed from the list.
Leo VoPosted Jan 25, 2016, 12:41 AM
Please help me: http://stackoverflow.com/questions/34985730/when-to-use-angular-transclusion
Santhakumar MunuswamyPosted Oct 18, 2015, 5:59 AM
Good one
Ankit BansalPosted Oct 7, 2015, 1:24 AM
nice..thanks for sharing knowledge..
Sibeesh VenuPosted Oct 7, 2015, 12:55 AM
Nice Share
RakeshPosted Oct 7, 2015, 12:53 AM
Good Article Share
Humayun Kabir MamunPosted Oct 7, 2015, 12:46 AM
Nice...
Nilesh JadavPosted Oct 6, 2015, 9:19 PM
Nice one sir