

Introduction
- Arduino Uno
- Bread Board
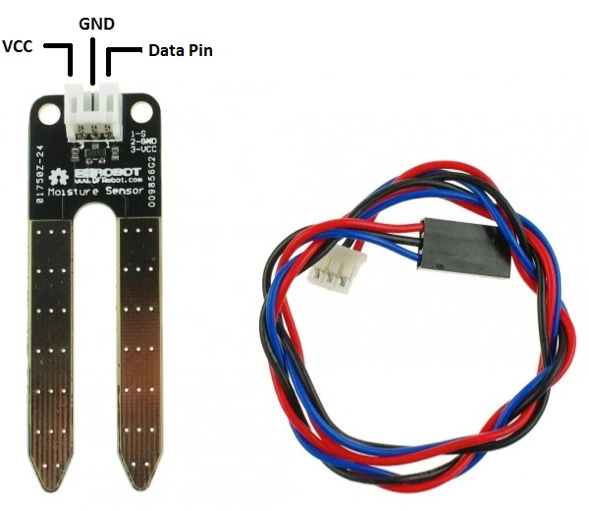
- Soil Moisture Sensor
- Led
Connection
- Pin1 to the Analog
- Pin2 to the Gnd
- Pin3 to the 5v
Programming
- int pin=A0;
- int soilmoisture=0;
- int led=13;
- void setup()
- {
- pinMode(led,OUTPUT);
- Serial.begin(9600);
- }
- void loop()
- {
- int soilmoisture=analogRead(pin);
- if(soilmoisture>=100){
- digitalWrite(led,HIGH);
- }
- else{
- digitalWrite(led,LOW);
- }
- Serial.println(soilmoisture);
- Serial.print("%");
- delay(20);
- }
Explanation
Declare the variable pin to the Analog and set the minimum value to the soil moisture sensor as 0 and connect the led to the digital pin 13
Functions
Void setup()
- Set the pinMode to led as OUTPUT
- Set the baud Rate( 9600)
Void loop()
AnalogRead- Reads the analog value from the specific pin i.e soil moisture pin with the delay time
Condition
- if (soilmoisture >= 100)
- {
- //led will on
- }
- else
- {
- //led is off
- }
And then print the soil moisture sensor value in the serial monitor.
Advantages
- It reduces the human effort.
- Based upon the irrigation the water will flow through the plant.
- We can save our water.
Read more articles on Arduino:
Shubham KumarPosted Feb 8, 2016, 12:59 AM
nice one
Sibeesh VenuPosted Feb 8, 2016, 12:05 AM
Nice Share
Sr KarthigaPosted Feb 7, 2016, 8:05 PM
Nice share
Kumaresh RajalingamPosted Feb 7, 2016, 7:51 PM
Thanks Jaco
Kumaresh RajalingamPosted Feb 7, 2016, 7:51 PM
My pleasure Santhakumar sir
Jaco ZwartsPosted Feb 7, 2016, 1:47 PM
Nice article thanks for sharing
Santhakumar MunuswamyPosted Feb 7, 2016, 12:45 PM
Thanks for your sharing
Kumaresh RajalingamPosted Feb 7, 2016, 11:37 AM
Thank you Md Almajid Koushik
Md Almajid KoushikPosted Feb 7, 2016, 10:07 AM
Great article!!!!!