

What is Arduino
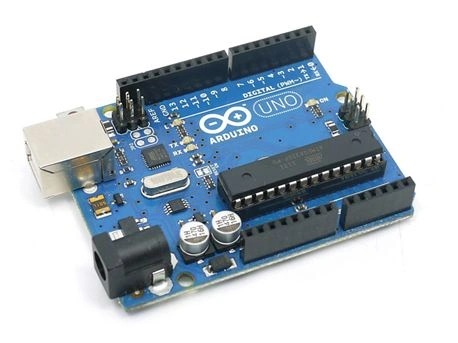

- Arduino UNO (fundamental and very basic).
- Arduino Mega (advanced in terms of memory and functionality).
- Arduino Nano (most tiny in size).
- Arduino YEN (advanced).
- Arduino LilyPad (tiny in size).
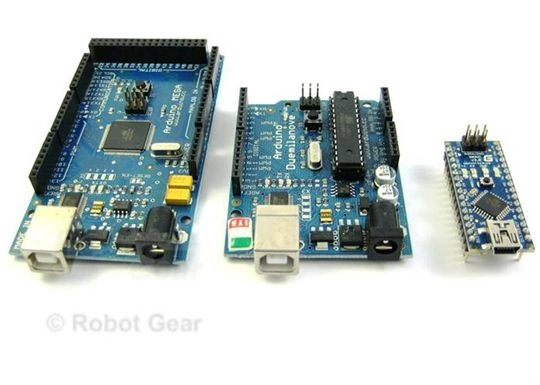
Figure: Arduino Mega then, Arduino UNO and last we have Arduino Nano.
- It's an Open Source Project.
- Arduino and your computer interface with a USB A to B cable. The chip on the Arduino board treats the USB as a Serial Port. Though, your computer detects it as a virtual serial device that is communicating through Serial Communication.
- There is a simple built-in power regulator. Since using an external voltage supply you can 12volts whereas it supplies either 3.3 Volts or 5 Volts.
- We have an ATmega328 chip at the heart of the microcontroller.
- The clock speed of the Arduino UNO is 16 MHz. Not the fastest, but that much is enough to control most modules.
- It has 32KB of flash memory to store your code.
- Arduino UNO has 13 digital pins to connect digital devices or external modules. Whereas, it has 6 analog pins to connect analog devices.
- There is an on-board LED in front of pin 13.
- Besides the USB port, there is a small push-button to reset the program on a chip.
Arduino IDE
 Download link
Contribute to the Arduino Software.
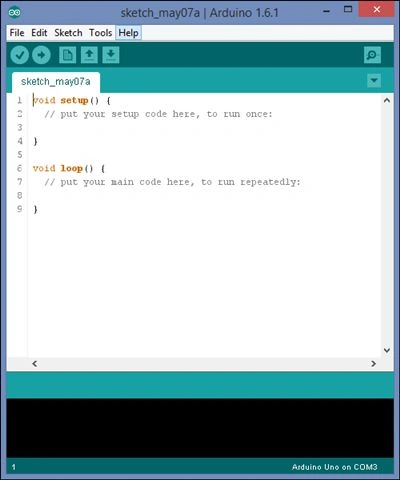
Just below the menu bar, we have a few buttons that are most used.
Download link
Contribute to the Arduino Software.
Just below the menu bar, we have a few buttons that are most used.
 It's a VERIFY button that debugs your code and checks whether it's correct or not.
- After compilation, we need to upload that code to an Arduino UNO for execution. So, we have this button
 to upload.
- Finally, we have
 New, Open, and Save that you can find in File also.
- Next, we have some sample code that is essentially good when you are new to Arduino programming. And, that you will get in File > Examples.
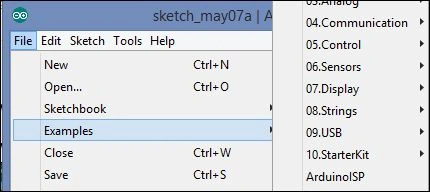
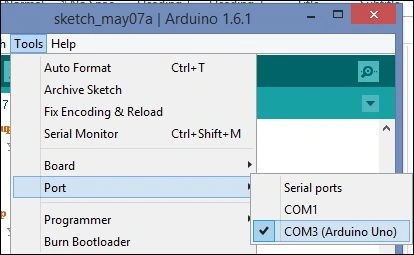
- Then, we have another feature in Tools where you keep your eyes always open while working with Arduino.
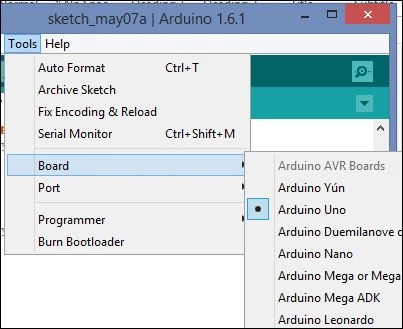
Set the Arduino UNO in your board section and choose the correct COM port of Arduino. I then have something like this:
 Code
Like all programming languages, it has its own recipe to code that is quite similar to the C language. That's the reason why most of the libraries are written in C++.
So, in Arduino code, we will have two definite functions or method, void setup() and void loop().
Where the setup() method is designed to assign the PIN numbers and initialization part, what is to be done before the microcontroller begins executing. Here, we just fix or setup our Arduino. Next, we have the loop() method that actually is the coding part. And it continues to execute until you turn your Arduino off. Most of the conditions, logic, and decision-making statements are written in this block.
In a few words, If I must say
Setup() is similar to a function prototype declaration in the C language where you suggest what kind of data you are expecting. While loop() Is the actual method where you define all the logic and conditions.
How to Light Up a LED
Pre-requite stuff
Code
Like all programming languages, it has its own recipe to code that is quite similar to the C language. That's the reason why most of the libraries are written in C++.
So, in Arduino code, we will have two definite functions or method, void setup() and void loop().
Where the setup() method is designed to assign the PIN numbers and initialization part, what is to be done before the microcontroller begins executing. Here, we just fix or setup our Arduino. Next, we have the loop() method that actually is the coding part. And it continues to execute until you turn your Arduino off. Most of the conditions, logic, and decision-making statements are written in this block.
In a few words, If I must say
Setup() is similar to a function prototype declaration in the C language where you suggest what kind of data you are expecting. While loop() Is the actual method where you define all the logic and conditions.
How to Light Up a LED
Pre-requite stuff
- 3mm LED
- Arduino UNO
- USB A-B Cable
Snapshot
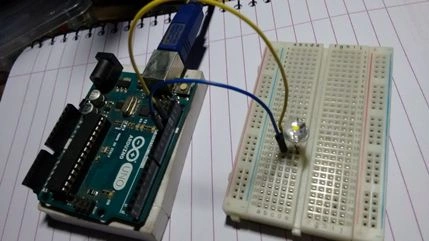
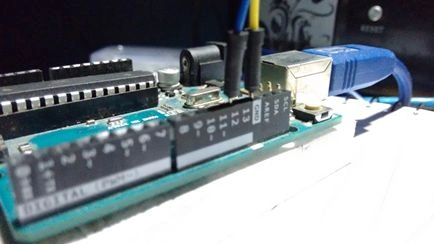 Procedures
- First, connect your LEDs (+ve port) to Digital Pin 12 and the other end to the Ground (GND) of the Arduino.
- Connect your Arduino to the Computer's USB cable and wait until it finds the COM port.
- Write your code (or, sketch what people say).
- Then, verify your code and upload it to the Arduino.
Note: an LED has two legs; the longer leg is always positive whereas the shorter leg is negative.
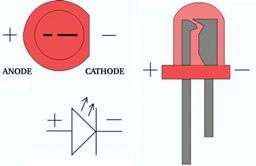 The code will be as in the following:
- // LIGHT UP LED
- int LED = 12; // PIN 12
- void setup()
- {
- pinMode(LED, OUTPUT);
- }
- void loop()
- {
- digitalWrite(LED, HIGH);
- }
As you know, the two methods setup() and loop() are required, whether you code them or not. First, we declared a LED as 12, since we are targeting the LED + pin to digital pin 12. So, it's a good habit to declare a PIN in any integer type. Next, we set up the pinMode() method that decides the digital-pin behavior, whether it is input or output. Here, we are instructing the LED to glow, so it's an OUTPUT command.
That's why we need OUTPUT and LED (that's a Pin number) as arguments. Finally, we have a Loop() method that continually loops until you turn off your Arduino. Here, we called the method digitalWrite() that instructs the digital device to be in ON (HIGH) or OFF (LOW). We can glow our LED, so we ed digitalWrite(LED, HIGH).
And this command instructs Arduino to glow the LED that is connected to PIN 12. And, on a continuous loop, it will remain glowing until you turn off your Arduino.
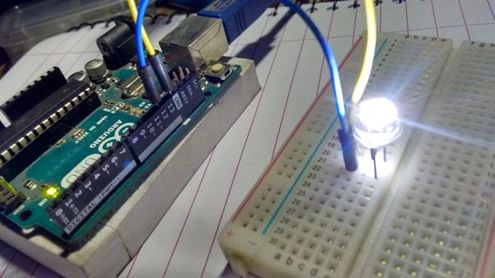
Conclusion
It's a beginning. I will continue this series where we will discuss some cool Arduino modules and shields. Better, you should order your own Arduino UNO from Flipkart, Amazon, or eBay. And ensure you are buying a genuine one.
Jaco ZwartsPosted Feb 6, 2016, 1:15 PM
This really helped me thank you
Kiran MaramPosted May 12, 2015, 10:01 PM
Good one
NitinPosted May 8, 2015, 12:16 PM
nice
Sibeesh VenuPosted May 8, 2015, 7:04 AM
Good one .
Abhishek JaiswalPosted May 8, 2015, 6:31 AM
Would love to know about ur modules. :)
Abhishek JaiswalPosted May 8, 2015, 6:31 AM
Good to see an article on arduino. So what did u create using arduino?? :)
Rambabu CHPosted May 8, 2015, 6:19 AM
Interesting article.Please do keep post series of articles.
Santhakumar MunuswamyPosted May 7, 2015, 11:53 PM
Thanks for nice article