

I am here to continue the discussion around AngularJS 2.0. Today, we will discuss ViewChild in AngularJS 2. Also, in case you did not have a look at the previous articles of this series, go through the links mentioned below.
- AngularJS 2.0 From Beginning Introduction of AngularJS 2.0 (Day 1)
- AngularJS 2.0 From Beginning Component (Day 2)
- AngularJS 2.0 From Beginning Data Binding (Day 3)
- AngularJS 2.0 From Beginning Input Data Binding (Day 4)
- AngularJs 2.0 From Beginning - Output Property Binding (Day 5)
- AngularJs 2.0 From Beginning - Attribute Directive (Day 6)
- AngularJs 2.0 From Beginning - Structural Directives (Day 7)
- AngularJs 2.0 From Beginning - Pipes (Day 8)
In my previous article, I already discussed about Pipes in Angular 2.0. In that article, we discussed about the Angular 2.0 predefined pipes and also discussed how to create custom pipes`. Now in this article, I will discuss about ViewChild.
Basically, ViewChild is one of the new features introduced in Angular 2.0 framework. Since Angular 2.0 basically depends on component architecture, when we try to develop any web page or UI, it is most obvious that the page or UI must be a component, which basically contains a number of multiple different types of components within that component. In simple words, it is basically a parent component – child component based architecture. In this scenario, there are some situations when a parent component needs to interact with the child component. There are multiple ways to achieve this interaction between parent and child component. One of the ways is ViewChild. So when a parent component needs to execute or call any method of the child component, it can inject child component as a ViewChild within the parent component.
- @ViewChild('calculator') private _calculator: ChildComponent;
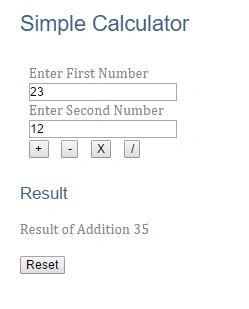
Now, for illustrating this, we will develop a calculator type UI. In this, we will develop two components.
- First component i.e. child component contains two textboxes from taking inputs and four buttons for performing four basic mathematical operations. After completion of the operations, each button will emit its final value to the parent component so that the parent component can show those values or perform any other operations on the basis of those value.
- Now, parent component wants to clear the values from both its own component and also from child component. For clearing the child component value, parent component will access the child component’s clear() by using the @ViewChild decorator.
Now, to illustrate the ViewChild, follow the below lab exercise.
First, create an html file named app.component.child.html and add the below code.
- <div class="ibox-content">
- <div class="row">
- <div class="col-md-4">
- Enter First Number
- </div>
- <div class="col-md-8">
- <input type="number" [(ngModel)]="firstNumber" />
- </div>
- </div>
- <div class="row">
- <div class="col-md-4">
- Enter Second Number
- </div>
- <div class="col-md-8">
- <input type="number" [(ngModel)]="secondNumber" />
- </div>
- </div>
- <div class="row">
- <div class="col-md-4">
- </div>
- <div class="col-md-8">
- <input type="button" value="+" (click)="add()" />
- <input type="button" value="-" (click)="subtract()" />
- <input type="button" value="X" (click)="multiply()" />
- <input type="button" value="/" (click)="divide()" />
- </div>
- </div>
- </div>
Now, create a TypeScript file named app.component.child.ts and add the below code.
- import { Component, OnInit, Output, EventEmitter } from '@angular/core';
- @Component({
- moduleId: module.id,
- selector: 'child',
- templateUrl: 'app.component.child.html'
- })
- export class ChildComponent implements OnInit {
- private firstNumber: number = 0;
- private secondNumber: number = 0;
- private result: number = 0;
- @Output() private addNumber: EventEmitter<number> = new EventEmitter<number>();
- @Output() private subtractNumber: EventEmitter<number> = new EventEmitter<number>();
- @Output() private multiplyNumber: EventEmitter<number> = new EventEmitter<number>();
- @Output() private divideNumber: EventEmitter<number> = new EventEmitter<number>();
- constructor() { }
- ngOnInit(): void {
- }
- private add(): void {
- thisthis.result = this.firstNumber + this.secondNumber;
- this.addNumber.emit(this.result);
- }
- private subtract(): void {
- thisthis.result = this.firstNumber - this.secondNumber;
- this.subtractNumber.emit(this.result);
- }
- private multiply(): void {
- thisthis.result = this.firstNumber * this.secondNumber;
- this.multiplyNumber.emit(this.result);
- }
- private divide(): void {
- thisthis.result = this.firstNumber / this.secondNumber;
- this.divideNumber.emit(this.result);
- }
- public clear(): void {
- this.firstNumber = 0;
- this.secondNumber = 0;
- this.result = 0;
- }
- }
Add another html file named app.component.parent.html files and add the below code.
- <div>
- <h2>Simple Calculator</h2>
- <div>
- <child (addNumber)="add($event)" (subtractNumber)="subtract($event)" (multiplyNumber)="multiply($event)"
- (divideNumber)="divide($event)" #calculator></child>
- </div>
- <h3>Result</h3>
- <span>{{result}}</span>
- <br />
- <br />
- <input type="button" value="Reset" (click)="reset()" />
- </div>
Add another TS file named app.component.parent.ts and add the below code.
- import { Component, OnInit, ViewChild } from '@angular/core';
- import { ChildComponent } from './app.component.child';
- @Component({
- moduleId: module.id,
- selector: 'parent',
- templateUrl: 'app.component.parent.html'
- })
- export class ParentComponent implements OnInit {
- private result: string = '';
- @ViewChild('calculator') private _calculator: ChildComponent;
- constructor() {
- }
- ngOnInit(): void {
- }
- private add(value: number): void {
- this.result = 'Result of Addition ' + value;
- }
- private subtract(value: number): void {
- this.result = 'Result of Substraction ' + value;
- }
- private multiply(value: number): void {
- this.result = 'Result of Multiply ' + value;
- }
- private divide(value: number): void {
- this.result = 'Result of Division ' + value;
- }
- private reset(): void {
- this.result = '';
- this._calculator.clear();
- }
- }
Now, add app.module.ts file and write down the below code.
- import { NgModule } from '@angular/core';
- import { BrowserModule } from '@angular/platform-browser';
- import { FormsModule } from "@angular/forms";
- import { ParentComponent } from './src/app.component.parent';
- import { ChildComponent } from './src/app.component.child';
- @NgModule({
- imports: [BrowserModule, FormsModule],
- declarations: [ParentComponent, ChildComponent],
- bootstrap: [ParentComponent]
- })
- export class AppModule { }
Now, add main.ts file and write down the below code.
- import { platformBrowserDynamic } from '@angular/platform-browser-dynamic';
- import { AppModule } from './app.module';
- const platform = platformBrowserDynamic();
- platform.bootstrapModule(AppModule);
Now, add the index.html file and write down the below code.
- <!DOCTYPE html>
- <html>
- <head>
- <title>Angular2 - ViewChild</title>
- <meta charset="UTF-8">
- <meta name="viewport" content="width=device-width, initial-scale=1">
- <link href="../resources/style/style1.css" rel="stylesheet" />
- <!-- Polyfill(s) for older browsers -->
- <script src="../node_modules/core-js/client/shim.min.js"></script>
- <script src="../node_modules/zone.js/dist/zone.js"></script>
- <script src="../node_modules/reflect-metadata/Reflect.js"></script>
- <script src="../node_modules/systemjs/dist/system.src.js"></script>
- <script src="../systemjs.config.js"></script>
- <script>
- System.import('app').catch(function (err) { console.error(err); });
- </script>
- </head>
- <body>
- <parent>Loading</parent>
- </body>
- </html>
Former memberPosted Mar 13, 2017, 4:59 AM
Please fix this link http://www.c-sharpcorner.com/article/angularjs-2-0-from-the-beginning-pipes-day-8/
sujith monyPosted Mar 8, 2017, 5:20 PM
AngularJs 2.0 From Beginning - Pipes (Day 8). page is missing , can you send me the url
Rahul Pushpendu BhaskarPosted Mar 3, 2017, 12:47 AM
Well Presented and Easy To Understand... Thank you Dada..
Former memberPosted Feb 20, 2017, 3:34 AM
Your day 8 link "AngularJs 2.0 From Beginning - Pipes (Day 8)" is not opening. can u plzz fix it. thanks
Former memberPosted Feb 20, 2017, 3:32 AM
Why you upload 4 files with same name called Ang2.rar ? all 4 files has different content or same ?