

- AngularJS 2.0 From Beginning Introduction of AngularJS 2.0
- AngularJS 2.0 From Beginning Component (Day 2)
- AngularJS 2.0 From Beginning Data Binding (Day 3)
- AngularJS 2.0 From Beginning Input Data Binding (Day 4)
In my previous article, I already discussed about the different processes of data binding techniques including input property binding mechanism in case of components within Angular 2.0. Now in this article, I will discuss about the process through which we can return the data to the parent component from the child component or execute any method in the parent component during any event execution of the child component. Since in Angular 2.0 the components are the core objects of the Angular framework, it is a very common concern for all of us regarding how we can pass the data or event into the parent component so that we can dynamically manipulate or configure the parent component while any changes are being done in the child component. In the world of web development, static components will not fulfill all our requirements, due to which we need to develop dynamic components or nonstatic components, which can take data from its parent component and also return some data or event to the parent component.
As I had already mentioned in my previous article, Angular 2.0 is actually made up a nested or hierarchical component structures, it means Angular 2.0 basically begins with a root component, which contains all the child components of the applications. The components act as a self contained entity because normally we want to encapsulate our component variables and functions, and we never want that other code to arbitrarily reach our code or value to check what changes can be done in the component. This architecture works fine for simply displaying data, but in the real world application, the data needs to flow both ways – i.e. back to the hierarchy – such as when the user makes changes to any data in the child component. In that case we need to tell the parent component about the changes, so the parent component updates its model and returns that data to the Server. Now, Angular 2 uses a different mechanism to send back data to the parent's events.
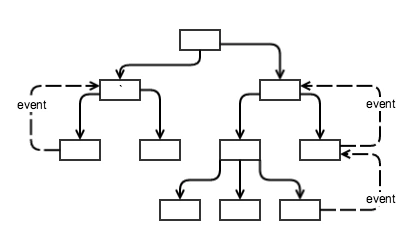
Now, whenever any action occurs within a child component, the child component fires an event which is traced by the parent component to intimate parent component. The parent component can perform separate actions against that event to perform its own logical operations.
If the child component wants to send the information back to its container; i.e., parent component, it can raise an event with the help of @Output decorator. Like the @Input decorator, we can always use @Output decorator to decorate any property of the child component. This property must be an event of the child component. The data to pass is called the event payload. In Angular 2, an event is defined with an EventEmitter object. Below is the sample example of an output event emitter property.
- @Output() click EventEmitter<string> = new EventEmitter<string>();
To declare output property, we need to first import the output and EventEmitter command from Angular Core module and then use @Output decorator to declare that property.
We create a typescript file named app.component.emailboxevent.ts and write down the code given below.
- import { Component, Input, Output, EventEmitter } from '@angular/core';
- @Component({
- selector 'emailboxevent',
- template '<input placeholder="{{email}}" #emailbox/><button class="red" (click)="register(emailbox)">Register</button>',
- styles [".red {colorred;}"]
- })
- export class EmailBoxEventComponent {
- @Input('placeholder')
- email string = "Type your email..";
- @Output() emailregister EventEmitter<string> = new EventEmitter<string>();
- register(txtEmail) {
- console.log('Email Address resgister properly...');
- if (txtEmail.value == '') {
- alert('Put your email address first..');
- return;
- }
- else {
- this.emailregister.emit(txtEmail.value);
- }
- }
- }
Now, add another typescript file named app.component.parent.ts and add the code given below.
- //components files
- import { Component, OnInit } from '@angular/core';
- //
- @Component({
- moduleId module.id,
- selector 'myapp',
- templateUrl 'app.component.parent.html',
- })
- export class ParentComponent implements OnInit {
- constructor() { }
- ngOnInit() { }
- confirmregister(email string) void {
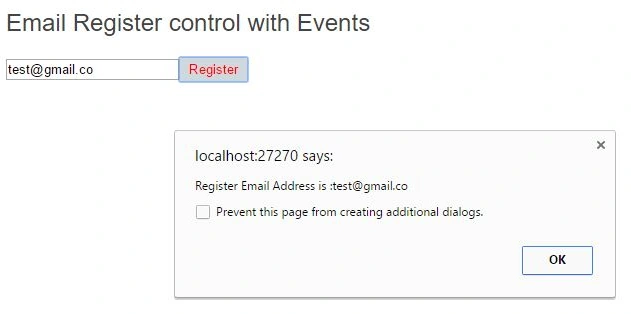
- alert("Register Email Address is " + email);
- }
- }
Now, add HTML file named app.component.parent.html and write down the code given below in the file.
- <div>
- <br />
- <h2>Email Register control with Events</h2>
- <emailboxevent [placeholder]="'Put your email'" (emailregister)="confirmregister($event)"></emailboxevent><br />
- </div>
Now, add a style sheet file named style.css and add css codes given below in the files
- .red {
- color black;
- backgroundcolor red;
- fontsizesmall;
- fontweightbold;
- }
- .blue {
- color white;
- backgroundcolor blue;
- fontsizesmall;
- fontweightbold;
- fontfamily'Franklin Gothic Medium', 'Arial Narrow', Arial, sansserif;
- fontstyleitalic;
- }
Now, add another typescript file named app.module.ts and add the code given below.
- import { NgModule } from '@angular/core';
- import { BrowserModule } from '@angular/platformbrowser';
- import { ParentComponent } from './src/app.component.parent';
- import { EmailBoxEventComponent } from './src/app.component.emailboxevent';
- @NgModule({
- imports [BrowserModule],
- declarations [ParentComponent, EmailBoxEventComponent],
- bootstrap [ParentComponent]
- })
- export class AppModule { }
Now, add another HTML file named index.html and add the code given below.
- <!DOCTYPE html>
- <html>
- <head>
- <title>Angular2</title>
- <meta charset="UTF8">
- <meta name="viewport" content="width=devicewidth, initialscale=1">
- <link rel="stylesheet" href="../styles.css">
- <! Polyfill(s) for older browsers >
- <script src="../node_modules/corejs/client/shim.min.js"></script>
- <script src="../node_modules/zone.js/dist/zone.js"></script>
- <script src="../node_modules/reflectmetadata/Reflect.js"></script>
- <script src="../node_modules/systemjs/dist/system.src.js"></script>
- <script src="../systemjs.config.js"></script>
- <script>
- System.import('app').catch(function(err){ console.error(err); });
- </script>
- </head>
- <body>
- <myapp>Loading...</myapp>
- </body>
- </html>
Ramzanali MominPosted Jul 17, 2019, 12:37 PM
Great ............
Uwais ManzoorPosted May 18, 2017, 5:36 AM
There are some errors in the code like this is not working " @Output() emailregister EventEmitter<string> = new EventEmitter<string>(); " we used to write like this " @Output() emailregister = new EventEmitter<string>(); " and this line of code is also not working " confirmregister(email string) void { alert("Register Email Address is " + email); } " we should write like this " confirmregister(email ): void { alert("Register Email Address is " + email); } " BUT STILL AWESOME POST KEEP DOING GREAT WORK
Ravi KandelPosted Mar 8, 2017, 8:41 AM
Awesome Thanks for sharing