

Introduction
Authentication is the process of validating user credentials and authorization is the process of checking privileges for a user to access specific modules in an application. In this article, we will see how to protect an ASP.NET Core Web API application by implementing JWT authentication. We will also see how to use authorization in ASP.NET Core to provide access to various functionality of the application. We will store user credentials in an SQL server database and we will use Entity framework and Identity framework for database operations.
JSON Web Token (JWT) is an open standard (RFC 7519) that defines a compact and self-contained way for securely transmitting information between parties as a JSON object. This information can be verified and trusted because it is digitally signed. JWTs can be signed using a secret (with the HMAC algorithm) or a public/private key pair using RSA or ECDSA.
In its compact form, JSON Web Tokens consist of three parts separated by dots (.), which are:
- Header
- Payload
- Signature
Therefore, a JWT typically looks like the following.
xxxx.yyyy.zzzz
Please refer to below link for more details about JSON Web Tokens.
Create ASP.NET Core Web API using Visual Studio 2019
We can create an API application with ASP.NET Core Web API template.
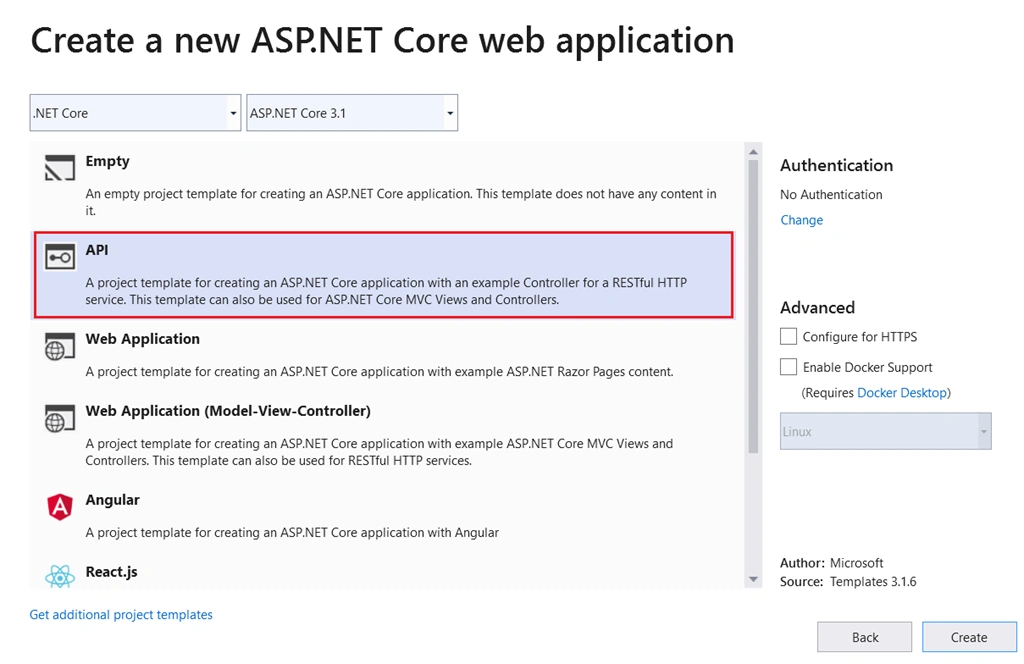
We must install below libraries using NuGet package manager.
- Microsoft.EntityFrameworkCore.SqlServer
- Microsoft.EntityFrameworkCore.Tools
- Microsoft.AspNetCore.Identity.EntityFrameworkCore
- Microsoft.AspNetCore.Identity
- Microsoft.AspNetCore.Authentication.JwtBearer
We can modify the appsettings.json with below values.
appsettings.json
{
  "Logging": {
    "LogLevel": {
      "Default": "Information",
      "Microsoft": "Warning",
      "Microsoft.Hosting.Lifetime": "Information"
    }
  },
  "AllowedHosts": "*",
  "ConnectionStrings": {
    "ConnStr": "Data Source=(localdb)\\MSSQLLocalDB;Initial Catalog=SarathlalDB;Integrated Security=True;ApplicationIntent=ReadWrite;MultiSubnetFailover=False"
  },
  "JWT": {
    "ValidAudience": "http://localhost:4200",
    "ValidIssuer": "http://localhost:61955",
    "Secret": "ByYM000OLlMQG6VVVp1OH7Xzyr7gHuw1qvUC5dcGt3SNM"
  }
}
We have added a database connection string and also added valid audience, valid issuer and secret key for JWT authentication in above settings file.
Create an “ApplicationUser” class inside a new folder “Authentication” which will inherit the IdentityUser class. IdentityUser class is a part of Microsoft Identity framework. We will create all the authentication related files inside the “Authentication” folder.
ApplicationUser.cs
using Microsoft.AspNetCore.Identity;

namespace JWTAuthentication.Authentication
{
    public class ApplicationUser: IdentityUser
    {
    }
}
We can create the “ApplicationDbContext” class and add below code.
ApplicationDbContext.cs
using Microsoft.AspNetCore.Identity.EntityFrameworkCore;
using Microsoft.EntityFrameworkCore;

namespace JWTAuthentication.Authentication
{
    public class ApplicationDbContext : IdentityDbContext<ApplicationUser>
    {
        public ApplicationDbContext(DbContextOptions<ApplicationDbContext> options) : base(options)
        {

        }
        protected override void OnModelCreating(ModelBuilder builder)
        {
            base.OnModelCreating(builder);
        }
    }
}
Create a static class “UserRoles” and add below values.
UserRoles.cs
namespace JWTAuthentication.Authentication
{
    public static class UserRoles
    {
        public const string Admin = "Admin";
        public const string User = "User";
    }
}
We have added two constant values “Admin” and “User” as roles. You can add many roles as you wish.
Create class “RegisterModel” for new user registration.
RegisterModel.cs
using System.ComponentModel.DataAnnotations;

namespace JWTAuthentication.Authentication
{
    public class RegisterModel
    {
        [Required(ErrorMessage = "User Name is required")]
        public string Username { get; set; }

        [EmailAddress]
        [Required(ErrorMessage = "Email is required")]
        public string Email { get; set; }

        [Required(ErrorMessage = "Password is required")]
        public string Password { get; set; }

    }
}
Create class “LoginModel” for user login.
LoginModel.cs
using System.ComponentModel.DataAnnotations;

namespace JWTAuthentication.Authentication
{
    public class LoginModel
    {
        [Required(ErrorMessage = "User Name is required")]
        public string Username { get; set; }

        [Required(ErrorMessage = "Password is required")]
        public string Password { get; set; }
    }
}
We can create a class “Response” for returning the response value after user registration and user login. It will also return error messages, if the request fails.
Response.cs
namespace JWTAuthentication.Authentication
{
    public class Response
    {
        public string Status { get; set; }
        public string Message { get; set; }
    }
}
We can create an API controller “AuthenticateController” inside the “Controllers” folder and add below code.
AuthenticateController.cs
using JWTAuthentication.Authentication;
using Microsoft.AspNetCore.Http;
using Microsoft.AspNetCore.Identity;
using Microsoft.AspNetCore.Mvc;
using Microsoft.Extensions.Configuration;
using Microsoft.IdentityModel.Tokens;
using System;
using System.Collections.Generic;
using System.IdentityModel.Tokens.Jwt;
using System.Security.Claims;
using System.Text;
using System.Threading.Tasks;

namespace JWTAuthentication.Controllers
{
    [Route("api/[controller]")]
    [ApiController]
    public class AuthenticateController : ControllerBase
    {
        private readonly UserManager<ApplicationUser> userManager;
        private readonly RoleManager<IdentityRole> roleManager;
        private readonly IConfiguration _configuration;

        public AuthenticateController(UserManager<ApplicationUser> userManager, RoleManager<IdentityRole> roleManager, IConfiguration configuration)
        {
            this.userManager = userManager;
            this.roleManager = roleManager;
            _configuration = configuration;
        }

        [HttpPost]
        [Route("login")]
        public async Task<IActionResult> Login([FromBody] LoginModel model)
        {
            var user = await userManager.FindByNameAsync(model.Username);
            if (user != null && await userManager.CheckPasswordAsync(user, model.Password))
            {
                var userRoles = await userManager.GetRolesAsync(user);

                var authClaims = new List<Claim>
                {
                    new Claim(ClaimTypes.Name, user.UserName),
                    new Claim(JwtRegisteredClaimNames.Jti, Guid.NewGuid().ToString()),
                };

                foreach (var userRole in userRoles)
                {
                    authClaims.Add(new Claim(ClaimTypes.Role, userRole));
                }

                var authSigningKey = new SymmetricSecurityKey(Encoding.UTF8.GetBytes(_configuration["JWT:Secret"]));

                var token = new JwtSecurityToken(
                    issuer: _configuration["JWT:ValidIssuer"],
                    audience: _configuration["JWT:ValidAudience"],
                    expires: DateTime.Now.AddHours(3),
                    claims: authClaims,
                    signingCredentials: new SigningCredentials(authSigningKey, SecurityAlgorithms.HmacSha256)
                    );

                return Ok(new
                {
                    token = new JwtSecurityTokenHandler().WriteToken(token),
                    expiration = token.ValidTo
                });
            }
            return Unauthorized();
        }

        [HttpPost]
        [Route("register")]
        public async Task<IActionResult> Register([FromBody] RegisterModel model)
        {
            var userExists = await userManager.FindByNameAsync(model.Username);
            if (userExists != null)
                return StatusCode(StatusCodes.Status500InternalServerError, new Response { Status = "Error", Message = "User already exists!" });

            ApplicationUser user = new ApplicationUser()
            {
                Email = model.Email,
                SecurityStamp = Guid.NewGuid().ToString(),
                UserName = model.Username
            };
            var result = await userManager.CreateAsync(user, model.Password);
            if (!result.Succeeded)
                return StatusCode(StatusCodes.Status500InternalServerError, new Response { Status = "Error", Message = "User creation failed! Please check user details and try again." });

            return Ok(new Response { Status = "Success", Message = "User created successfully!" });
        }

        [HttpPost]
        [Route("register-admin")]
        public async Task<IActionResult> RegisterAdmin([FromBody] RegisterModel model)
        {
            var userExists = await userManager.FindByNameAsync(model.Username);
            if (userExists != null)
                return StatusCode(StatusCodes.Status500InternalServerError, new Response { Status = "Error", Message = "User already exists!" });

            ApplicationUser user = new ApplicationUser()
            {
                Email = model.Email,
                SecurityStamp = Guid.NewGuid().ToString(),
                UserName = model.Username
            };
            var result = await userManager.CreateAsync(user, model.Password);
            if (!result.Succeeded)
                return StatusCode(StatusCodes.Status500InternalServerError, new Response { Status = "Error", Message = "User creation failed! Please check user details and try again." });

            if (!await roleManager.RoleExistsAsync(UserRoles.Admin))
                await roleManager.CreateAsync(new IdentityRole(UserRoles.Admin));
            if (!await roleManager.RoleExistsAsync(UserRoles.User))
                await roleManager.CreateAsync(new IdentityRole(UserRoles.User));

            if (await roleManager.RoleExistsAsync(UserRoles.Admin))
            {
                await userManager.AddToRoleAsync(user, UserRoles.Admin);
            }

            return Ok(new Response { Status = "Success", Message = "User created successfully!" });
        }
    }
}
We have added three methods “login”, “register”, and “register-admin” inside the controller class. Register and register-admin are almost same but the register-admin method will be used to create a user with admin role. In login method, we have returned a JWT token after successful login.
We can make below changes in “ConfigureServices” and “Configure” methods in “Startup” class as well.
Startup.cs
using JWTAuthentication.Authentication;
using Microsoft.AspNetCore.Authentication.JwtBearer;
using Microsoft.AspNetCore.Builder;
using Microsoft.AspNetCore.Hosting;
using Microsoft.AspNetCore.Identity;
using Microsoft.EntityFrameworkCore;
using Microsoft.Extensions.Configuration;
using Microsoft.Extensions.DependencyInjection;
using Microsoft.Extensions.Hosting;
using Microsoft.IdentityModel.Tokens;
using System.Text;

namespace JWTAuthentication
{
    public class Startup
    {
        public Startup(IConfiguration configuration)
        {
            Configuration = configuration;
        }

        public IConfiguration Configuration { get; }

        // This method gets called by the runtime. Use this method to add services to the container.
        public void ConfigureServices(IServiceCollection services)
        {
            services.AddControllers();

            // For Entity Framework
            services.AddDbContext<ApplicationDbContext>(options => options.UseSqlServer(Configuration.GetConnectionString("ConnStr")));

            // For Identity
            services.AddIdentity<ApplicationUser, IdentityRole>()
                .AddEntityFrameworkStores<ApplicationDbContext>()
                .AddDefaultTokenProviders();

            // Adding Authentication
            services.AddAuthentication(options =>
            {
                options.DefaultAuthenticateScheme = JwtBearerDefaults.AuthenticationScheme;
                options.DefaultChallengeScheme = JwtBearerDefaults.AuthenticationScheme;
                options.DefaultScheme = JwtBearerDefaults.AuthenticationScheme;
            })

            // Adding Jwt Bearer
            .AddJwtBearer(options =>
            {
                options.SaveToken = true;
                options.RequireHttpsMetadata = false;
                options.TokenValidationParameters = new TokenValidationParameters()
                {
                    ValidateIssuer = true,
                    ValidateAudience = true,
                    ValidAudience = Configuration["JWT:ValidAudience"],
                    ValidIssuer = Configuration["JWT:ValidIssuer"],
                    IssuerSigningKey = new SymmetricSecurityKey(Encoding.UTF8.GetBytes(Configuration["JWT:Secret"]))
                };
            });
        }

        // This method gets called by the runtime. Use this method to configure the HTTP request pipeline.
        public void Configure(IApplicationBuilder app, IWebHostEnvironment env)
        {
            if (env.IsDevelopment())
            {
                app.UseDeveloperExceptionPage();
            }

            app.UseRouting();

            app.UseAuthentication();
            app.UseAuthorization();

            app.UseEndpoints(endpoints =>
            {
                endpoints.MapControllers();
            });
        }
    }
}
We can add “Authorize” attribute inside the “WeatherForecast” controller.
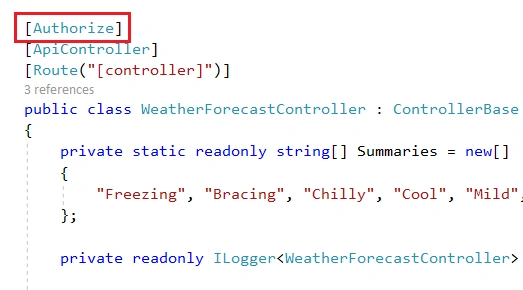
We must create a database and required tables before running the application. As we are using entity framework, we can use below database migration command with package manger console to create a migration script.
“add-migration Initial”

Use below command to create database and tables.
“update-database”
If you check the database using SQL server object explorer, you can see that below tables are created inside the database.

Above seven tables are used by identity framework to manage authentication and authorization.
We can run the application and try to access get method in weatherforecast controller from Postman tool.

We have received a 401 unauthorized error. Because, we have added Authorize attribute to entire controller. We must provide a valid token via request header to access this controller and methods inside the controller.
We can create a new user using register method in authenticate controller.

We can use above user credentials to login and get a valid JWT token.

We have received a token after successful login with above credentials.
We can pass above token value as a bearer token inside the authorization tab and call get method of weatherforecast controller again.
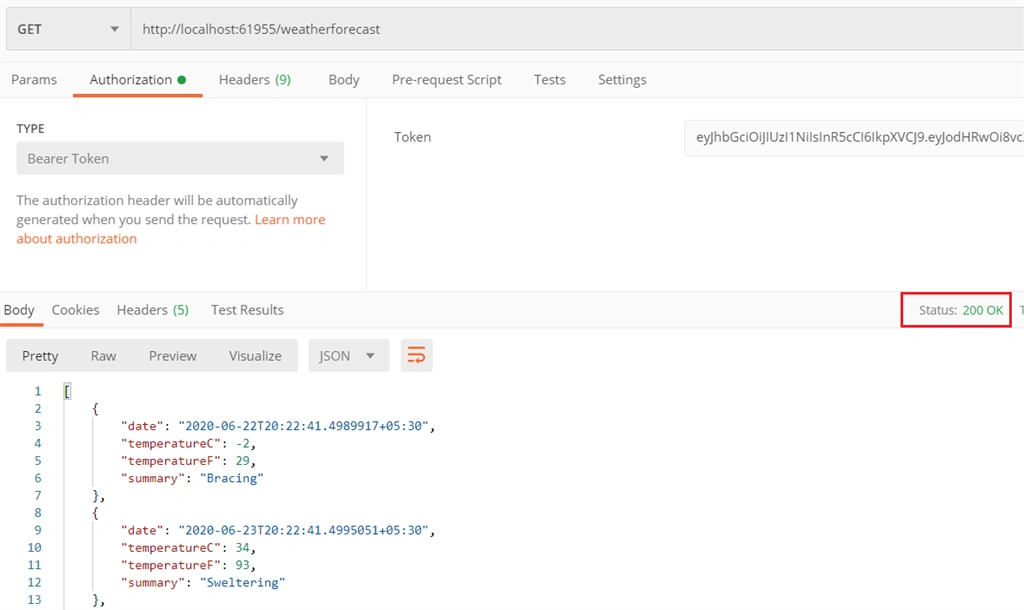
This time, we have successfully received the values from controller.
We can modify the weatherforecast controller with role-based authorization.
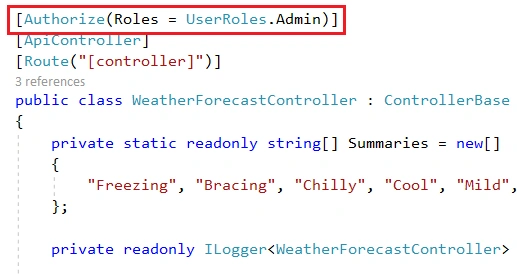
Now, only users with admin role can access this controller and methods.
We can try to access the weatherforecast controller with same token again in Postman tool.

We have received a 403 forbidden error now. Even though, we are passing a valid token we don’t have sufficient privilege to access the controller. To access this controller, user must have an admin role permission. Current user is a normal user and do not have any admin role permission.
We can create a new user with admin role. We already have a method “register-admin” in authenticate controller for the same purpose.
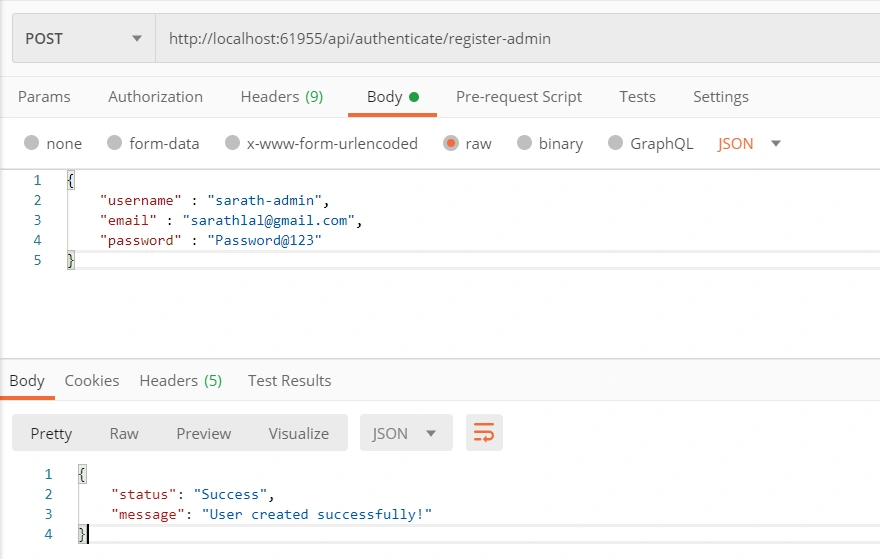
We can login with this new user credentials and get a new token and use this token instead of old token to access the weatherforecast controller.
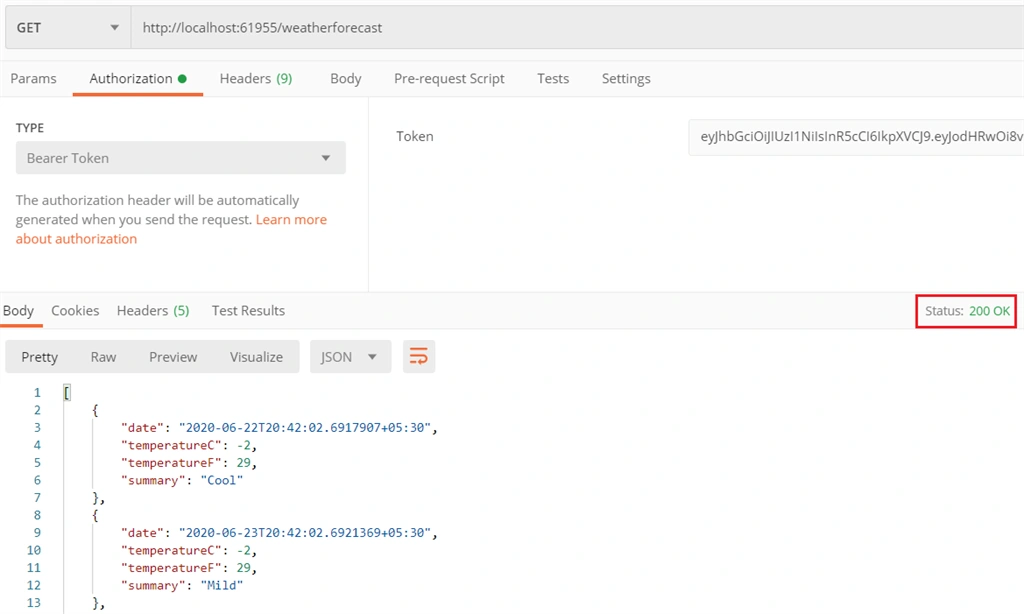
We have again received the values from weatherforecast controller successfully.
We can see the token payload and other details using jwt.io site.

Inside the payload section, you can see the user name, role and other details as claims.
Conclusion
In this post, we have seen how to create a JSON web token in ASP.NET Core Web API application and use this token for authentication and authorization. We have created two users, one without any role and one with admin role. We have applied the authentication and authorization in controller level and saw the different behaviors with these two users.
Farhan HamzaPosted Jun 24, 2024, 2:05 PM
Great Details, Thank you. I just notice we miss the one setting for Expiring the JWT. just add the in JWTBearerOption:ClockSkew = TimeSpan.Zero, // This setting will not wait after Expiration
milind panchalPosted Mar 1, 2023, 11:45 AM
Do you have same article with ADO.NET instead on Entity Framework.
ali rasouliPosted Dec 9, 2022, 7:27 PM
Hi. Thank you mr Sarath.
Sarathlal SaseendranPosted Oct 25, 2022, 12:36 AM
Thank you all for your overwhelming responds to this article. I have already written same content in .NET 6.0 with required changes. If you want to read, try that also pls
Isidro APosted Sep 5, 2022, 4:15 AM
Hi Sarathlal. I'm following your article but in the step of add-migration the instruction give an error like this: PM> add-migration InitialBuild started... Build succeeded. Unable to create an object of type 'ApplicationDbContext'. For the different patterns supported at design time, see https://go.microsoft.com/fwlink/?linkid=851728 PM> i reviewed the nuget package and are ok all added to the project. I don't know what's the problem. Thanks in advance
Amir KarimiPosted Aug 1, 2022, 9:25 AM
Hi, thank you for this article ,when we change the Roles for current user, we need to refresh token. how we can refresh token and send to client ? for example each 5 minutes token automatically refresh .
Bel AhmedPosted Jun 19, 2022, 5:42 AM
Hi, please i have dashboard angular and web api asp core i would to integrate user authentification in this dashboard i dont know from what to start?
Nadarajan SPosted Apr 21, 2022, 5:32 AM
Hi , i want to edit login time when i hit the "login" controller method. so how to implement the edit operation in this api.
Chan LiPosted Mar 28, 2022, 11:41 PM
Thank you for the example. I followed the article, but when I used the token with bearer token authorization, I still got the 401 error. Not sure what I did wrong.
Subrahmanyeswara KallakuriPosted Jan 9, 2022, 2:17 PM
This is a simple and great article/sample. Thank You so much. Worked as expected without any hurdles.
Naji AliPosted Oct 10, 2021, 4:44 PM
Thank you ,good example
ishwar giriPosted Sep 8, 2021, 3:37 AM
Sir please make a blog on facebook n google authentication in same above application
Rakesh KumarPosted Sep 5, 2021, 9:19 PM
How can I consume it in my mvc project
sajal patranabishPosted Aug 30, 2021, 2:51 PM
Many many thanks to you :)
Rehman AliPosted Aug 24, 2021, 9:50 AM
Hello, Thanks for the article. The code "var userExists = await userManager.FindByNameAsync(model.Username);" in file authenticate controller does not return null even though user is not present instead it returns task with status faulted. Can you guide me why this could be the case?
Amit GautamPosted Aug 21, 2021, 11:56 AM
Good Article......
Abhijit DasPosted Jul 26, 2021, 7:45 AM
Great job.. How can I implement refresh token in this example??
Κωνσταντίνος ΜαλλιαρίδηςPosted Jul 15, 2021, 10:49 AM
It is a very good and clear article. To help other with some tips, in IIS you must open the port 61955 in web site's bindings in order to do calls with postman. Moreover, if someone apply that instuction in his applicatation then in order to create successfully the authentication tables the (-context ApplicationDbContext) must be used in both Package manager Console commands. e.g. (add-migration Initial -Context ApplicationDbContext) and (update-database -Context ApplicationDbContext). I hope it help someone from losing time!
Ajay KumarPosted May 9, 2021, 7:19 AM
Great Article, Thanks For Share
Mayank MishraPosted May 3, 2021, 11:05 AM
Nice Article
Sarath BaijuPosted Mar 13, 2021, 5:41 AM
Hi, I have a doubt regarding the JWT config keys added in appsettings.json file. What you mean by valid audience and valid issuer?
Jannik NordenPosted Feb 6, 2021, 6:05 PM
Very neat tutorial. I have some issues in the migration part. If I update-database I get the error, that "there is an object named 'AspNetRoles' in the database". Do you have a solution for it?
Nikhil PanchabhaiPosted Feb 6, 2021, 12:57 PM
Very informative thanks!
George varamashviliPosted Jan 23, 2021, 7:50 PM
Hi Sarath, Nicely described, but got one problem :(
Joby ThomasPosted Jan 22, 2021, 4:29 AM
Hi Sarath,Well described, it is very easy to understand.
Nitu ShahPosted Dec 23, 2020, 12:27 PM
Did any one get this error: MySql.Data.MySqlClient.MySqlException (0x80004005): Specified key was too long; max key length is 1000 bytes...... i get it when i run the update database command
TomaszPosted Dec 4, 2020, 5:09 AM
Create-admin endpoint shouldn't be allow for all. How i should create first admin account, when i want to add [Authorize(Role="Admin")] for create-admin method?
Ahmed MullaPosted Oct 27, 2020, 4:36 AM
This is great. How do I use this web api now to authenticate a user in another web application that's been developed in .net core 3.1? I can call the api from the web application using HttpClient using the following:- using (var client = new HttpClient()) { HttpRequestMessage request = new HttpRequestMessage(HttpMethod.Post, @"http://localhost:51274/api/Authentication/Login"); string loginJson = JsonConvert.SerializeObject(Model); request.Content = new StringContent(loginJson, System.Text.Encoding.UTF8, "application/json"); HttpResponseMessage response = await client.SendAsync(request); if(response.IsSuccessStatusCode) { //authorise return RedirectToAction("Index", "Customer"); } else { ModelState.AddModelError(string.Empty, "Invalid Login Attempt"); } }
Ahmed MullaPosted Oct 27, 2020, 4:36 AM
This is great. How do I use this web api now to authenticate a user in another web application that's been developed in .net core 3.1? I can call the api from the web application using HttpClient using the following:-
Joe SheblePosted Oct 22, 2020, 3:26 PM
Thank you, this was very helpful. But from a WebAPI perspective, how would one include MFA?
rakesh yadavPosted Oct 20, 2020, 3:11 AM
It is really wonderful and running as expected but I also want a captcha in the login with this code..
Win PoohPosted Oct 13, 2020, 4:06 AM
Thank you for the article. One question: I have tried to build the project and run it but it does not run from VS as an IIS or as a standalone app: a browser starts with http://localhost/weatherforecast url and 401 error. What may be the reason?
Shrikant NathanPosted Sep 24, 2020, 12:14 PM
I have a question, now just as when you are passing arguments through the constructor, where did you inject the service of AuthenticateController in the startup.cs file? during runtime it is giving an error stating that the services of AuthenticateController could not be resolved, can you pls assist?
zy zPosted Sep 23, 2020, 4:39 AM
Thanks. It's very usefull
borahan arslanPosted Sep 9, 2020, 1:22 PM
Thanks for article. How do external login (facebook, google, twitter) for web api ?
Man MaiPosted Aug 27, 2020, 1:04 AM
Hi Sarathlal, nice and easy to uderstand tutorial there. Could you please clarify further on who is the Issuer and Audience here?
jayant daradePosted Jun 29, 2020, 11:06 AM
Nice article
Maidul ShawonPosted Jun 27, 2020, 12:36 PM
I really appreciate and thank you a lot for this wonderful blog. You are a Rockstar Brother.
RahulPosted Jun 26, 2020, 10:19 PM
Nice explanation Sarathlal ..
Sundaram SubramanianPosted Jun 21, 2020, 11:04 PM
Neatly explained