

Introduction
Refresh tokens are the kind of tokens that can be used to get new access tokens. When the access tokens expire, we can use refresh tokens to get a new access token from the authentication controller. The lifetime of a refresh token is usually much longer compared to the lifetime of an access token.
I have already authored a detailed article about JWT Refresh tokens in .NET 6.0 on C# Corner.
You can read the article and download the entire source code from the link below.
JWT Authentication with Refresh Tokens in .NET 6.0
In this article, we will see all the steps to create a client-side application for JWT refresh token with Angular 13 version.
I am using the latest version of Angular CLI (as on February 13th). You must download the compatible version of Node JS.
Modify the existing .NET 6.0 backend application
We are using the same source code of backend application (.NET 6.0) that we have used in the earlier article.
We must add the code changes below in Program.cs file to enable CORS (Cross Origin Resource Sharing)
Program.cs
// Partial Code for Program.cs

var MyAllowedOrigins = "_myAllowedOrigins";

builder.Services.AddCors(options =>
{
    options.AddPolicy(MyAllowedOrigins,
                          builder =>
                          {
                              builder.WithOrigins("http://localhost:4200")
                                                  .AllowAnyHeader()
                                                  .AllowAnyMethod();
                          });
});

var app = builder.Build();

app.UseCors(MyAllowedOrigins);
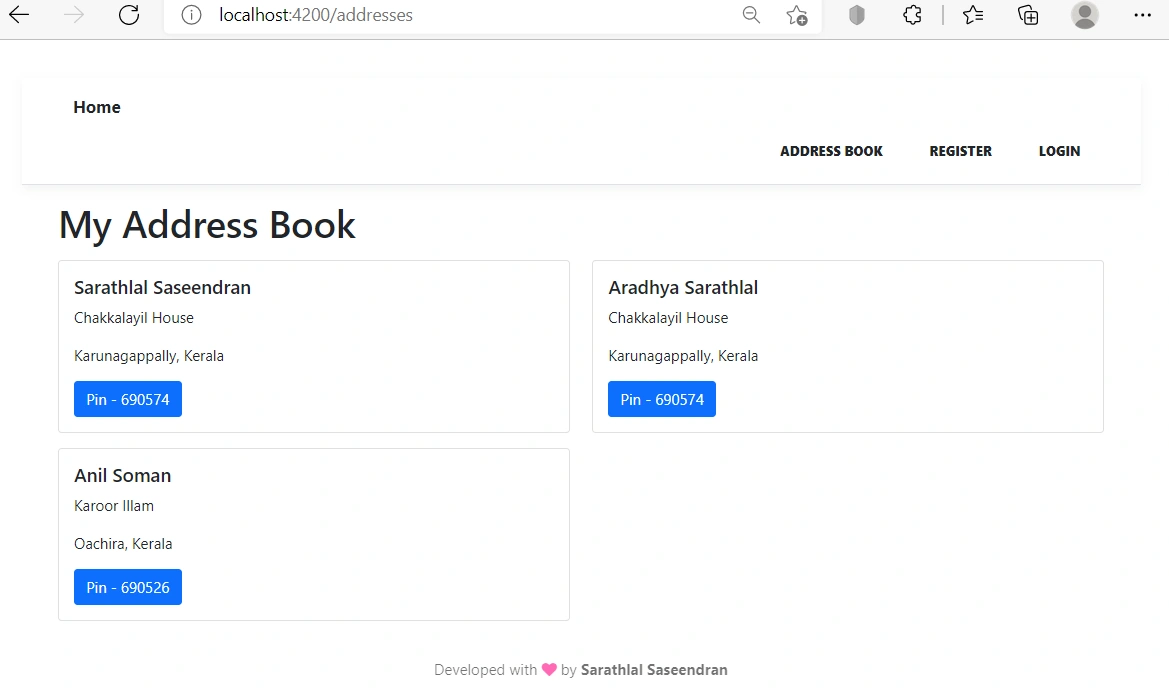
We can add a new Web API controller inside the Controller folder for our Address Book application. We are simply returning a few hard coded Address book data from this controller. We will use this Address book data in our Angular application later.
AddressesController.cs
using Microsoft.AspNetCore.Authorization;
using Microsoft.AspNetCore.Mvc;

// For more information on enabling Web API for empty projects, visit https://go.microsoft.com/fwlink/?LinkID=397860

namespace JWTRefreshToken.NET6._0.Controllers
{
    [Authorize]
    [Route("api/[controller]")]
    [ApiController]
    public class AddressesController : ControllerBase
    {
        // GET: api/<AddressesController>
        [HttpGet]
        public IEnumerable<Address> Get()
        {
            List<Address> addresses = new()
            {
                new Address { Name = "Sarathlal Saseendran", HouseName = "Chakkalayil House", City = "Karunagappally", State = "Kerala", Pin = 690574 },
                new Address { Name = "Aradhya Sarathlal", HouseName = "Chakkalayil House", City = "Karunagappally", State = "Kerala", Pin = 690574 },
                new Address { Name = "Anil Soman", HouseName = "Karoor Illam", City = "Oachira", State = "Kerala", Pin = 690526 },
            };
            return addresses;
        }
    }

    public class Address
    {
        public string? Name { get; set; }
        public string? HouseName { get; set; }
        public string? City { get; set; }
        public string? State { get; set; }
        public int Pin { get; set; }
    }
}
Please note that we have added an Authorize attribute in this controller. So that, nobody can access this controller without proper permission.
We can create our Angular 13 application from scratch.
Create Angular 13 application using Angular CLI
Use the below command to create a new angular application using Angular CLI.
ng new JWTRefreshTokenAngular13
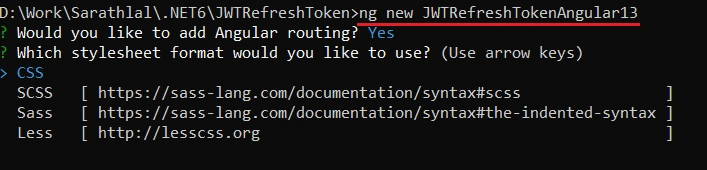
Angular CLI will ask you about adding routing to the application. We have opted for routing with this application. We have also chosen CSS as the default stylesheet format for our application.
Our new application will be created in a few moments.
We must install the libraries below inside our application.
- bootstrap
- font-awesome
- ngx-toastr
- @auth0/angular-jwt
Bootstrap and font-awesome libraries are used for application styling and ngx-toastr is used for some beautiful notification messages. @auth0/agular-jwt is an important library used for checking the access token expiry inside our application.
npm install bootstrap font-awesome ngx-toastr @auth0/angular-jwt
Above single npm command will install all four libraries into our Angular application.
We must change angular.json file with below code change.
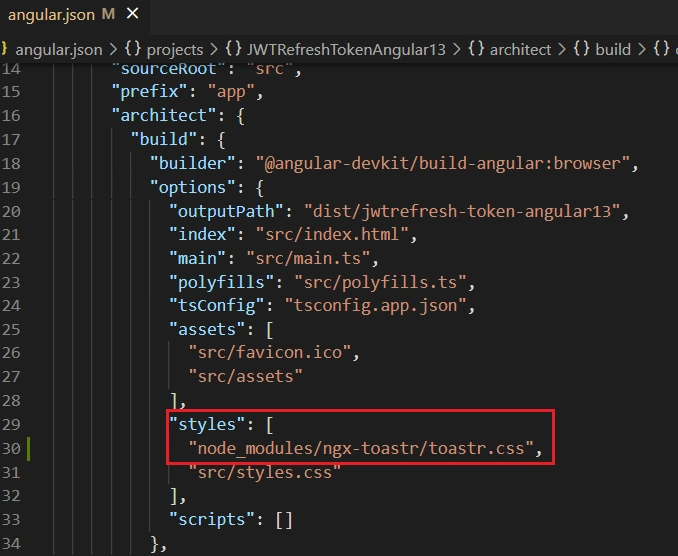
We have added a stylesheet configuration for toaster notification.
We can add one property inside the environment variable. This property is used for storing backend base URL. So that, we can use this base URL multiple times in our application without hard coding.
environment.ts
export const environment = {
  production: false,
  baseUrl: "http://localhost:5000/api/"
};
We need our own interceptor to add JWT token to the header of each request. We can create our interceptor.
ng g class MyInterceptor
my-interceptor.ts
import { Injectable } from "@angular/core";
import {
    HttpInterceptor, HttpHandler, HttpRequest,
} from '@angular/common/http';

@Injectable()
export class MyInterceptor implements HttpInterceptor {

    intercept(request: HttpRequest<any>, next: HttpHandler) {

        request = request.clone({ headers: request.headers.set('Content-Type', 'application/json') });
        let token: string | null = localStorage.getItem("accessToken");
        if (token) {
            request = request.clone({ headers: request.headers.set('Authorization', 'Bearer ' + token) });
        }
        return next.handle(request);
    }

}
We will store the JWT access token inside the local storage once we receive it from backend application. We will add this token to the request header using the interceptor. We will also set content type as application/json using interceptor.
We can create the notification service now.
ng g service Notification
notification.service.ts
import { Injectable } from '@angular/core';
import { ToastrService } from 'ngx-toastr';

@Injectable({
  providedIn: 'root'
})
export class NotificationService {

  constructor(private toastr: ToastrService) { }

  showSuccess(message: string, title: string) {
    this.toastr.success(message, title)
  }

  showError(message: string, title: string) {
    this.toastr.error(message, title)
  }

  showInfo(message: string, title: string) {
    this.toastr.info(message, title)
  }

  showWarning(message: string, title: string) {
    this.toastr.warning(message, title)
  }
}
Notification service is used for creating various toaster messages for successful, error and information type messages.
We can create our authentication guard now.
ng g service guard/AuthGuard
auth-guard.service.ts
import { HttpClient } from '@angular/common/http';
import { Injectable } from '@angular/core';
import { CanActivate, Router } from '@angular/router';
import { JwtHelperService } from '@auth0/angular-jwt';
import { lastValueFrom } from 'rxjs';
import { environment } from 'src/environments/environment';
import { NotificationService } from '../notification.service';

@Injectable({
  providedIn: 'root'
})
export class AuthGuard implements CanActivate {

  public jwtHelper: JwtHelperService = new JwtHelperService();

  constructor(private router: Router, private http: HttpClient, private notification: NotificationService) {
  }
  async canActivate() {
    const token = localStorage.getItem("accessToken");

    if (token && !this.jwtHelper.isTokenExpired(token)) {
      return true;
    }

    const isRefreshSuccess = await this.refreshingTokens(token);
    if (!isRefreshSuccess) {
      this.router.navigate(["login"]);
    }

    return isRefreshSuccess;
  }

  private async refreshingTokens(token: string | null): Promise<boolean> {
    const refreshToken: string | null = localStorage.getItem("refreshToken");

    if (!token || !refreshToken) {
      return false;
    }

    const tokenModel = JSON.stringify({ accessToken: token, refreshToken: refreshToken });

    let isRefreshSuccess: boolean;
    try {

      const response = await lastValueFrom(this.http.post(environment.baseUrl + "authenticate/refresh-token", tokenModel));
      const newToken = (<any>response).accessToken;
      const newRefreshToken = (<any>response).refreshToken;
      localStorage.setItem("accessToken", newToken);
      localStorage.setItem("refreshToken", newRefreshToken);
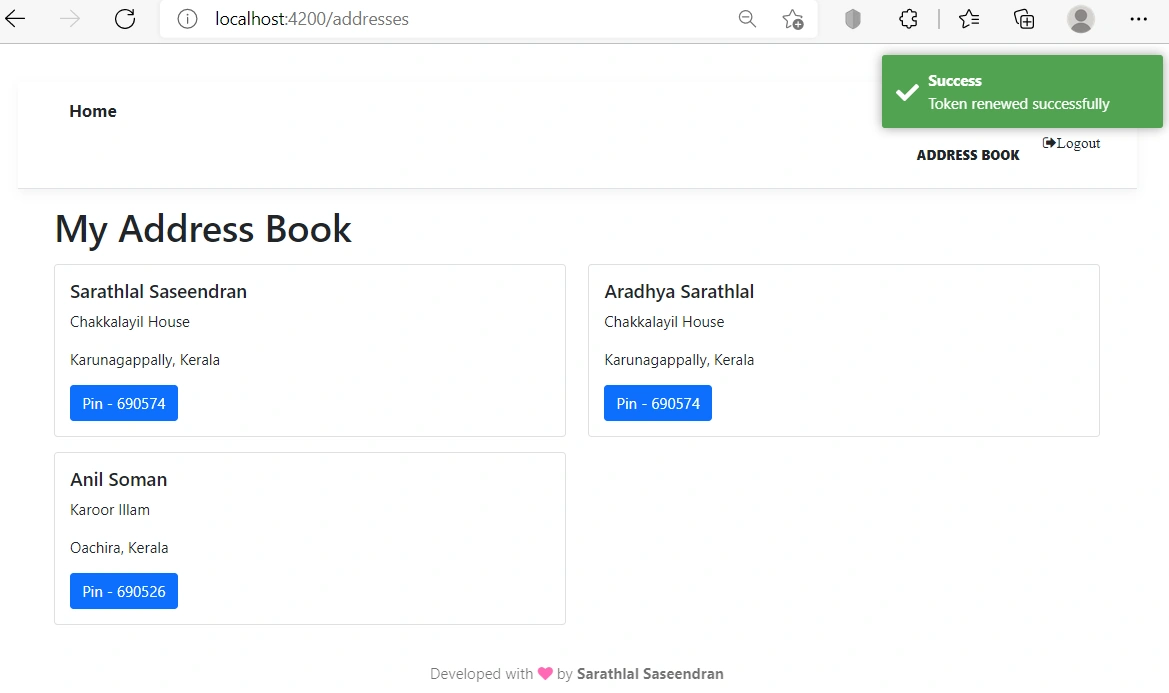
      this.notification.showSuccess("Token renewed successfully", "Success")
      isRefreshSuccess = true;
    }
    catch (ex) {
      isRefreshSuccess = false;
    }
    return isRefreshSuccess;
  }

}
Auth guard will check the access token expiry and once it is expired, it will try to refresh using refresh token. If the refresh token is successful, a new access token and refresh token will be replaced in local storage.
Please note that I have added a notification message in token refresh time. This is not needed in real application. I just added it for testing purposes.
We can create our components now.
First, we can create Login component.
ng g component Login
Copy the code below for component class file.
login.component.ts
import { HttpClient } from '@angular/common/http';
import { Component, OnInit } from '@angular/core';
import { NgForm } from '@angular/forms';
import { Router } from '@angular/router';
import { environment } from 'src/environments/environment';
import { NotificationService } from '../notification.service';

@Component({
  selector: 'app-login',
  templateUrl: './login.component.html',
  styleUrls: ['./login.component.css']
})
export class LoginComponent implements OnInit {
  public invalidLogin: boolean = false;

  constructor(private router: Router, private http: HttpClient, private notification: NotificationService) { }

  ngOnInit(): void {
  }

  public login = (form: NgForm) => {
    const credentials = JSON.stringify(form.value);

    this.http.post(environment.baseUrl + "authenticate/login",
      credentials
    ).subscribe({
      next: (response) => {
        this.notification.showSuccess("User login successful", "Success")
        const token = (<any>response).token;
        const refreshToken = (<any>response).refreshToken;
        localStorage.setItem("accessToken", token);
        localStorage.setItem("refreshToken", refreshToken);
        this.invalidLogin = false;
        this.router.navigate(["/"]);
      },
      error: (err) => {
        this.notification.showError("Invalid username or password.", "Error")
        console.error(err)
        this.invalidLogin = true;
      },
      complete: () => console.info('Login complete')
    });
  }
}
Copy the code below for component HTML file.
login.component.html
<form class="form-signin" #loginForm="ngForm" (ngSubmit)="login(loginForm)">
    <div class="container-fluid">
        <h2 class="form-signin-heading">Login</h2>
        <div *ngIf="invalidLogin" class="alert alert-danger">Invalid username or password.</div>
        <br/>
        <label for="username" class="sr-only">User Name</label>
        <input type="email" id="username" name="username" ngModel class="form-control" placeholder="User Name" required autofocus>
        <br/>
        <label for="password" class="sr-only">Password</label>
        <input type="password" id="password" name="password" ngModel class="form-control" placeholder="Password" required>
        <br/>
        <button class="btn btn-lg btn-primary btn-block" type="submit">Sign in</button>
    </div>
</form>
We can create the Register component now.
ng g component Register
Copy the code below for component class file.
register.component.ts
Ajay JojiPosted Sep 29, 2022, 1:32 AM
Hi Sarathlal Saseendran, Refresh token functionality works at the time of switching new route but it was not working or checking token expiration in background... I think this will not be working for real time..can we have those changes (checking token expiration in app background) ?
Olga GrankinaPosted Mar 15, 2022, 11:51 AM
Thank you very much for the article, the description of webapi + angular13 helped a lot
jose loraPosted Feb 13, 2022, 10:05 PM
From dominican republic
jose loraPosted Feb 13, 2022, 10:05 PM
Excelent article